Microsoft word 2010, 2013, 2016, 2019, and 365 offer several languages for their spellchecking feature. Sometimes, you may encounter a document that spellchecks in a different language other than US English. How does that happen? How can you change it? If the source was in UK English or even something like Spanish, it may maintain that language profile when you open the file up. There are also hotkeys that you can accidentally activate to switch languages or turn the spell checker on or off. Here are some of the most common reasons that Word checks spelling in a different language, plus some solutions to get the spellchecker to work the way you desire.
Why is Microsoft Word Spellchecking in a Different Language?
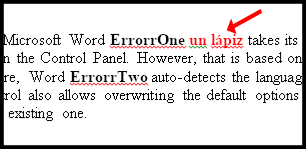
Generally speaking, Microsoft Word takes its default language from the PC’s local settings in the Control Panel. However, that action is based on opening a blank, new document. Furthermore, Word auto-detects the language based on your typing.
Regardless, user control also allows overwriting the default options whether you have a new file or an existing one. Therefore, the most common reason for incorrect language checking is opening a document created in a different language.
In fact, selective text can also get used to change a section to another spellchecking language. Copy and paste can mess up the document too.
Sometimes, your file may have parts with the spellchecking on and parts with it off. Other times, one paragraph may be spellchecking in Spanish while the rest is in US English. Then, of course, there is the whole document that gets spellchecked in a different language.
How to Fix Spellchecking Language for the Entire Microsoft Word Document
For changing the spellchecking language of the entire document, try the following steps.
- Select the entire document. Press “ctrl” + “A” to highlight all content, or go to the “Home” tab on the far right side and click “Select -> Select All.”

- Right-click and choose “Copy.”

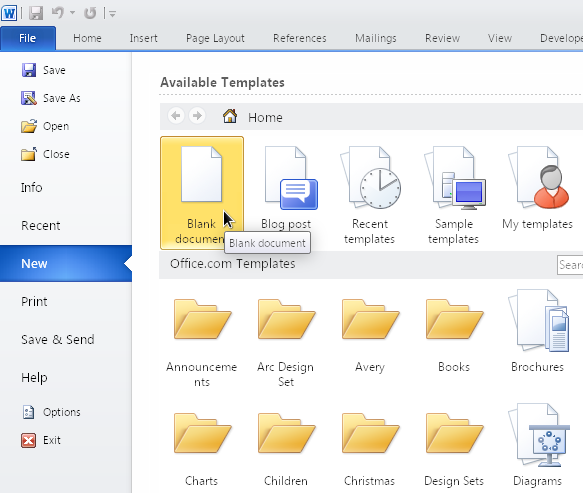
- Open a new, blank document by clicking “File -> New -> Blank Document.”
- Right-click the page and select “Keep Text Only (T)” so that it will paste unformatted text.
- “Text only” pasting resets any special characters, custom settings, and formatting. It also applies your existing settings to the pasted content, such as US English spelling and grammar. Confirm the changes are correct.


It might also be an idea to try selecting the entire document and changing the language and then switching it back to English. Using this method, you’ll also need to unselect the “Do not check spelling or grammar” checkbox. Remember that the checkbox has three states: unticked (checks for spelling errors), ticked (doesn’t check), and solid (some areas get checked and others don’t).
How to Fix Spellchecking Language for a Section of a Word Document
Another issue with Microsft Word spellchecker is that the option “Do not check spelling or grammar” can be applied to a particular style (a character, paragraph, or linked style), which the user might have activated by accident. Therefore, a paragraph or section in a different language will remain undetected by the spellchecker, just as grammar and spelling are.
Sectional-based spelling and grammar options are easily activated if you manually apply the “Do not check spelling and grammar” option to some text and then later use the “Update Style to Match Selection” command. It will still ignore the other language too.
The scenario also occurs if you copied content from one window (any type) and “format-pasted” it into Word. Unsetting “Do not check spelling and grammar” across the whole document (as instructed in the previous section) should override any language settings in the styles. However, if those styles are complex such as the way they’re linked together (one style based on another, which is based on yet another), this might not work properly. In any case, you’ll want to reset the styles, grammar, and spelling for that particular section, and then set things the way you want them.
Here’s how to clear all spelling, grammar, and language styles in a particular section of the document, and set it to US English or whatever language you need.
- Highlight the desired paragraph or section of your document.
- Select the “Review” tab, then click on “Language -> Set Proofing Language.”
- Place a checkmark in the box next to “Do not check for spelling or grammar,” then click “OK.”
- Your selected section will get reset to ignore all spelling, grammar, and language styles. To change the language to the US, go back into the “Language” menu, and highlight “English (U.S.).” DO NOT click on “OK” yet.
- Uncheck both “Do not check for spelling or grammar” and “Detect language automatically.” Now, you can click on “OK” to save changes.
- Confirm the changes. Any content in another language will show the red squiggly underline below it since it is not US English.
- You can use a translation app or browser add-on to convert it to English and then insert it into your content.


These suggestions apply to anyone who has multiple languages installed on their computer, even if they’re just variants of the same language such as English (US) and English (UK). If you don’t actually use the other language, remove it from your PC using Control Panel―it might make life so much easier.
Disclaimer: Some pages on this site may include an affiliate link. This does not effect our editorial in any way.