Webex is a video conferencing app developed for companies that allows participants to meet virtually in almost any location anywhere in the world. Hosts can start meetings and then invite participants to join them via email. In addition, they can record meetings and store them in the cloud or directly on their computer for future reference.
How to Record a Webex Meeting as a Participant
As a participant, you can record meetings if the administrator allows it. If you don’t see the record button, you’ll have to ask the host or presenter to record the meeting.
How to Record a Webex Meeting as a Participant on a Mac
Webex is also available on Mac, and the Mac OS X app also allows for recording. If you’re a participant or attendee, all you need is the host’s permission to record. Just as on Linux and Windows, where the recording will be saved depends on your account type.
These are the steps for recording a Webex meeting on Mac:
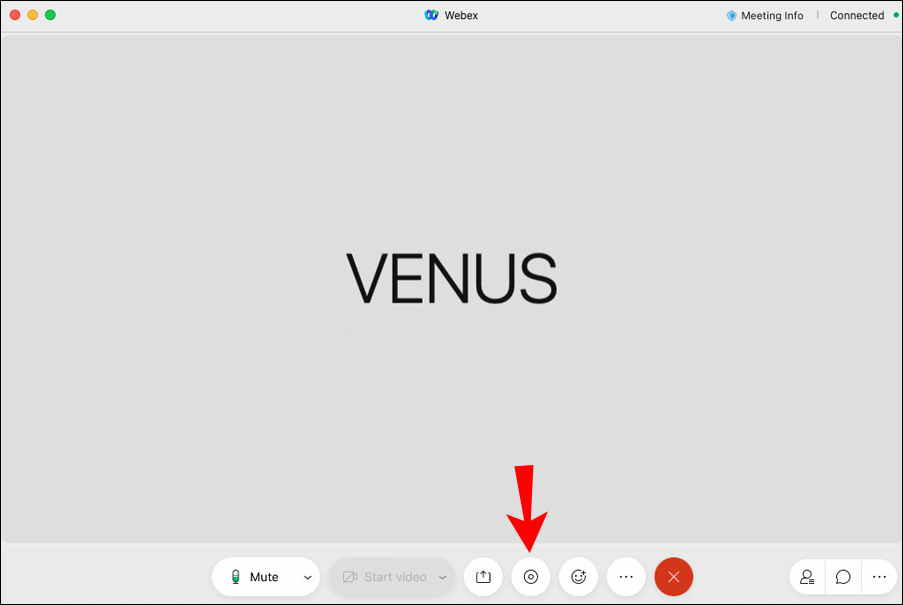
- Launch the Webex app on your Mac.

- Join a meeting with the host enabling recording features.

- At the bottom, you can select the record button – a circular icon.
- You can choose to save the recording to the cloud with a paid account or directly to your computer.
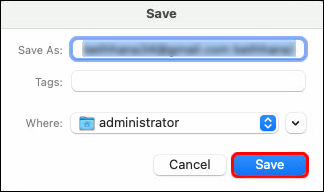
- If you only have a free account, a dialog box asking where to save the recording will appear instead.
- Now, you should see a recording pop-up box appear, and Webex will start recording.
- Select your destination and then click “Save.”
- When you want to stop recording, you can select “Stop” on the pop-up.


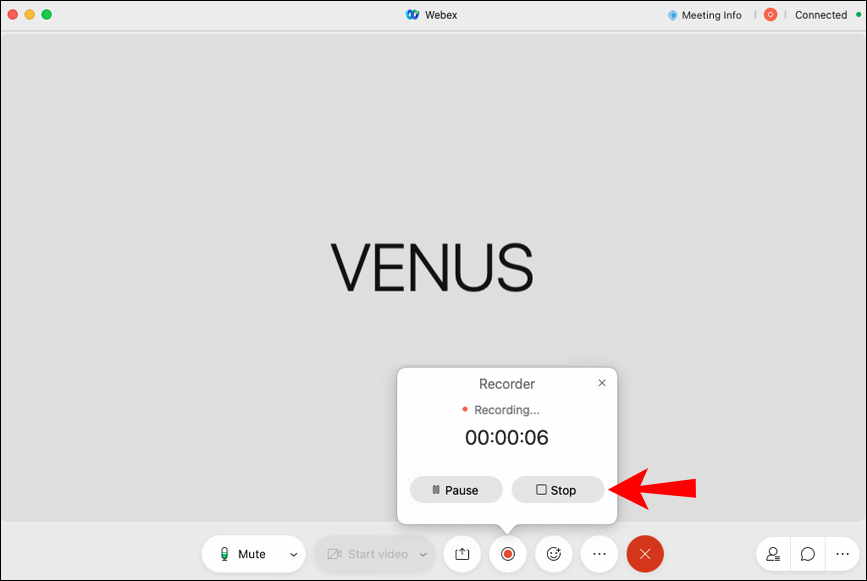
As long as you have permission, you can record as much of the meeting as you like. The pop-up also allows you to pause the recording. This is handy if there are segments you don’t want to share.
How to Record a Webex Meeting as a Participant on a Windows PC
Webex was originally made for Windows, and it’s no surprise that you can use the recording features on Windows 10 as well. As long as the proper conditions are met, you can easily record any meeting. Just make sure to have some space on your computer or cloud.
For Windows 10, follow these instructions to record a Webex meeting:
- Launch the Webex app on your Windows 10 PC.
- Join a meeting with the host enabling recording features.
- At the bottom, you can select the record button, which is a circular icon.
- You can choose to save the recording to the cloud with a paid account or directly to your computer.
- If you only have a free account, a dialog box will display a directory letting you choose the location to save the recording instead.
- Select your destination and then click “Save.”
- Now, you should see a recording pop-up appear, and Webex will start recording.
- When you want to stop recording, you can select “Stop” on the pop-up.


If you click the record button, you can hide or unhide the recording pop-up.
How to Record a Webex Meeting as a Participant on the iPhone
On the iPhone Webex app, the built-in recorder for Webex participants is also controlled by the administrator. If you get permission, you can start recording. On mobile, the quality is lower compared to desktop versions.
This is how you record on an iPhone:
- Launch the Webex app on your iPhone.
- Join a meeting.
- Select the record button at the bottom.
- When done, you can stop recording.
- The recording will be saved on your phone locally.


On mobile, the only way to save the recording is on your phone’s memory or an SD card. Make sure you have enough space on your iPhone to record a long meeting.
How to Record a Webex Meeting as a Participant on an Android
The process on Android is very similar, and you just need the permissions and enough memory. Since Android phones tend to have Micro SD card slots, it’s easy to add storage to save a large file.
These are the steps for Android:
- Launch Webex on your Android device.
- Join a meeting.
- Select the record button at the bottom.
- When done, you can stop recording.
- The recording will be saved on your phone locally.

You can always transfer the file to a computer or directly to your coworkers through Google Drive or another app. If you save it on Google Drive, you can free up your phone’s space and still access it with an internet connection.
Linux
In 2020, Webex decided to create a Linux version due to many user requests. Now, if you have Webex on your Linux computer, you can record your meetings. It’s very easy to save recordings.
Here are the steps for recording on Linux:
- Launch Webex on your Linux computer.
- Join a meeting.
- At the bottom, select the record button – a circular icon.
- You can choose to save the recording to the cloud with a paid account or download it directly to your computer.
- If you only have a free account, a directory box asking where to save the recording will appear instead.
- Select your destination and then click “Save.”
- Now, you should see a recording pop-up appear, and Webex will start recording.
- When you want to stop recording, you can select “Stop” on the pop-up.
Previously, there wasn’t an effective official Linux build of Webex, and Linux users had to use workarounds to make it run smoothly. Those days are now over, as the company has successfully created a functional Linux build. It works just as it does on Windows.
How to Record a Webex Meeting as Host
Recording meetings is extremely easy for hosts. You already have the power to do so, and you can grant it to co-hosts and presenters as well. All you need to do is to follow similar steps as above.
How to Record a Webex Meeting as Host on a Mac
As a host, you can record a Webex meeting on a Mac like this:
- Launch Webex on your Mac.
- Launch a meeting.
- Wait for the attendees to arrive.
- At the bottom, you can select the record button – a circular icon.
- You can choose to save the recording in the cloud with a paid account or directly to your computer.
- If you only have a free account, a dialog box asking you where you want to save the recording will appear instead.
- Now, you should see a recording pop-up appear, and Webex will start recording.
- Select your destination and then click “Save.”
- When you want to stop recording, you can select “Stop” on the pop-up.


How to Record a Webex Meeting as Host on a Windows PC
As the host on Windows 10, follow these instructions to record a Webex meeting:
- Launch Webex on your Windows 10 PC.
- Launch a meeting.
- Wait for the attendees to arrive.
- At the bottom, select the record button, which is a circular icon.
- You can choose to save the recording to the cloud (with a paid account) or directly to your computer.
- If you only have a free account, you’ll see a dialog box asking you which folder you want to save the recording to instead.
- Select your destination and then click “Save.”
- Now, you should see a recording pop-up appear, and Webex will start recording.
- When you want to stop recording, you can select “Stop” on the pop-up.
How to Record a Webex Meeting as Host on the iPhone
As a host on iPhone, follow these steps:
- Launch the Webex app on your iPhone.
- Start a meeting.
- Select the record button at the bottom.
- When done, you can stop recording.
- The recording will be saved on your phone locally.

How to Record a Webex Meeting as Host on an Android Phone
As a host on Android, you need can record through this method:
- Launch the Webex app on your Android device.
- Start a meeting.
- Select the record button at the bottom.
- When done, you can stop recording.
- The recording will be saved on your phone locally.

Understanding Webex Recording Rules
As a host, you can host meetings and record them to be saved in the cloud, but you need a paid account for this. With a paid account, you can also permit attendees to record to their computers or devices too.
If you as a host are on a free account, then you can only save the recording to your computer. On free accounts, only desktop users can control the recording.
On both paid and free accounts, participants can record only if they receive permission from t
host. They can only save it to their computer and not the cloud. Free accounts can’t record on mobile devices.
Additional FAQs
Why can’t I record the Webex meeting I’m attending?
There are a few reasons why you can’t record your Webex meeting:
• You’re an attendee and weren’t given permission.
• If you’re a co-host, you can’t record if the host is also present.
• You ran out of cloud storage space.
• You’re on a free account and using a mobile device.
• Recording might be disabled.
Can I save my Webex recording to the cloud?
Yes, you can. However, you need to have a paid account to save recordings to the cloud. Alternatively, you can use other screen recording software as a workaround.
Record and Review
Now that you know how to record a Webex meeting, you can always come back and review what was discussed in those meetings. You can even send the recordings to absent coworkers. It’s very convenient, especially as the host.
Do you use Webex’s built-in recorder or a different program? Do you enjoy using Webex for meetings? Tell us what you think in the comments section below.
Disclaimer: Some pages on this site may include an affiliate link. This does not effect our editorial in any way.