If you’re an Android user, there’s no reason not to bring some of those incredible apps to your Macbook Pro or Macbook Air. Maybe you’re looking for a weather application to keep around on your laptop for planning your outfit in the morning. Maybe you’d rather play some Android-exclusive games on a larger display, or you want to test out a brand new app without installing it onto your phone and taking up valuable storage space.
Whatever the reason, there’s an easy way to install Android apps on Mac OS: emulation. It doesn’t matter whether you’re looking to play a game on your PC originally purchased on Android, or if you’d rather spend your time using Snapchat on your computer instead of your phone, emulation is the way that you can force all of your favorite Android apps to automatically start functioning on your Mac.
What Software Should I Use?
There’s a number of Android emulators on the market today for Mac OS, including the Android emulator created by Google to help developers create and publish their apps, but when it comes to gaming, there’s really only one option available to use today.
That’s BlueStacks, now in its fourth version, a fully-featured Android emulator designed to run your games just as you would run typical PC games through Steam or other gaming clients, like Origin or Battle.net.
BlueStacks includes a full app software store, the ability to add friends to your list to play with, and even a social network called Pika World where you can connect with other BlueStacks players around you. We’ll cover all that below, once BlueStacks is set up on your computer.
Outside of the friends’ list and social options, the most important aspect of BlueStacks is the inclusion of the Play Store. Unlike basic Android emulators, the inclusion of both the Play Store and Google Play Games means you can install any Android game you’ve downloaded and purchased on your Google account through the BlueStacks software, all without limitations.
If you’ve purchased a wide library of games on Android but never found time to play them, BlueStacks is the best way to get them onto your Mac for some more serious gaming. It’s seriously impressive software.

Though BlueStacks was, in our testing, the most reliable emulation software we tried for Mac OS, it’s not alone in the field. You can find other emulators across most platforms, including Andy, a close competitor to BlueStacks.
Andy runs on both Mac and Windows alike and is perfect for games and productivity apps alike. The interface isn’t quite up to par with what you’ll find on BlueStacks, but if you don’t want to deal with some of the social aspects of BlueStacks 4 like Bluestacks World, it may be worth switching. Either option is solid for gaming and will provide you with a pretty decent experience on your iMac or MacBook, though we still think that BlueStacks is the one you should focus on.
Allow Apps
First, let’s enable apps to get installed from places other than just the Apple App Store. Before you can download and install the Android emulator—Andy—you’ll need to make sure your Mac allows the installation.
System Preferences
To do that, you’ll need to go to “System Preferences” on your Mac.

Open ‘Security & Privacy’
Next, you’re going to click on “Security and Privacy” before selecting the “General” tab (the first tab on the top left in Security and Privacy).
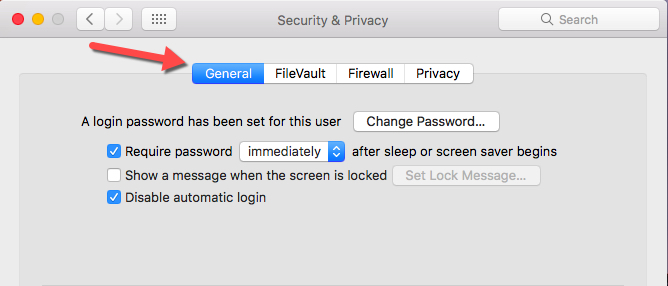
Allow Apps from Identified Developers
If you’ve only got apps from the Apple app store allowed for installation on your Mac, you’ll need to check off the “Allow apps downloaded from:” both the App Store and identified developers.
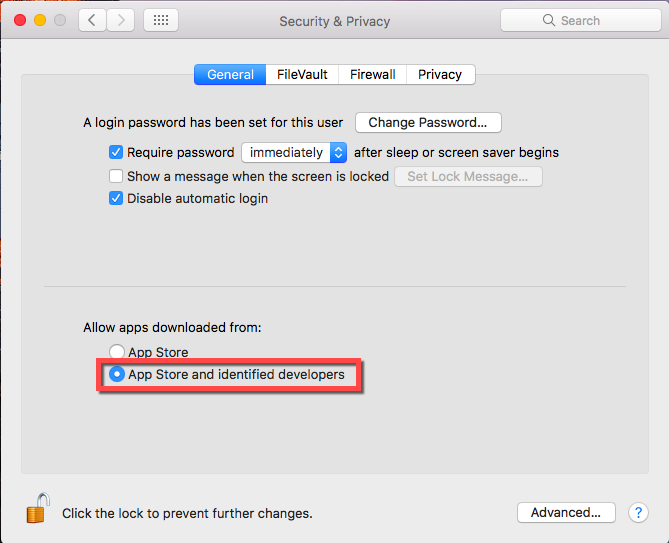
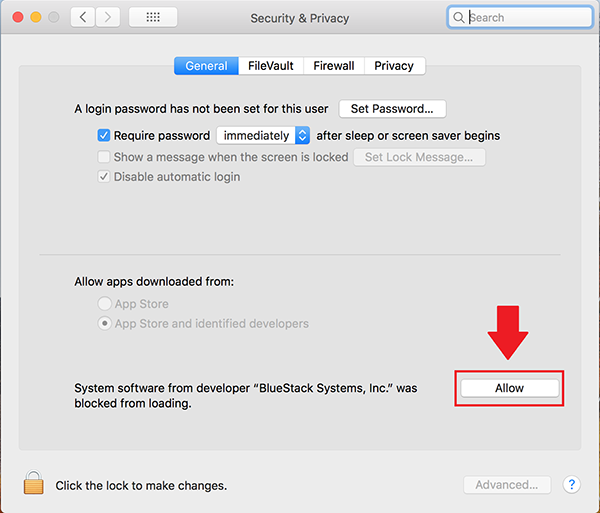
Now you should have the ability to download and install the Android emulator without a hitch. You may also need to accept adding BlueStacks as an accepted developer in your settings in order to properly install the app.
Get the Emulator
Make your way to the BlueStacks website.
Download the most recent version of Bluestacks from the page.
This will allow you to access and use any app right on your Mac.
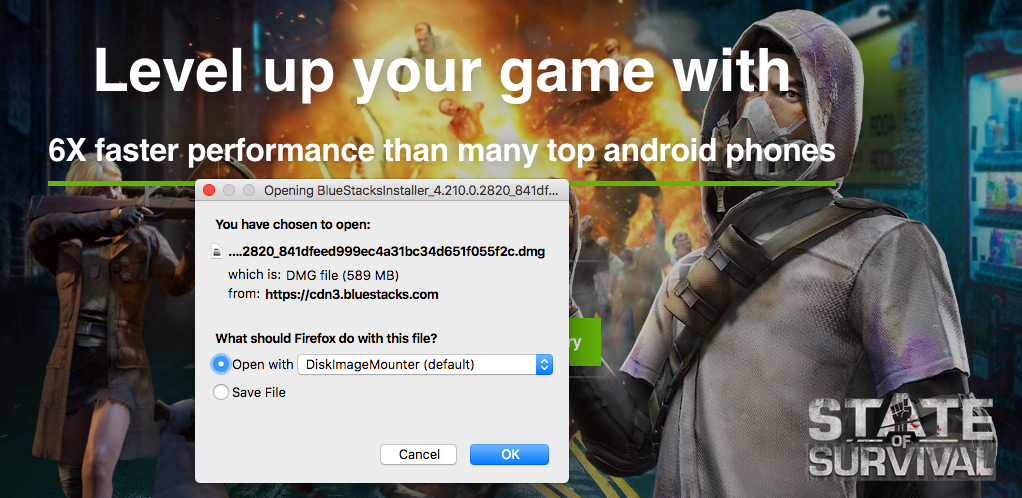
Double-click the Disk Image on Your Desktop
After you’ve downloaded the .dmg file to install the app, double-click on the disk image on your desktop and double-click on the package within this installation folder.
Your Mac prompts you to click on and accept the installation of BlueStacks to your Mac, just as with any application or program you install.

Follow Bluestacks Installation
At this point, you’ll want to follow through the installation software provided by BlueStacks, selecting the preferences you want for your emulator. When you finish your installation of BlueStacks, it’ll now live in your Applications folder within your Mac’s file system.

Open BlueStacks
Now that you’ve installed BlueStacks, you’re going to head to the “Applications” folder on your Mac. Double-click on the app to open it, and you’ll be asked to create a username and an avatar. The former can be whatever you want, though it can’t be something used by another BlueStacks player. As for the latter, you don’t need to spend too much time on the avatar portion if you don’t want to.
Simply hit the random button and move onto the next step. You’ll be asked to select some popular games you like to play to connect with other users. Once you have those down, you can move onto the map, or you can skip the game selection altogether.
Logging Into Google
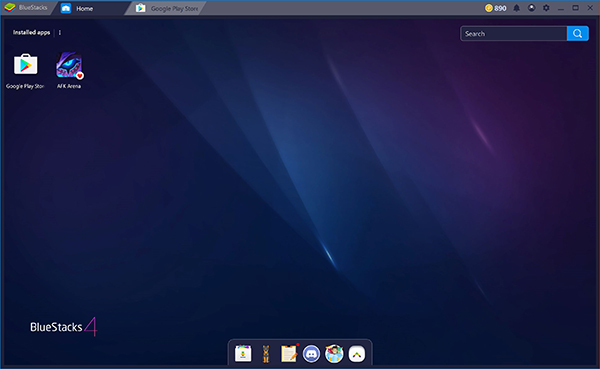
Once you’re inside of BlueStacks, you can ignore the general interface and location information provided by the service for now. Instead of looking at all that, you’ll want to click over to My Apps, then tap on the System Apps folder to enter your main list of content.
Select the Google Play icon, just as you would on another Android device, to open the Play Store. Google will prompt you to enter your login information for the device, using a tablet interface for the menu and visuals. BlueStacks runs Android 7.0 Nougat, so anything we try to install in Google Play will work fine on our device.
When you enter your login information for Google Play, you’ll be redirected back to the app, now able to install apps and launch content from within the store.
Unlike the BlueStacks App Store, Google Play is entirely unchanged here. If you’ve ever used Google Play on a tablet, you’ll know what to expect here; the app is identical. You can search through apps at the top of the browser, select one of the options from the carousel of highlighted apps and games at the top of the screen, and scroll through the suggested games below.
More importantly, however, is the ability to access your own account. Use your mouse to select the horizontal triple-lined menu button that will be familiar to any long-time Android user to open the sliding menu to the left of your screen. Since you previously logged into Google Play when first launching the app, you’ll see your standard number of options appear inside BlueStacks’ terminal, including your account name, your library of apps and games, and the ability to browse suggested categories like books, movies, and more.

To install from your pre-established library of Android apps, you’ll need to click “My Apps and Games” at the top of the list. Enter the list, then click on “Library” at the top of this page to navigate away from the sparse “Updates” page.
Your Library page shows every single individual app or game you’ve ever installed or purchased on your device, and you can install each of them by clicking on the Install button next to each app. Whether you purchased a specific app five years ago on Android, or you just bought an app a couple of weeks ago, it’ll appear in your library. You can also search for the app to reinstall it from the store automatically, and you can use the Play Store browser on Chrome or other similar browsers to push the installation directly to your device.
If you’re looking to purchase or install new apps, it’s done the same way as any other Android device. Search for the app using the search icon in the upper-right hand corner of your display, and select the app from the list of search results. Then simply hit the Install button for free apps, or the Purchase button for paid apps, to install the application to your device. If you’re buying an app, keep in mind that there’s always the possibility of incompatibility between your app and BlueStacks. Google Play has a refund option for most paid apps that you can use if your app doesn’t properly launch.
Installing Apps Outside of Google Play
BlueStacks has full access to the Play Store, and that is one of the reasons it’s our top pick for use on your Mac. That doesn’t mean you have to be locked to the Play Store, though. Instead, you have two other options for installing apps outside of Google Play, and both work just as well as using the Google-approved app store supplied with BlueStacks.
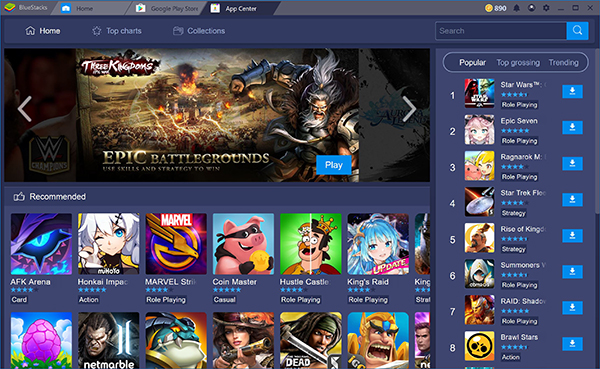
The first method uses the BlueStacks-centric app store provided within the app itself, which you can access by selecting the “App Center” tab on the top of the app. App Center has basically every option you could ever want in a Google Play Store replacement, from Clash Royale to Final Fantasy XV: A New Empire, allowing you to install the apps directly to your computer by navigating through the options allowed to be installed on your computer.
That said, we should also note that many, if not most of these games are downloads from Google Play, so you’ll still need a Play Store account to download them. Clicking on the app will simply load the Play Store interface to install it.
There are plenty of reasons to use the App Center interface over Google Play proper. For one, it’s a bit smoother and faster than the emulated Play Store, and a bit easier to browse with a mouse and keyboard. There are separate, game-focused top charts, including lists of the most popular, top grossing, and trending games based on the use cases of BlueStacks players.
Rolling over any app will tell you where the application is installed from, be it Google Play or another outside source. You can search for apps using App Center, though it won’t load every single possible game in the store. Searching for “Final Fantasy” will bring up four distinct results, but to view the rest of the apps, you’ll need to click the “Visit Google Play” icon, which will load a pop-up display with your results.
It’s not the perfect way to browse for apps, but App Center is a solid way to find out what other BlueStacks users are playing in their spare time.

Installing the APK
The other option for installing apps outside of the Play Store build into BlueStacks is by using straightforward APKs, available on the web from sources like APKMirror. APKMirror hosts free application packages, or APKs, available to be downloaded by anyone to install on Android.
Click ‘My Apps’
BlueStacks has the capabilities of installing apps from these packages, and you’ll find the option right on your own home display within My Apps.

‘Install APK’
At the bottom of the page, tap on the “Install APK” option to open a File Explorer window for your computer. Select the APK from your Downloads folder or wherever else you save your content, then click enter.
You can use the Google Chrome browser within the emulator to search and download a specific APK if you are unable to find it using the above-listed method.

You’ll see the app begin to install on your own home screen, and you can use the app like any other. In our tests, installing from an APK over installing from the Play Store didn’t change the user experience in any meaningful way.
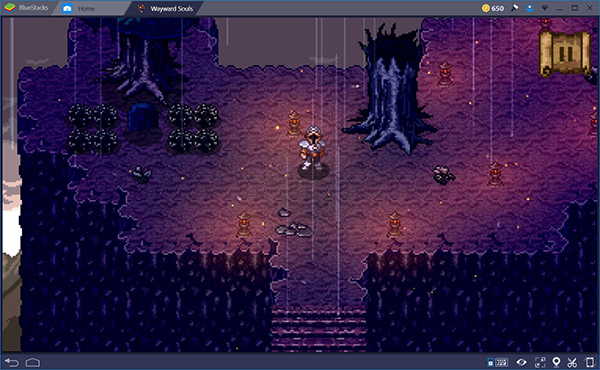
Playing Games
Now that we have some games installed on our Mac, it’s time to learn how to play them. For the most part, launching an installed game is as easy as clicking on the shortcut created on the My Apps tab on your home screen; it’ll launch the app in its own tab along the top of BlueStacks, and you can begin playing the game.
We didn’t run into any major compatibility issues when testing apps on either of our test computers, but that doesn’t mean it can’t happen. Just as we’ve mentioned above, there’s a solid chance that you may have an app or game designed for newer versions of Android that simply won’t work with your device.
If this is the case, you may need to check with the app’s developers to see if support for Android 4.4.2 or below has been scaled back. That said, as far as we can tell, newer apps that won’t run on your Mac inside of BlueStacks seem to be hidden from the Play Store on that device. For example, Google Assistant requires phones with Android 6.0 or above, and searching for it inside of BlueStacks returns results for other Google and voice assistant apps, but not Google Assistant itself.
When you’ve installed a game on your Mac through Google Play, head back to your My Apps page to open it. Each app opens in its own tab along the top of the screen, which helps you to play more than one game at a time. If you wish to have multiple games open at once, or you want to keep Google Play open in a separate tab at all times, this is a good way to do that.
Mapping Controls

BlueStacks comes with a complete control mapping scheme to fix the problem described above. It isn’t a perfect solution, but it is a good way to take what’s possible with a mouse and keyboard combined with what would typically be touch-based controls and meld them together to create something that can function, completely designed by the player. This is what makes BlueStacks one of the best Android emulators for Mac, beyond the inclusion of the Play Store, and makes it ideal for any type of game on mobile. More specifically, however: if you’re looking to play platformers, action games, first-person shooters, or MOBAs, this is probably the way to do it.
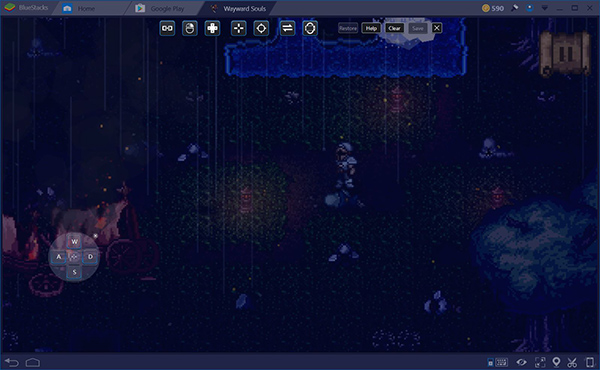
To open your control mapper utility, look to the bottom-right corner of BlueStacks. Near the left of the icons, you’ll see a small keyboard button. Select this to open the control mapper for your specific application, which will cover your game in a blue highlight and give you a series of controls along the top of the screen. If we’re being honest, BlueStacks does a pretty terrible job in explaining what each of these controls does, but here’s our basic guide to what each control does, from left to right:
- Link: This icon is the hardest of the bunch to determine what it does, but it seems to create two quick-release buttons with specific custom shortcut keys to allow you to program an area of the touchscreen with your own commands.
- Right-click: Allows you to use the right button on your mouse to move instead of the left button. It’s used mostly for MOBAs and other similar applications, though you can use it for whatever you determine necessary.
- D-Pad: This allows you to control a virtual D-Pad or joystick with the WASD keys on your keyboard, mapping W to up, A to left, S to down, and D to right, like most computer games. You can drag this over the D-Pad or Joystick to use and can resize the circle to fit the device you’re using.
- Shooting: If your game has a certain set of crosshairs used within the game, in order to shoot, fire, or switch to a scope, you can set the icon on top of that button to control the camera with your mouse.
- Scope: This is your fire button, meant to be dragged over the button on your screen that fires your weapon. It translates directly to left-click, allowing you to fire faster than with touch controls.
- Swipe: This button allows you to set the direction in which you swipe on your keyboard, either between left and right or up and down.
- Rotate: This button determines the rotation and orientation of your device, which translates directly to your gyroscope.
- Custom gestures: While on the blue highlight screen, drag your mouse in the necessary gesture to create a custom gesture, which can be activated with specific key binding.
- Cmd/Mouse Wheel: This shortcut allows you to zoom in and out of your screen.
- Clicking: Click anywhere on the blue portion of the display to create a custom click that can be bound to any key on your keyboard.
Unsurprisingly, this method isn’t perfect. There is most certainly some input lag when playing with mapped controls on your mouse and keyboard. Moving around in Wayward Souls, for instance, had about half a second of lag before the input was registered. For something like Wayward Souls, that isn’t necessarily the worst thing in the world, as it’s easy to get used to within that game.
For other apps, however, like MOBAs or online twitch shooters, you may run into more problems. We also experienced the control mapper freeze up more than once while programming controls, though it’s easy to reset the app and relaunch quickly on your Mac. It’s not perfect, but BlueStacks does go a long way in making controls manageable within the emulator.
There’s an obvious reason to choose to rely on playing games on your computer as opposed to playing games on a device that fits in your pocket. PC gaming is a huge hit these days, but it’s difficult to get into without a powerful device that can cost a ton of cash some players may simply not have—and on Mac OS, you might find yourself short on games that support the operating system.
If you’d rather play on the laptop or desktop PC you already own, and BlueStacks can run on your Mac, you gain access to not just a powerful application that can run thousands of free games, but also low-cost games that may be even cheaper on Android than on other operating systems. It truly makes for a premium gaming experience uninterrupted by having to shell out thousands of dollars for new hardware and AAA games, all while keeping things smooth, and providing users with a fully customizable suite of software that can be controlled right with your mouse and keyboard.
Disclaimer: Some pages on this site may include an affiliate link. This does not effect our editorial in any way.


