Are you wondering whether you can scan documents to your computer without a scanner? Most modern printers have multiple features, including the ability to scan documents. If you have an older model without scanning features, don’t worry. Your Windows or Mac operating system has programs that let you capture document scans to your computer.
Keep reading to learn more.
How To Scan From a Printer to Windows 11
Your printer may have robust software with multiple programs to maximize its functionality. Which means it probably also has a scanning program. However, if your model lacks such features, you can rely on the standard Windows 11 software and a document feeder to capture scans. Here’s what you need to do:
- Tap the Start Menu and find the “Scan” app. (Alternately, click “Windows + x” to bring up the Power User Menu.)

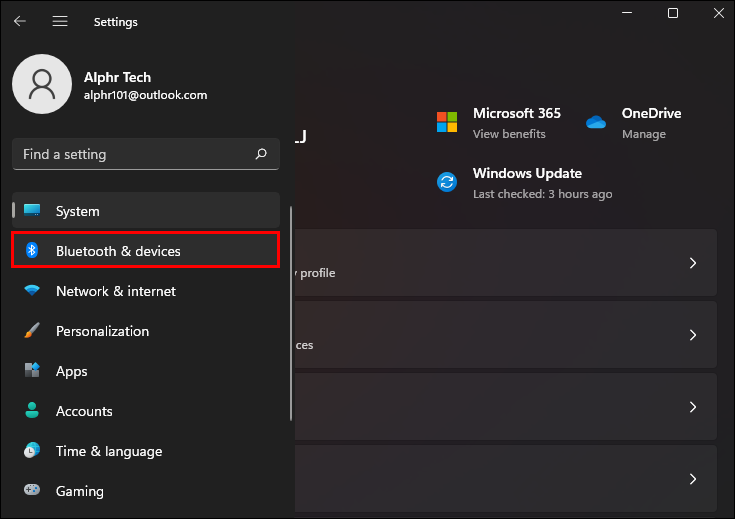
- Press “Settings” and choose “Bluetooth & devices.”

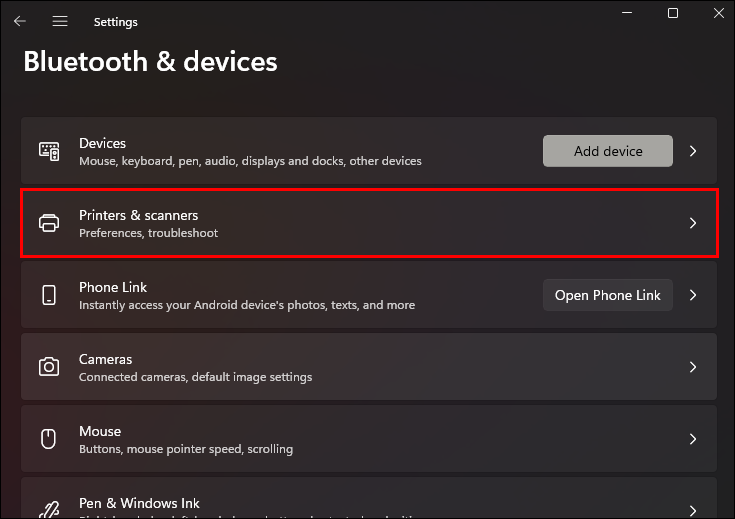
- Select “Printers & Scanners” and click the name of your printer.
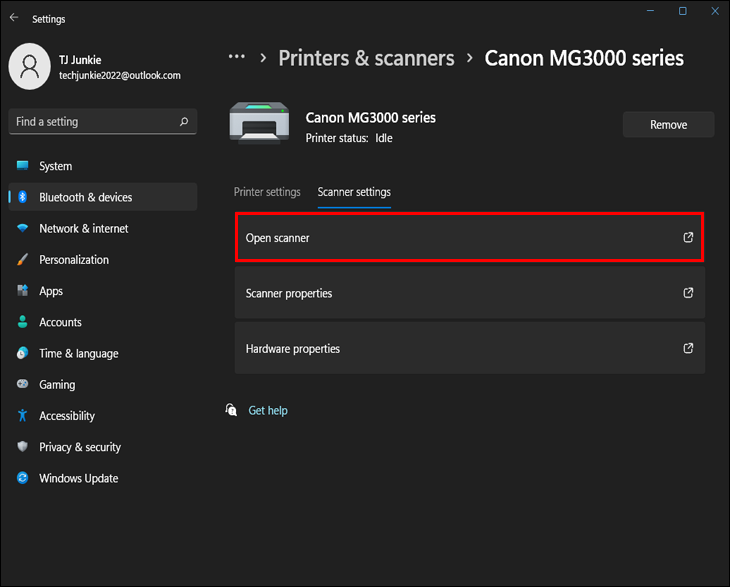
- Tap the “Manage” option.
- If you have a multi-function printer, you should see a drop-down menu. Select the “Scanner” entry.
- Press “Open Scanner” to launch the Scan app and modify your document’s pages.
- When you’re satisfied with the alignment, hit the “Scan” button.


The “Source” setting in the Scan app controls whether it will scan the document from the flatbed or your computer’s document feeder. Unless you’ve changed it, it’s best to leave it on “Auto.”
Most document feeders have a built-in lever that helps detect if there are any pages inside them. Thus, leaving the “Source” on “Auto” initiates scanning from the feeder if pages are loaded. Otherwise, the app will scan from the flatbed. With flatbed scanning, you need to go through each page individually.
Your PC will save the scan in the “Scan” subfolder of the “Pictures” folder on your computer in PNG format.
How to Scan From a Printer to a Mac
Capturing a scan from a printer on a Mac is relatively straightforward. Follow the below steps to do so:
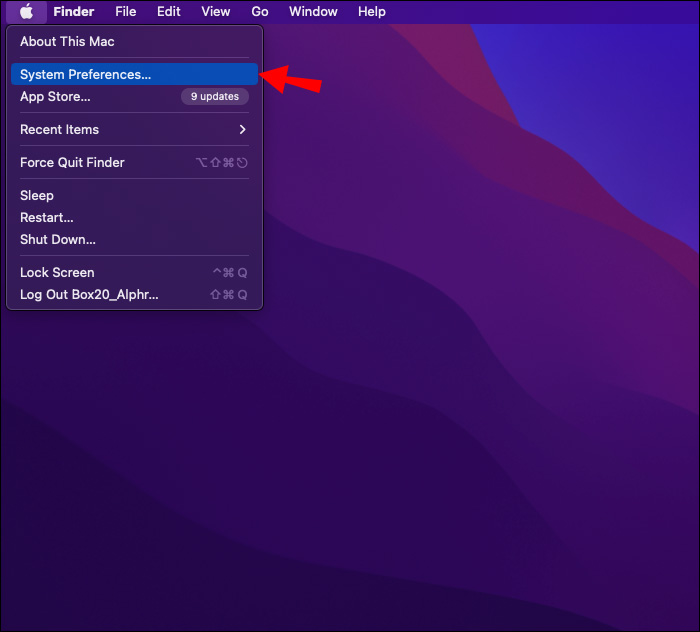
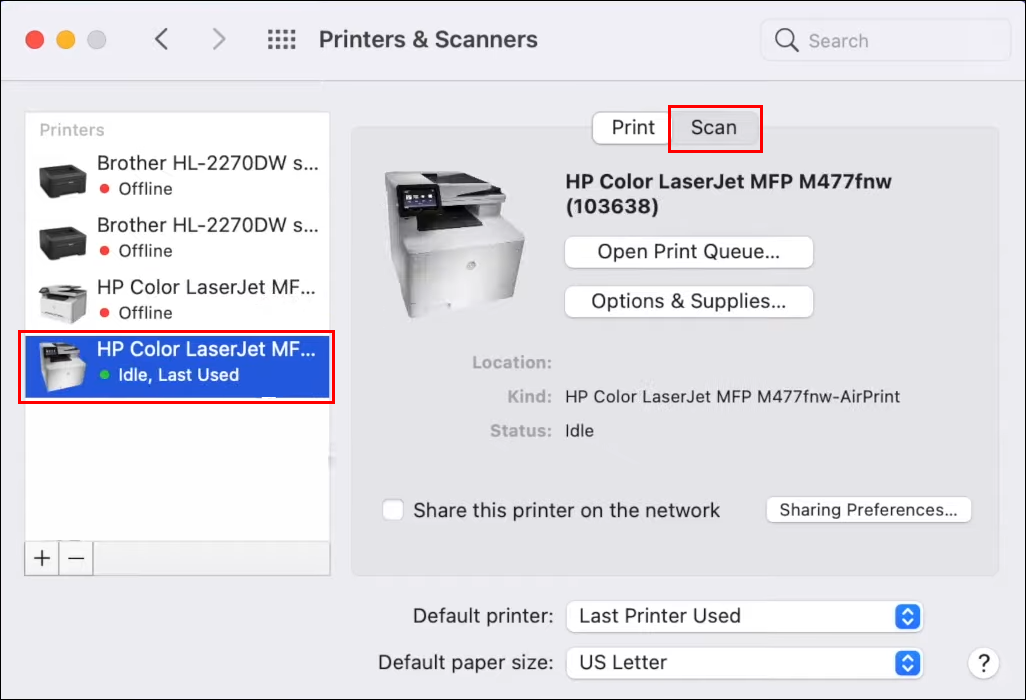
- Pull up the Apple Menu and press “System Preferences.”
- Select the “Printers & Scanners” option at the bottom of the screen.
- Tap the name of your printer and hit the “Scan” button at the top of the window.
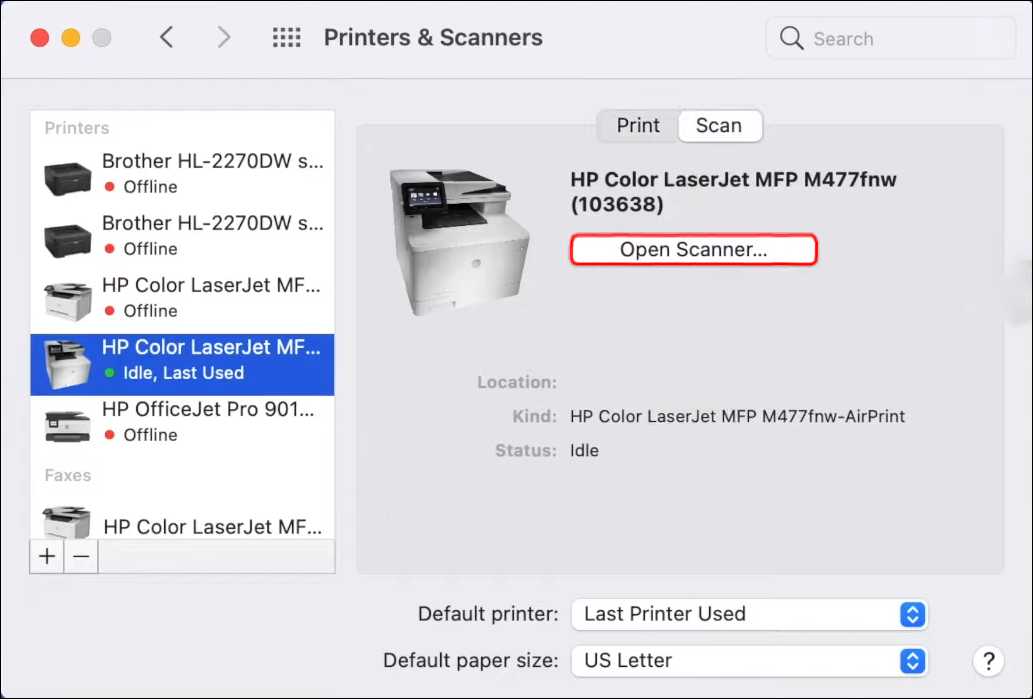
- Press “Open Scanner.”
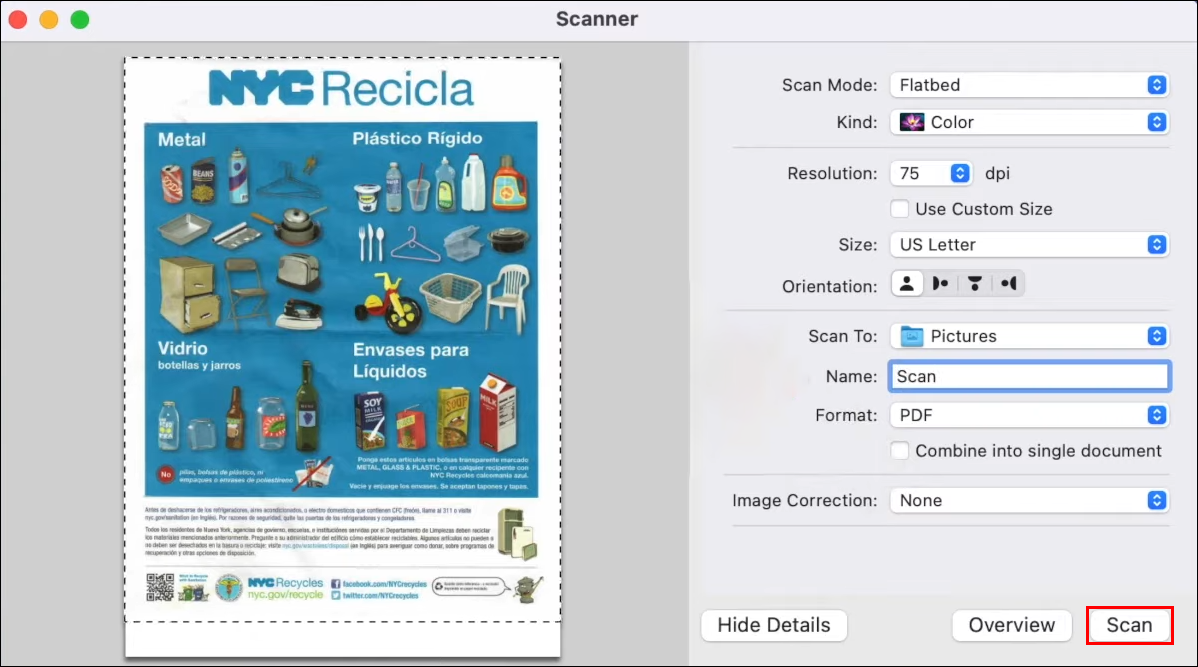
- Navigate to the “Scan to” menu and select where your Mac will store the scan.
- Find the “Size” menu in the left part of the interface and select the desired size of the scan.
- Press “Show Details” to view and customize the following options:
• Scan Mode: You can choose between Document Mode and Flatbed.
• Kind: This option allows you to pick either Text, Color, or Black & White. On calibrated scanners, the colors will resemble those of the original document.
• Resolution: You can adjust your scan’s DPI (dots per inch). It’s a good idea to set black-and-white documents to 150 dpi, while color images look best at 240 dpi or higher. Use 300 dpi or higher for photo prints.
• Size: This setting lets users resize the selection box.
• Rotation Angle: Use this option to rotate the selection box.
• Auto Selection: This setting provides two choices, Detect Separate Items and Detect Enclosing Box. Select the first to locate multiple objects on the scanning bed and tap the second to put one or more small documents in a box.
• Scan To: Unless you select where your Mac will save the file, it will store it on the desktop.
• Name: This setting allows users to rename scans.
• Format: Here, pick the desired format of the scan. Pick PDF for documents and files containing text and images. Photos look good as JPG. If you’re unsure which format works best, PDF is a safe bet. If necessary, you can easily convert it into JPG later.
• Image Correction: You’ll see this setting if your printer supports it.
• Unsharp Mask: Choose from High, Medium, Low, and None.
• Descreening: Choices include Fine Prints (175 LPI), Magazine (133 LPI), Newspaper (85 LPI), General, and None.
• Backlight Correction: Select High, Medium, Low, or None.
• Dust Removal: Choose High, Medium, Low, or None. - When you’re ready to move on, hit “Scan.”


How To Scan From a Brother Printer
Brother printers are multipurpose machines, and scanning is one of their standard functions. Follow the instructions below to scan a document from a Brother printer to a Windows PC:
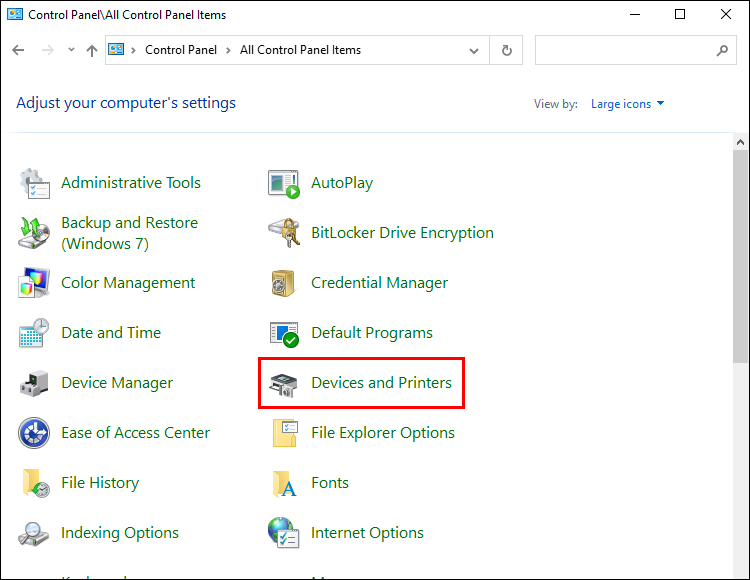
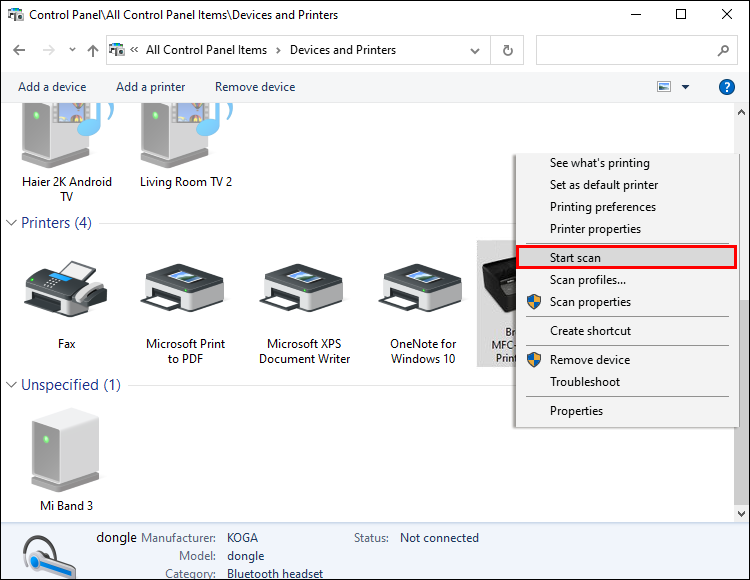
- Tap the “Start” button and go to “Control Panel,” enter “Devices & Printers.”
- Select the printer by clicking its model number or name.
- Hit “Start scan” and select the scan format.
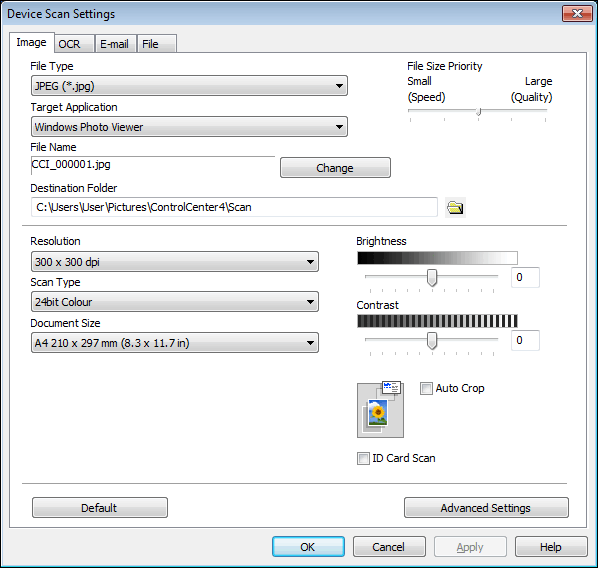
- Choose the destination folder and modify the brightness, contrast, resolution, etc. Load the document into the printer.
- Find the printer’s control panel and press “Scan.”
- Choose “Scan to PC.”
- Select “File” and pick “Start Black” or “Start Color.”

You can also scan documents from a Brother printer to a Mac.
- Bring up the “System Preference”.
- Choose your printer in the “Print & Scan” field.
- Open “Utilities”.
- Tap the Control Center.
- Head to the “Software Button” section and press “Scan to File.”
- Select the destination folder and scan type.
- Click on “OK” and load the document into the printer.
- Press “Scan” from your printer’s control panel and tap “Scan to PC.”
- Choose “File” and select “Start Black” or “Start Color.”
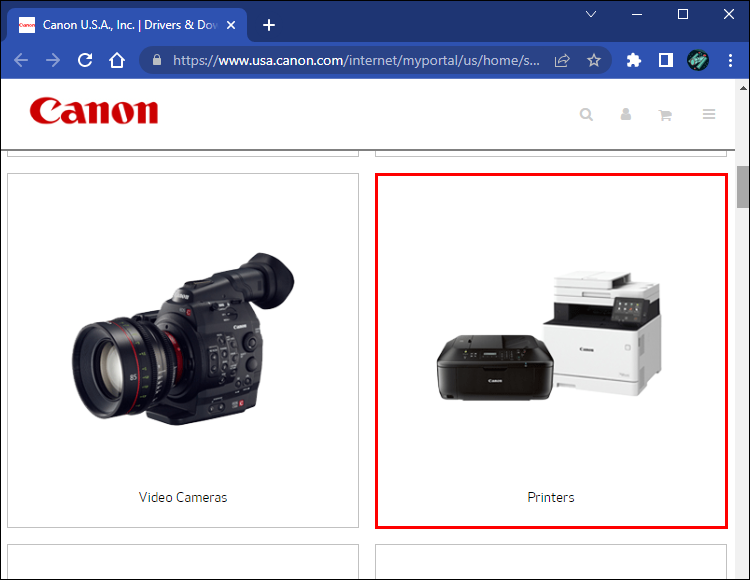
How To Scan From a Canon Computer
If you have a Canon Pixma TS, TR, MG, or MX printer, you can use it to scan documents and photos.
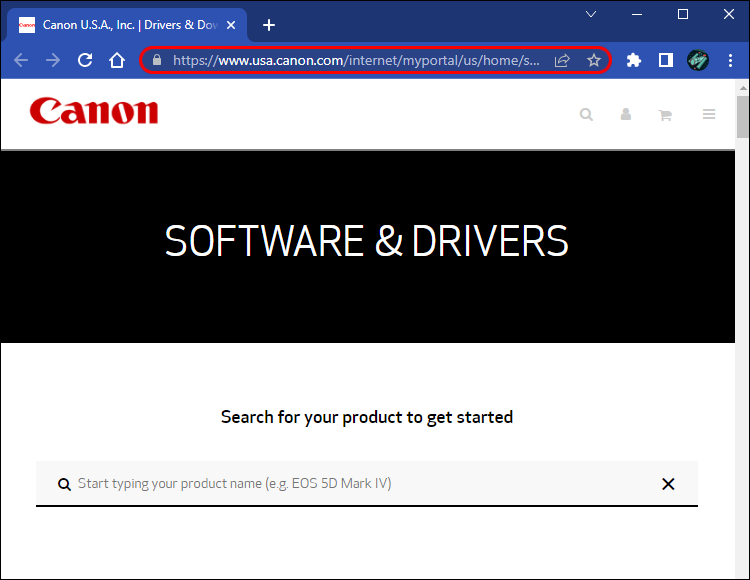
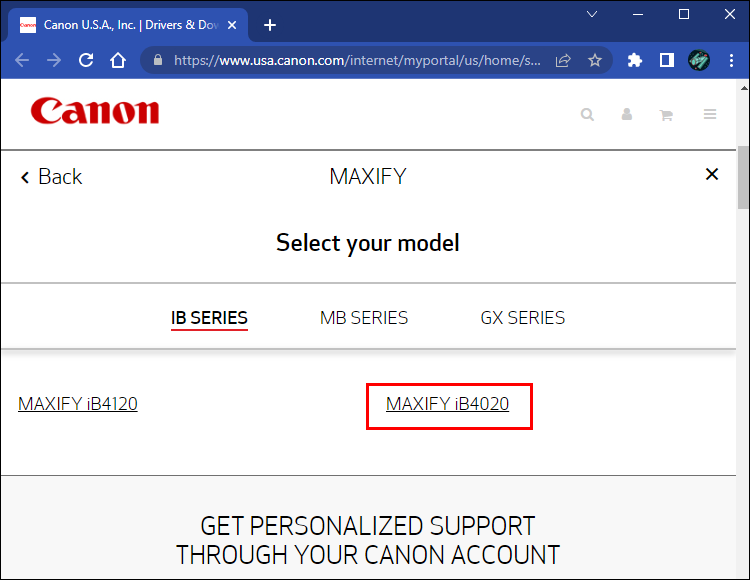
You’ll first need to download printer drivers:
- Read your printer’s documentation to ensure it has a scanning feature. Connect the printer to your PC.
- Open this page in your web browser.
- Press “Printers.”
- Select your printer’s model number and tap “Enter.” Choose your operating system in the drop-down menu beside the “Operating System.”
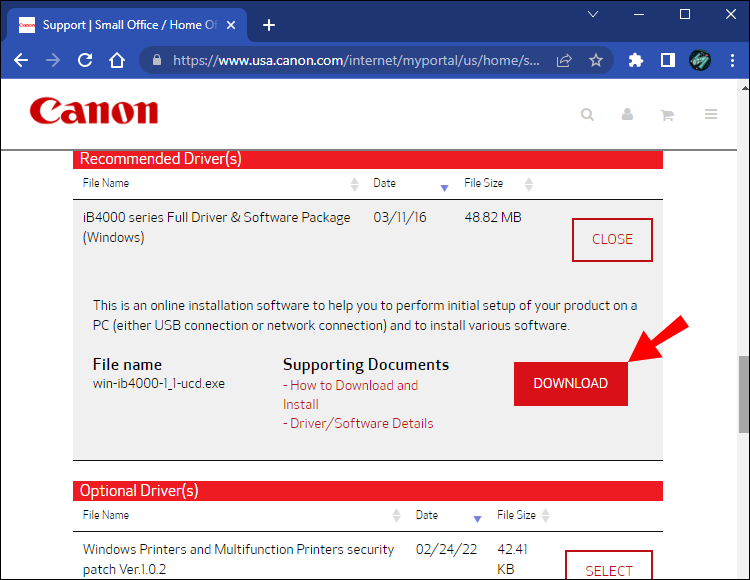
- Find the printer drivers you wish to download and click “Select.”
- Press “Download.” Tap the downloaded file and follow the onscreen instructions to complete the installation.

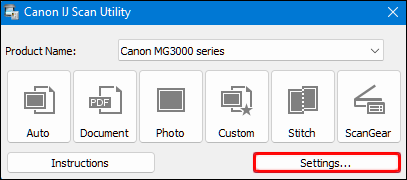
You can now scan documents using the IJ Scan Utility.
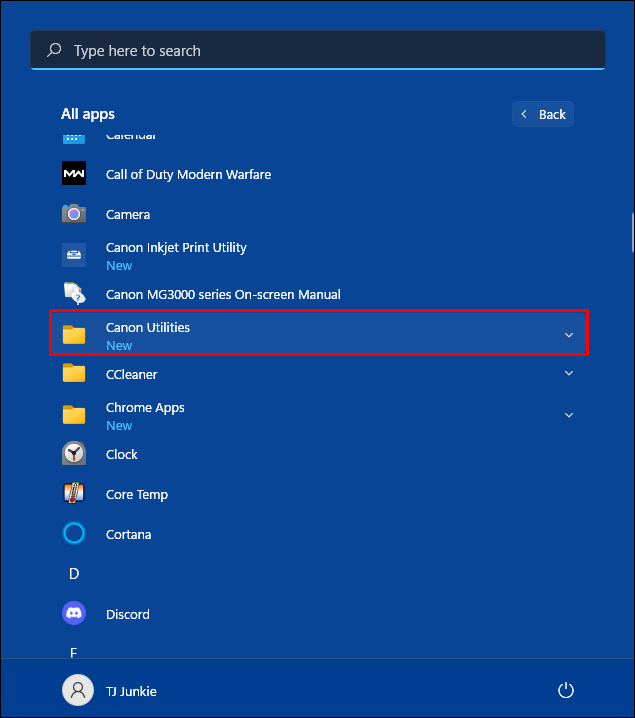
- If you have a Windows PC, press “Start” and access the “Canon Utilities” folder.
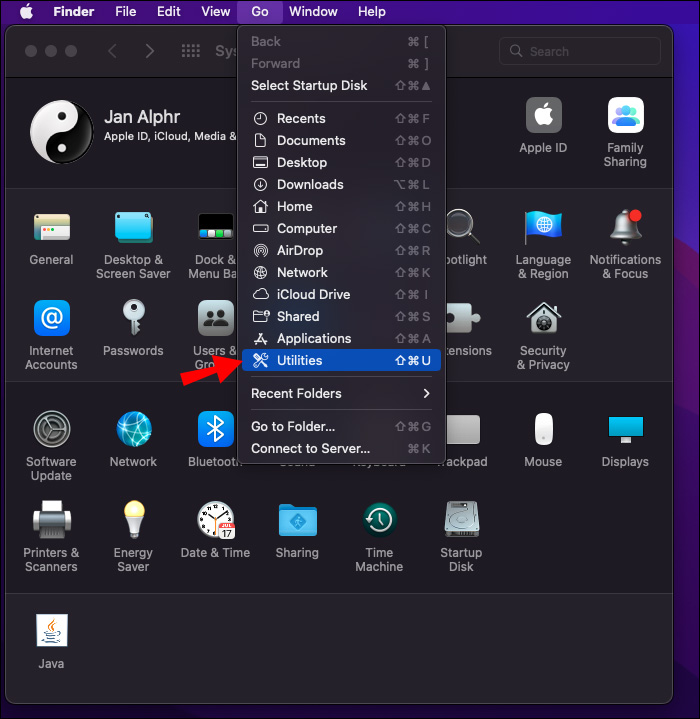
• For Mac users:
o Select “Go” in the menu bar and tap “Applications.”
o Open “Canon Utilities” and choose “IJ Scan Utility.” - Launch the IJ Scan Utility program and pick “Settings.”
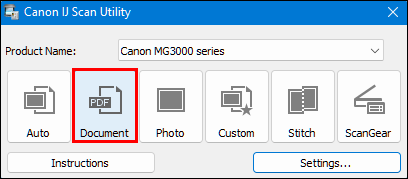
- Select “Document Scan” from the menu on the left part of the screen and press “PDF (Multiple Pages).”
- Navigate to “Save in” and select the destination location for your scans.
- Click on “OK” and choose the “Document” option.
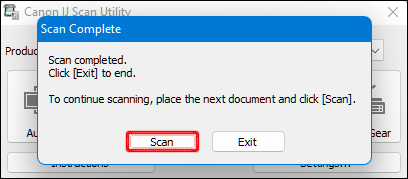
- If you want to print more than one page, place the pages in the automatic feeder or the glass scanner.
- Hit “Scan” to scan the next page.
- After scanning the pages, press “Exit.”


How To Scan from an HP Printer
Uploading documents or photos to your computer doesn’t have to be complicated if you have an HP printer. Before scanning files to your computer, check the printer’s documentation to ensure it has scanning features.
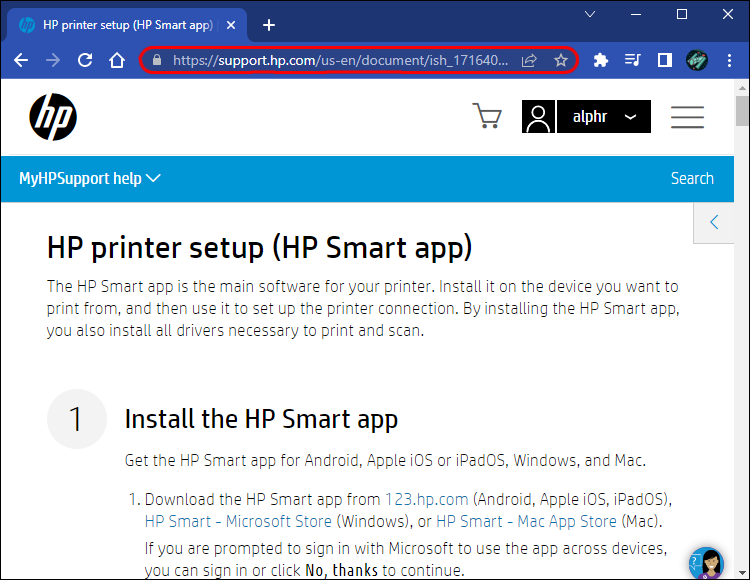
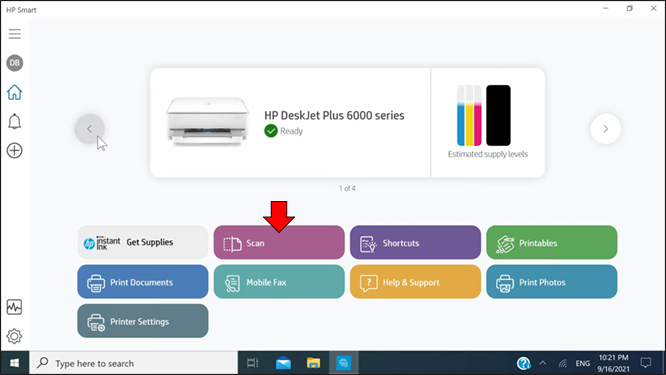
The process is a breeze when you use the HP Smart App.
- Open the website, and download the app and select your printer model. Follow the onscreen instructions to complete the installation and place the document on the glass scanner.
- Switch on the printer and launch the app.
- Pick your printer model in the app window and press the “Scan” box to move on.
- Adjust the scan settings by tweaking the resolution, page size, scanned part, scanning source, etc.
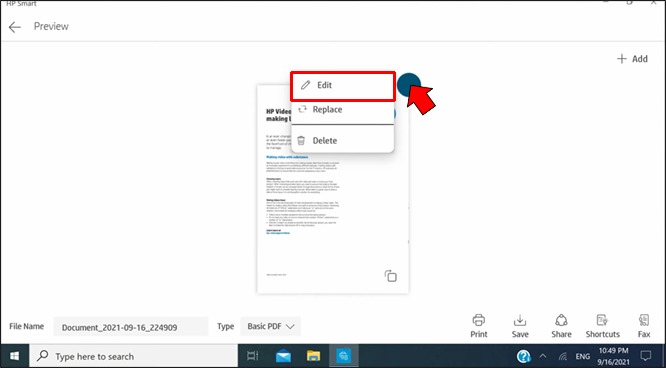
- When you’re satisfied with the changes, hit “Scan” at the bottom right.
- Press the button in the upper right to further edit the scan.
- Tap “Save” and store the file in the appropriate folder.


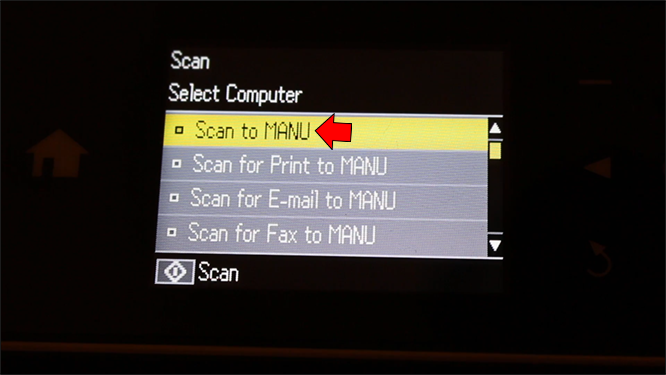
How To Scan From an Epson Computer
Before you can scan to your computer using an Epson printer, you must install the Epson Scan 2 program. Also, ensure you have Event Manager or Event Viewer on your PC. After that, the process is relatively straightforward.
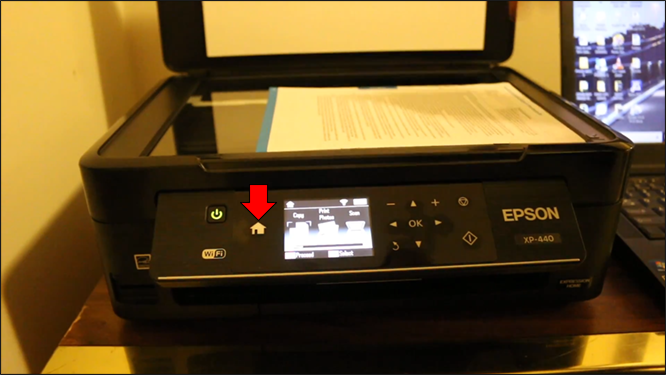
- Place the document you wish to scan on the automatic document feeder.
- If necessary, click the “Home” button.
- Press “Scan” and select “Computer” from the list of options.
- Hit “OK” to close the information window.
- Tap “Select a computer” to view the following options:
• If you’re connected the printer to your computer over a network, choose your computer. (If it isn’t listed, tap “Search Again.”)
• If you’re using a USB cable, press “USB Connection.” - Click “Save as PDF” and select one of the following: “Save as JPEG,” “Save as PDF,” “Attach to email,” and “Follow custom setting.”
- Hit “Scan.”


The scanned document will appear in a preview window when the task is complete.
How To Scan From Printer to a PDF
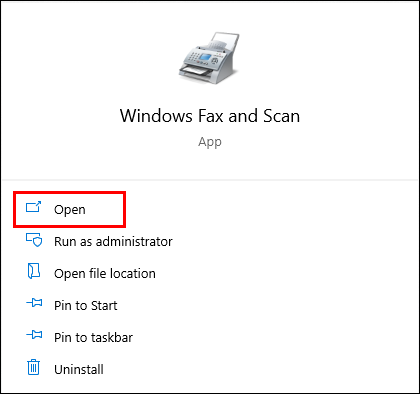
The simplest way to scan documents to a PDF format in Windows 10 is through the Windows Fax and Scan program.
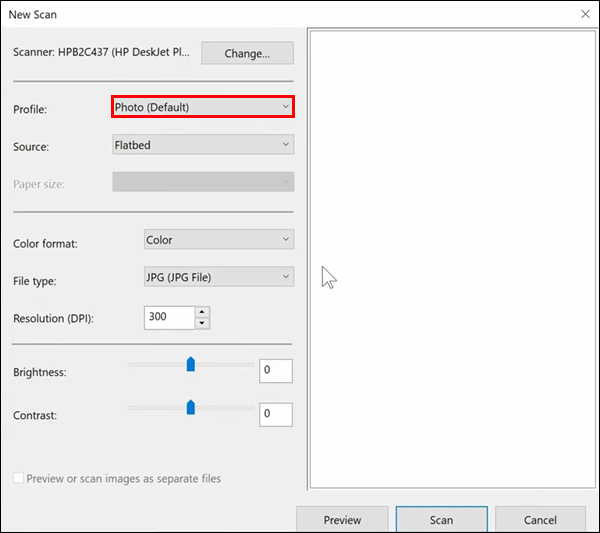
- Open Windows Fax and Scan and choose the “New Scan” option.
- Navigate to “Profile” and tap the drop-down menu.
- Tap “Document” and select the scanner type by pressing “Feeder” or “Flatbed.”
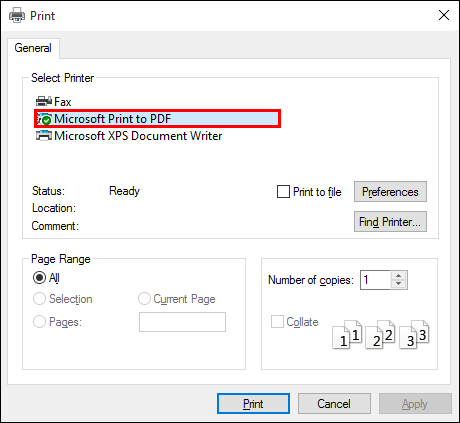
- Hit “Scan” and click “File.”
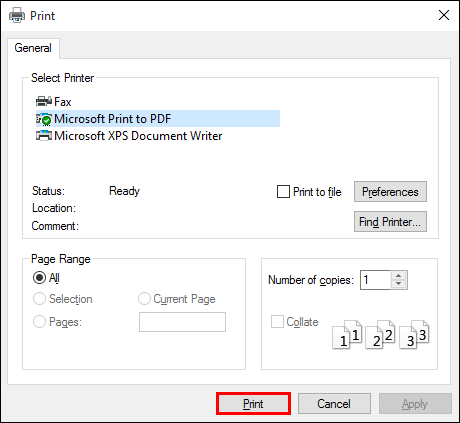
- Select the “Printer” menu and pick “Microsoft Print to PDF.”
- Press “Print” and choose a destination location.


Mac users can scan documents to a PDF format in just a few minutes.
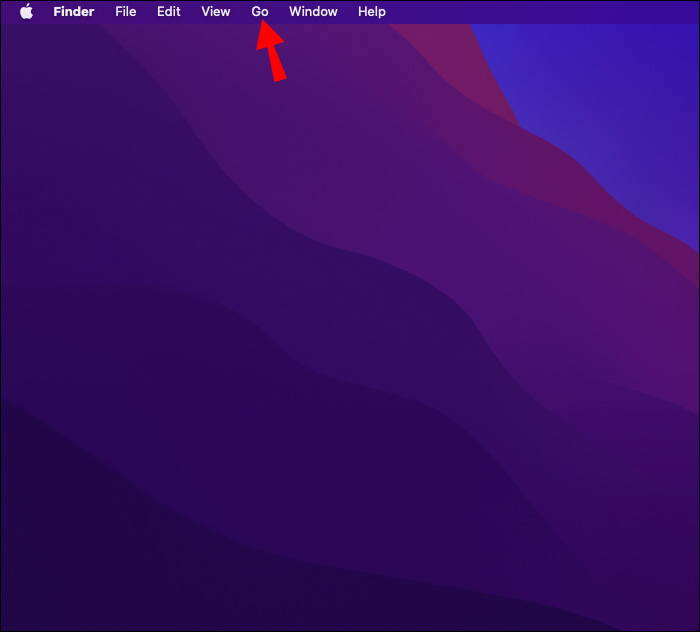
- Open a “Finder” window and press “Go.”
- Select “Applications”.
- Tap “Image Capture.”
- Choose your scanner, destination folder, and scanner type.
- Press “Format” and tap “PDF.”
- Hit “Scan.”


Hassle-Free Scanning
Scanning documents without a scanner can be daunting, but many modern printers have user-friendly features that make the process quick and easy. Users with older printers can rely on their Mac or Windows OS to help them capture document scans to their computers.
Have you used a printer to scan documents before? Which printer did you use? Let us know in the comments section below.
Disclaimer: Some pages on this site may include an affiliate link. This does not effect our editorial in any way.


