If you record videos with KineMaster, you’ll most certainly have come across the final format page. Despite having only three options, these export settings tend to be confusing.
If you’ve found yourself in this situation, don’t worry. This article has got you covered. Read on to learn more about the best export settings for your KineMaster video.
Best KineMaster Export Settings
In most video-editing situations, the default settings are more than sufficient. Like most platforms, KineMaster has figured out the best properties to be compatible with the most devices and the most sites. If you want to do a little more with your content, you’ll need to be aware of the export settings.

Exporting a KineMaster video involves converting your content into material that can be shared and uploaded across multiple platforms. Understanding these properties will help you achieve and maintain excellent quality output. Listed below are the top five KineMaster settings you need to pay attention to when saving your video.
Frames Per Second
If you want to improve your video quality and, in turn, boost your YouTube viewership, you’ll need to make sure that your frame per second values are great. A good frame rate ensures your audience enjoys a smooth playback transition. An FPS value between 25 and 30 is excellent.
Be aware that if you set a higher figure, your video will take even longer to export and vice versa. The highest frame rate in KineMaster is 60.
Resolution
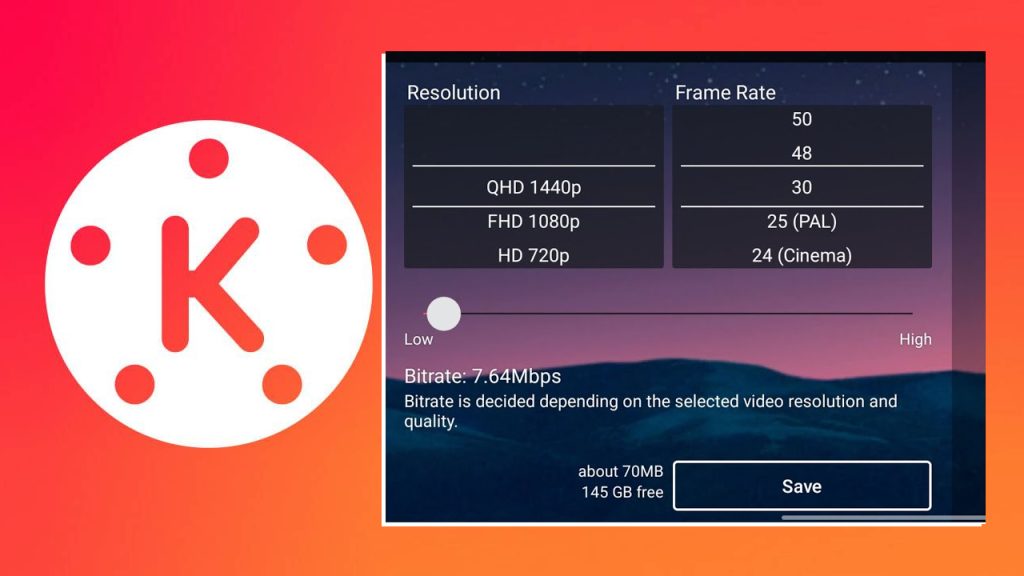
Your resolution setting is the biggest determinant of your KineMaster video quality during and after exporting. A higher resolution provides greater image detail, while a lower resolution provides lower contrast. This means that there’s also less clarity in the content displayed. KineMaster provides various resolution export settings for you to choose from:
- 360p
- 480p
- 540p
- 720 (HD)
- 1080p (Full HD)
- 2160p (4K or UHD)
Most online platforms accept 1080p as it offers a good balance of quality and size. Be aware that KineMaster doesn’t support QHD and 1440p resolutions. If you want always to enjoy a high resolution, here’s what you should do:
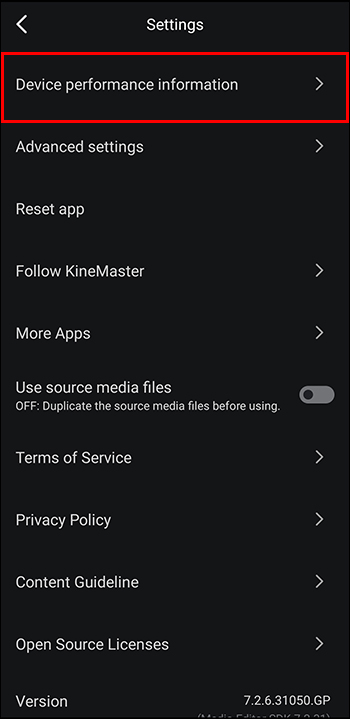
- Install KineMaster and launch the app.

- Click on the cog icon to open “Settings.”
- Check “Device Performance Information” under the “Information” section.
- You’ll see the Maximum supported video quality.


Keep in mind that this export setting will require you to have more extensive storage and better bandwidth.
Bitrate
This value depicts the number of bits per second in your video. It shows the rate of data transmission for your content. In KineMaster, the metric used for bitrate is megabits per second (Mbps). Every resolution setting on the app has an ideal bitrate value that will ensure excellent video quality:
- 720p (HD): 5-8 Mbps
- 1080p (Full HD): 8-12 Mbps
- 2160p (4K or UHD): At least 35Mbps
File Format
There are various file formats that you can use on KineMaster to export your video. This includes MP4, MKV, and MOV. MP4 is the most favored format due to its high cross-platform compatibility. However, you can explore the rest of the KineMaster formats for projects with unique requirements.
Audio Settings
You can also adjust your audio settings during exports. Users can select between audio bitrate, stereo, and mono-output properties based on their project requirements. Make sure that the audio settings you choose create a balanced audio-visual experience.
Best KineMaster Export Settings Practices
Every content creator wants to ensure that their video quality is sound after exportation. Using the correct export settings is essential to ensure that your video quality is high and maintained throughout the entire process. This is also essential to ensure device compatibility across various platforms.
Here are some things you can do to optimize your video exports.
Maintain Aspect ratio
Every platform has a set aspect ratio for video uploads. Using the wrong settings during exports will distort video quality. KineMaster provides options to maintain or alter your aspect ratio according to your needs and preferences.
Explore Different Export Settings
If your content project allows you some flexibility, it’s a smart idea to try out different settings to determine the best one. This can be determined by the balance it provides between quality, size, and compatibility.
Assess Your Ideal Demographic
The users you target mainly watch the content via mobile devices. As such, they should set their export settings to align with these phones. If the properties selected aren’t compatible with these gadgets, you’ll likely lose viewership. It’s essential that content creators consider the platforms and devices their audience uses and adjust the export settings as required. Remember, the viewership you receive is ultimately what you need to expand your content reach.
Check Your File Size
Large video files are typically challenging to upload and share to platforms. They also require higher bitrates, framerates and resolution to achieve high quality. Simply put, it will take even longer to export. KineMaster users should be aware of the video’s file size to ensure its manageable while maintaining high quality. Adjusting the bitrate or compressing the video is an excellent way to reduce the capacity without quality loss.
FAQs
What is KineMaster’s default export setting format?
The standard video format in KineMaster is MP4. Besides being supported across many platforms, the balance between quality and the size of the file is ideal.
Which is the highest export resolution setting you can set for your KineMaster video?
The highest value you can obtain is 4K or Ultra High Definition (UHD). However, this depends on your device’s specifications. Remember, good, original, quality content is the recipe for better quality even after setting a high resolution.
Can you export videos with subtitles and captions in KineMaster?
Yes. You can do this by adding text layers within the app’s editor. This helps you create subtitles and import pre-made subtitle files. However, to succeed in the exportation process, you must ensure that the subtitles are appropriately positioned and well-synchronized with the video. This will ensure that the subtitles are correctly included in the video.
Can you export videos with transparent backgrounds in KineMaster?
Yes. However, you’ll need to use a transparent video layer like the alpha channel or green screen. The video format you use should also support transparency. MOV and PNG are excellent options.
In terms of audio settings, what should I use when exporting videos in KineMaster?
Ideally, a 128 kbps bit rate when exporting videos is the sweet spot. The audio and video must be well-balanced. Also, check to ensure that there is no disruption to the settings during the export process.
Got It All Figured Out?
If you want to get the best out of your KineMaster videos, you’ll need to know about the best export settings. Whether it relates to frames per second, resolution, or bitrate, all can impact on the quality and effectiveness of your videos. If you’re happy with the default settings, that’s fine, too. But if you need to tweak or enhance your content, you’ll need working knowledge of the export settings.
Have you ever changed the export settings on KineMaster? If so, what impact did it have on your video? Let us know in the comments section below.
Disclaimer: Some pages on this site may include an affiliate link. This does not effect our editorial in any way.