If you’re a content creator who uses KineMaster, you might be wondering how to save your videos on the platform. Maybe you’re looking to promote your business or artistic work. Maybe you’re looking to showcase a new product or your musical or movie-making skills.
Whatever the case may be, KineMaster is a great choice. Not only is it free, but it features a ton of great editing options. This article will explain how to save videos in KineMaster.
KineMaster – How to Save a Video
If you’ve created a great video on KineMaster, the first thing you’ll want to do is save it. This way, you won’t risk losing your valuable content and can share it on social media, with potential clients or employees, or even just with your friends and family. You can use two methods to do this: The Export Menu and the Editing screen. However, there are three essential factors to consider before you save the video. You should check its resolution, bitrate, and frame rate. These three aspects will determine your video quality after saving.
Using the Export Menu
This method is great for saving prior video edits as it doesn’t need you to re-open the projects. Here’s what you need to do to save your video on KineMaster.
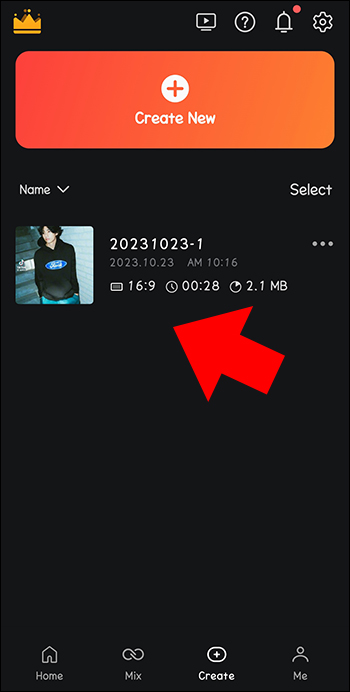
- Go to the KineMaster main page.

- Locate the video you want to save. All finished projects will be under the “My Projects” tab.

- Click on the project.
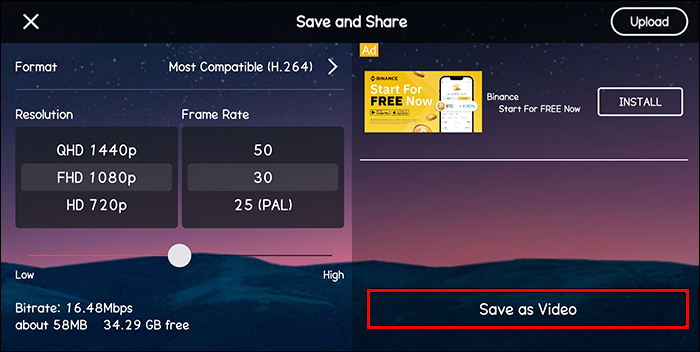
- Select the resolution, frames per second and bitrate on the new screen. You can also leave them as they are and KineMaster’s recommended values.
- Once satisfied with the video settings, click on “Save as Video.”


That’s all there is to it! You can now share your video with whoever you want.
The export duration depends on the video edits made and the size. It also varies with the settings you’ve made and your devices specifications. The videos are typically saved in mp4 format. You can access your exported media on the KineMaster folder for Android and the Photos app for iOS devices.
Using KineMaster’s Editing Screen
This is the method to use if you want to save your video immediately after editing. Here’s how you can save your media via KineMaster’s Editing screen:
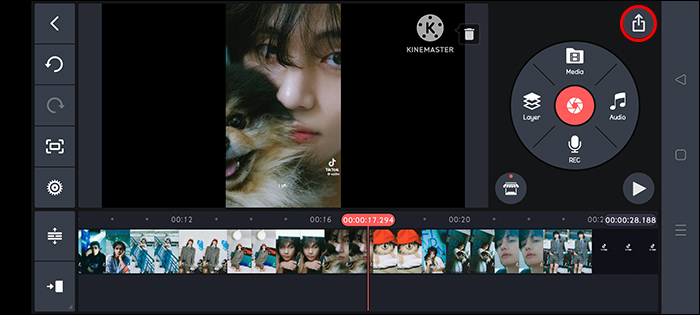
- Tap the “Share” icon located on your screen’s righ pane.
- The video “Setting” menu will be displayed.
- Select your desired export options. Tap “Save as Video .”
- Your saved video will appear on the screens right side. You can click the “Share” icon on it to send videos to other platforms. It’s however already saved on your device too.

Alternatively, you can do the following:
- Click the “Export” icon at the top-right corner of your screen.
- The export “Setting” window will be displayed. Select the FPS, resolution, and bitrate values you want here.
- Navigate to the bottom right corner of your screen and click on “Save as Video” button.
- The exportation process will begin and the video will be saved on your device gallery or selected folder.
Understanding the KineMaster Video Exportation Process
As a content creator, it’s vital that the videos you produce are engaging and visually appealing. To achieve this, you need to pay special attention to a few unique features that can significantly boost your viewership. Listed below are the most essential factors to consider before exporting your video.
Video Resolution
This value displays the videos height in pixels. The metric is usually accompanied with a “P” symbol at the end which refers to progressive scan. This is the format that most screens use to display videos. The higher the value the better your media resolution.
Frame Rate
The frame rate depicts the video density. It measures the amount of pictures that appear on your screen in a second. This is typically referred to as frames per second (FPS). Any frame rate value that falls between 25 and 30 is ideal.
Bitrate
Bitrate displays the number of bits tracked per second and signifies the quality and size of the video. The higher the bitrate value the better.
KineMaster Video Saving Tips
To successfully save your video on KineMaster without any challenges, there are some essential points to keep in mind.
- Test out different video formats to find the one that best suits your needs.
- Make sure your device has enough storage before you begin exporting your media.
- Select export settings that are compatible with your device specifications.
KineMaster Video Export Troubleshooting Options
You may occasionally face some challenges when trying to export your edited video in KineMaster. The app may flag error messages or stop the rendering process entirely. This can be frustrating given the time and effort it takes to spice up raw content. Below are a few methods you can implement to try and resolve video export issues in KineMaster.
Clear Background Running Apps
It’s common for codecs from other apps on your device to interfere with the smooth running of another. This is especially common if there are other graphics software present as they have to share the same video decoder.
Here’s how you can stop the apps from running in the background:
- Exit your KineMaster app.
- Navigate to the bottom of your screen and tap on the “Recent apps” button.
- Select the “Close All” option.
- Relaunch the app and try saving your video to see if the issue has been resolved.
Clear Cache
Glitches in the app can cause it to have video export issues. Clearing cached data from the app can help resolve the problem. Here’s how you can do it:
- Navigate to “Settings.”
- Select “Apps.”
- Go to “KineMaster.”
- Select the “Storage” option.
- Choose “Clear Data.”
Relaunch KineMaster and try exporting the video to confirm if the problem has been fixed.
Lower Your Resolution Settings
If the resolution you’ve selected isn’t compatible with your device, KineMaster will have errors during the exportation process. Try reducing the values to see whether you can save the video successfully.
Force Stop the App and Restart
If you can’t easily pinpoint the problem source, restating KineMaster is usually a good solution. It helps refresh the app settings and get rid of minor bugs. Here’s how you can force stop the app and restart it:
- Locate “Settings.”
- Go to “Apps.”
- Find “KineMaster” and open the app.
- Scroll to the screen’s bottom and tap on the “Force Stop” option.
FAQs
Can you use KineMaster for PC?
Yes. Though it was initially primarily intended for mobile devices, there is a Chrome extension you can install and activate to edit your videos on either PC or Mac using KineMaster.
How can you remove the watermark on your KineMaster videos?
The only way you can eliminate the watermark is to upgrade to a premium subscription.
Are You Ready?
If you’ve created some great content with KineMaster, you’ll want to make sure that you save it properly. This will not only give you peace of mind, but enable you to share your work with potential customers, friends, and family members.
Have you ever saved your videos with KineMaster? If so, did you use any of the tips and tricks featured in this article? Let us know in the comments section below.
Disclaimer: Some pages on this site may include an affiliate link. This does not effect our editorial in any way.