AutoCorrect is a helpful feature in Microsoft Word that checks your spelling and corrects it automatically, just like Android. Well, everyone knows how the Android feature often leads to frustration. MS Word is no different, especially for fast typers. This statement is based on the auto-correction of words, not predictive text.
The AutoCorrect feature in MS Word occasionally corrects misspelled words to something that doesn’t fit the sentence or phrase, but it’s pretty good at knowing what you mean and leaves most phrases alone. However, when typing model numbers, business names, abbreviations, HTML, proper nouns, or other types of code, it thinks you spelled a word incorrectly when you didn’t. You’ll get spaces where you shouldn’t. Word will change the punctuation in HTML. Strangely spelled business or product names get corrected to actual words. Sometimes, you may want an intentionally misspelled word in a quiz or when referencing something. The list goes on.
Luckily, you can turn off the AutoCorrect feature on different versions of MS Word. Keep reading to learn more about switching off this handy feature, and get answers to common questions like changing your AutoCorrect language preference and adding or removing words to the feature.
How to Turn Off AutoCorrect on Microsoft Word on a Windows PC
Here we will focus more on the different Microsoft Word versions rather than the different Windows operating systems. The steps may vary slightly between Windows versions, but the main idea stays the same.
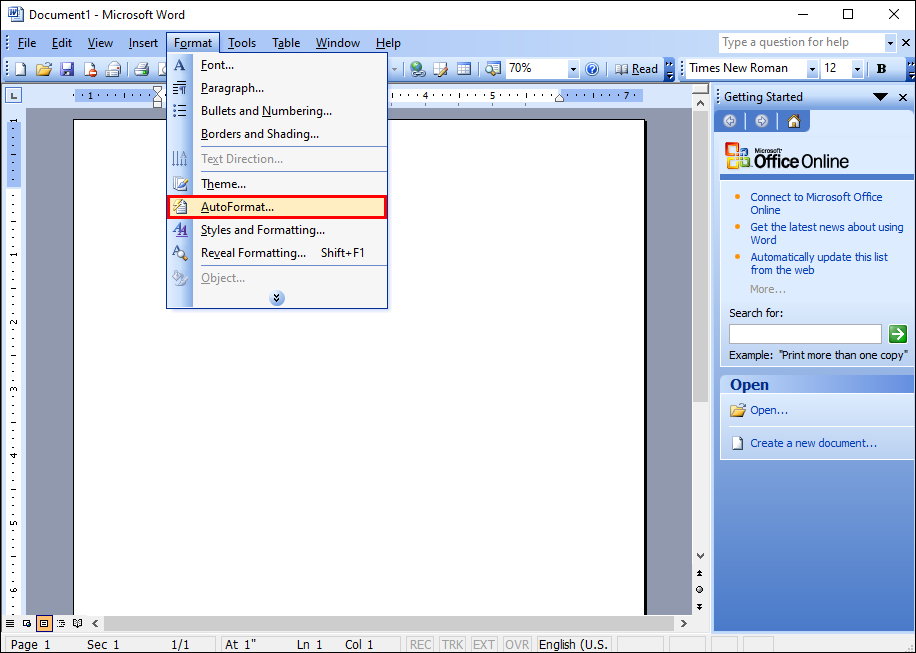
Microsoft Word 2003 and Earlier
- Open “Microsoft Word.”

- Select “AutoFormat” from the “Format” menu.

- Go to the “Options” tab.
- Scroll down and select the “AutoCorrect” option from the drop-down menu.
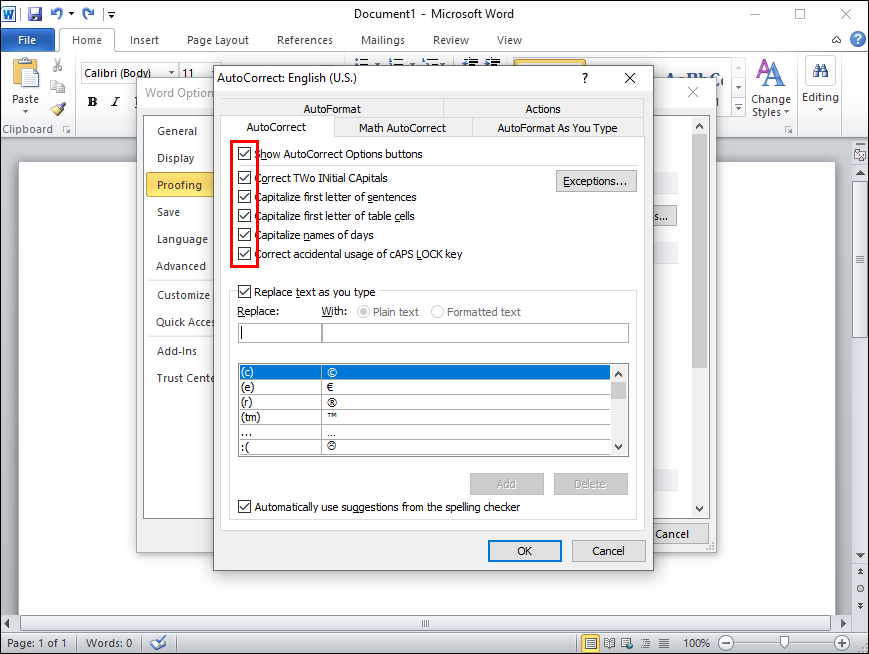
- Tick the “option boxes” to turn on/off different AutoCorrect features or disable them altogether.


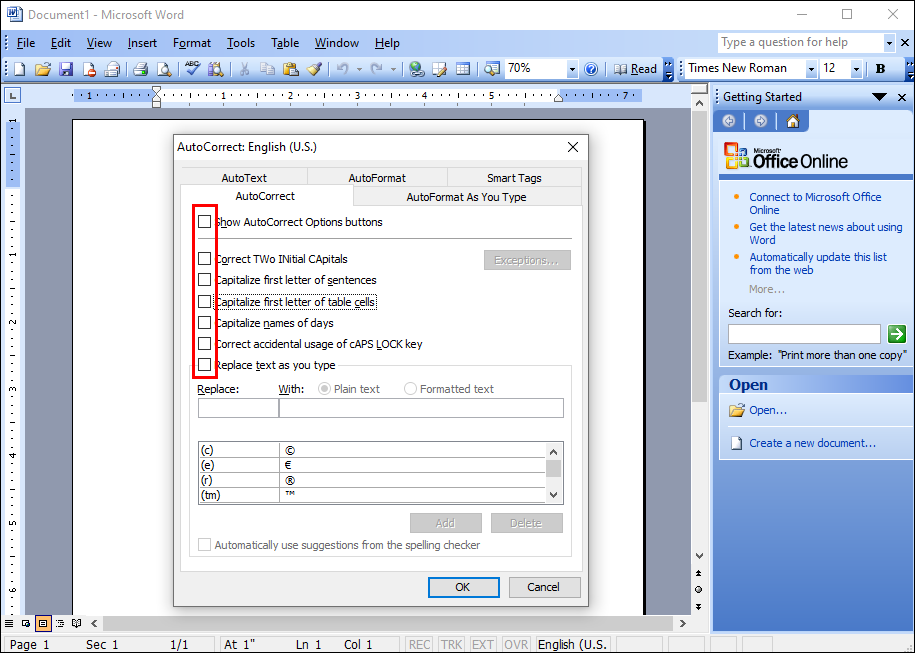
You can also add additional automatic corrections for words you frequently misspell, or remove words you don’t want to get corrected.
Microsoft Word 2007
- Open “Microsoft Word.”
- In the top-left corner, click the “Office” button.
- Select “Options” from the drop-down menu.
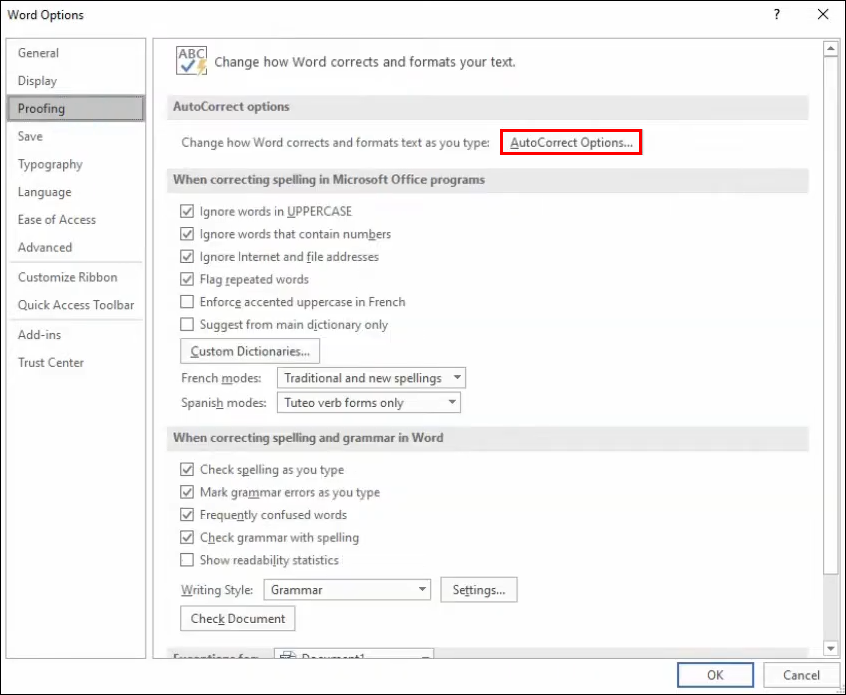
- Click the “Proofing” option in the “Word Options” box.
- Go to the “AutoCorrect options” section and click on the “AutoCorrect Options…” button.
- Check off the “options boxes” (features) you want to turn on/off, then click “OK.”


Here, you also can add additional corrections or remove words that you don’t want to get corrected.
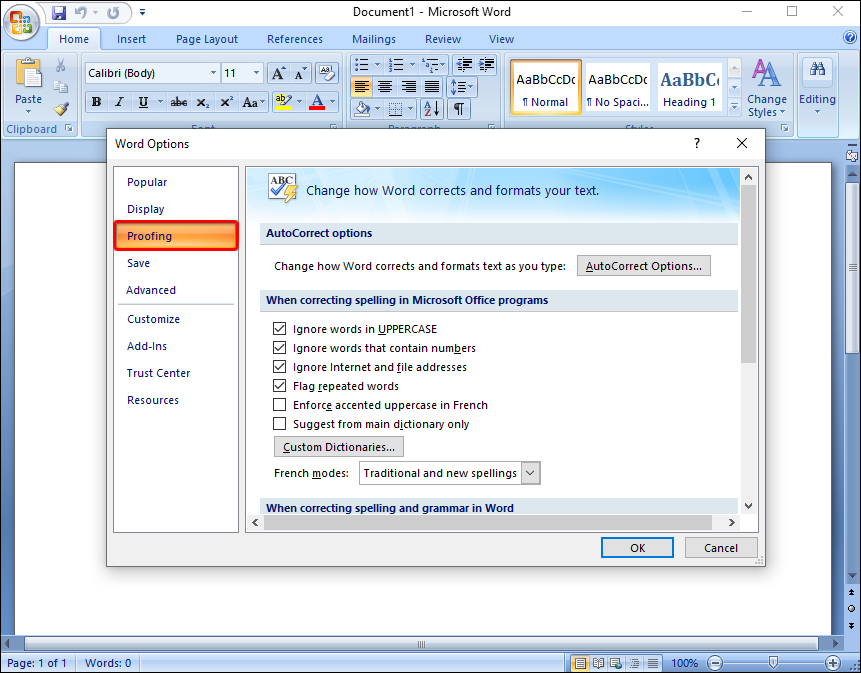
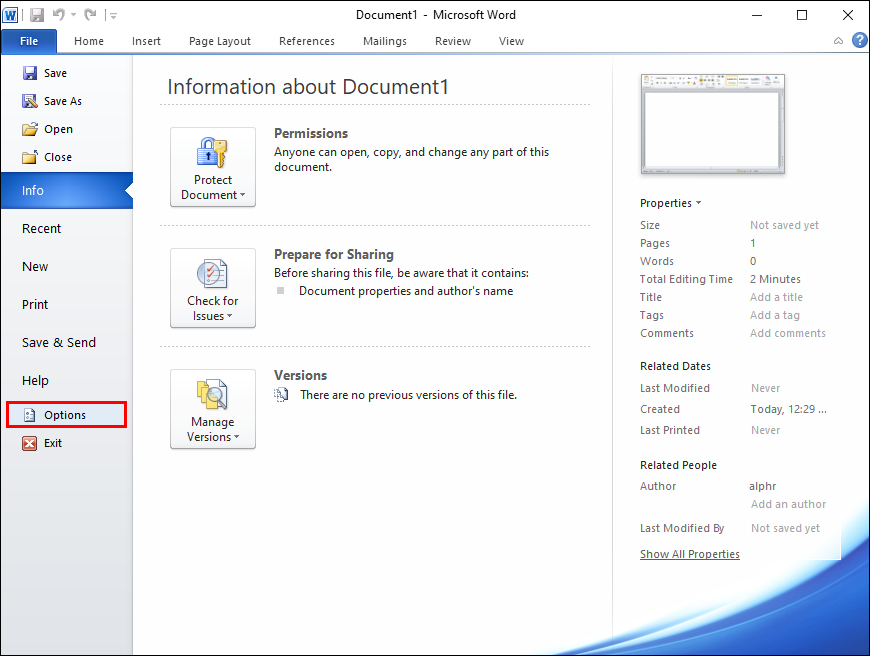
Microsoft Word 2010 and 2013
- Open “Microsoft Word.”
- Select the “File” tab.
- In the left menu window, click on “Options.”
- Click the “Proofing” option in the Word Options menu.
- Select “AutoCorrect Options” on the right side, under the “AutoCorrect options” section.
- Check off the “options boxes” to customize the AutroCorrect feature or disable it altogether.


Microsoft Word 2016 and Later
- Open “Microsoft Word.”
- Click on the “File” tab.
- At the bottom-left, select “Options.”
- Click the “Proofing” option in the “Word Options” menu.
- Select “AutoCorrect Options.”
- Check off the “options boxes” for features you want turned on or turn off a specific feature that you don’t like.


As with the older version of Word, you can add additional automatic corrections or remove words that you don’t want to get corrected.
How to Turn Off AutoCorrect in Microsoft Word on a Mac
The steps for turning off Autocorrect on Microsoft Word when using macOS are similar to Windows, only slightly different depending on your Word version.
Microsoft Word 2003 and Earlier
- Open “Microsoft Word.”
- Then, from the “Format” option, choose “AutoFormat.”
- Select the “Options” tab.
- Go to the “AutoCorrect” tab.
- You can turn off the features you dislike or turn off everything. Check any boxes to enable the feature or uncheck them to turn them off.
You may also add more automatic corrections for words that you commonly misspell. You can also delete ones that you don’t want to have corrected automatically. In the case of the latter, AutoCorrect won’t check words deleted from its dictionary.
Microsoft Word 2007
- Open “Microsoft Word.”
- Click the “Office” button in the top-left corner.
- From the drop-down menu, choose “Options.”
- In the “Word Options” window, select the “Proofing” option.
- From the drop-down menu, choose “AutoCorrect Options.”
- Select the features you wish to disable or enable. Checked boxes enable the feature.
You can also add further adjustments or remove words that you don’t want to get corrected in the same menu.
Microsoft Word 2010 and 2013
- Open “Microsoft Word.”
- From the drop-down menu, choose “File.”
- Click “Options” in the left menu.
- In the “Word Options” tab, click on the “Proofing” option.
- Choose “AutoCorrect Options.”
- Select the features you want to disable, or you can disable AutoCorrect entirely.
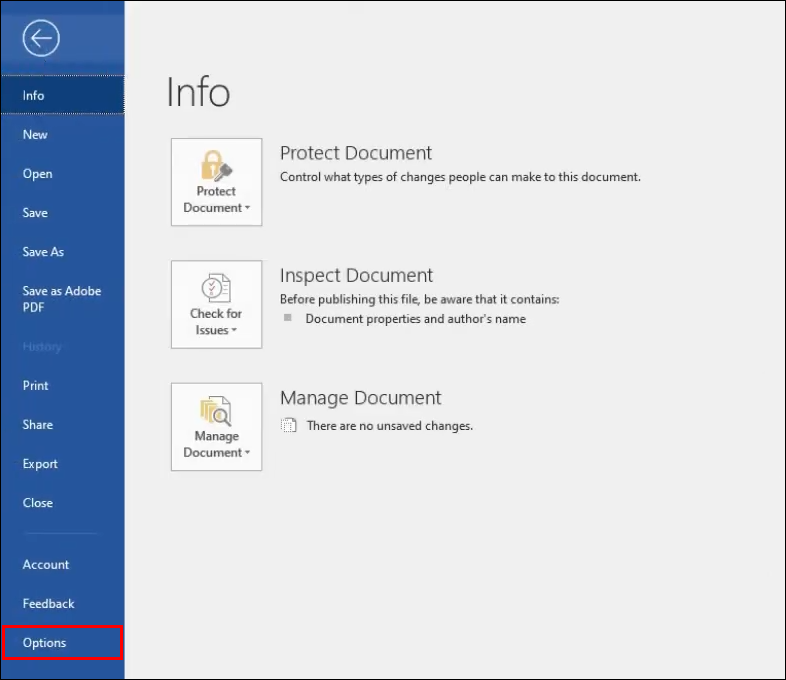
Microsoft Word 2016 and Later
- Launch “Microsoft Word.”
- Select the “File” tab.
- Choose “Options” in the bottom-left corner of the left pane.
- In the “Word Options” window, choose “Proofing.”
- Seloect “AutoCorrect Options.”
- Turn off “AutoCorrect,” or turn off a “specific feature” you don’t like.
As with previous versions, you may add more automated corrections or delete words that you don’t want to get corrected automatically.
In closing, most people use the AutoCorrect features to assist them when writing or examining large files. However, for some people, it might be more of a distraction.
While tools like AutoCorrect are meant to enhance a user’s experience, it’s not without flaws. The feature might struggle with selecting whether to fix spelling or substitute words, resulting in mistakes that must be manually fixed. For those that type HTML, proper nouns, strangely spelled business names, abbreviations, etc., AutoCorrect is best turned off. However, you can tweak the options in AutoCorrect settings to fix common errors without disabling the feature entirely.
Microsoft Word AutoCorrect FAQs
Can I use AutoCorrect with other languages Besides English?
Yes! Many different languages are supported by AutoCorrect. However, keep in mind that you may experience more bugs with some languages. To choose a different language, follow these steps:
1. Go to “Review” and click on “Language” then “Language Preferences.”
2. Go to “Office authoring languages and proofing” and choose the language you want.
3. Click “OK.”
How can I add or remove AutoCorrect entries?
As mentioned before, you can add words or remove words that you don’t want to get corrected automatically.
To add automatic corrections, check out these steps:
1. Click on the AutoCorrect tab.
2. Enter a word or phrase that you frequently misspell in the “Replace” box.
3. Enter the proper spelling of the word in the “With” box.
4. Click on “Add.”
To remove corrections, the steps are:
1. Click on the AutoCorrect tab.
2. Enter the word you want to remove from the list in the “Replace” box.
3. Choose the entry from the list.
4. Press the “Delete” button.
Disclaimer: Some pages on this site may include an affiliate link. This does not effect our editorial in any way.