Ever since its introduction in 2015, Visual Studio Code has soared in popularity as one of the best lightweight programming languages and code editors. With a range of features that support a multitude of different languages, and a vast library of extensions to improve upon the base text-editing functionalities, it’s easy to see why VS Code is a favorite for many programmers and hobbyists alike.
However, some users who have grown accustomed to Integrated Development Environments (IDEs) might have a few problems setting up VS Code to their liking. We’re here to help and to explain how to use VS Code to create and manage new projects.
How to Create a New Project in VS Code
VS Code doesn’t use the usual “File > New Project” dialog method, which IDEs commonly use to start developing new projects. The basic design of VS Code is that of a text editor, which uses your file system to browse for existing files to edit and compile. As such, it is not able to provide adequate scaffolding for new projects on its own.
However, there is a way to make new projects in VS Code. You’ll need to download the appropriate extension from VS Code’s Marketplace. An extension will have a list of its additional features, but you need to locate the one which contains a proper debugger and a scaffolder to suit your specific programming interests. Different programming languages and projects will require separate extensions to provide a full range of functionality, from making projects to debugging the code.
How to Create a New C# Project in VS Code
To make a new C# project (.NET application), you first need the adequate requirements to set up scaffolding for the project, and then use VS Code to make the new folders for it. Here’s what you need to do:
- Download a C# extension and install it on VS Code.

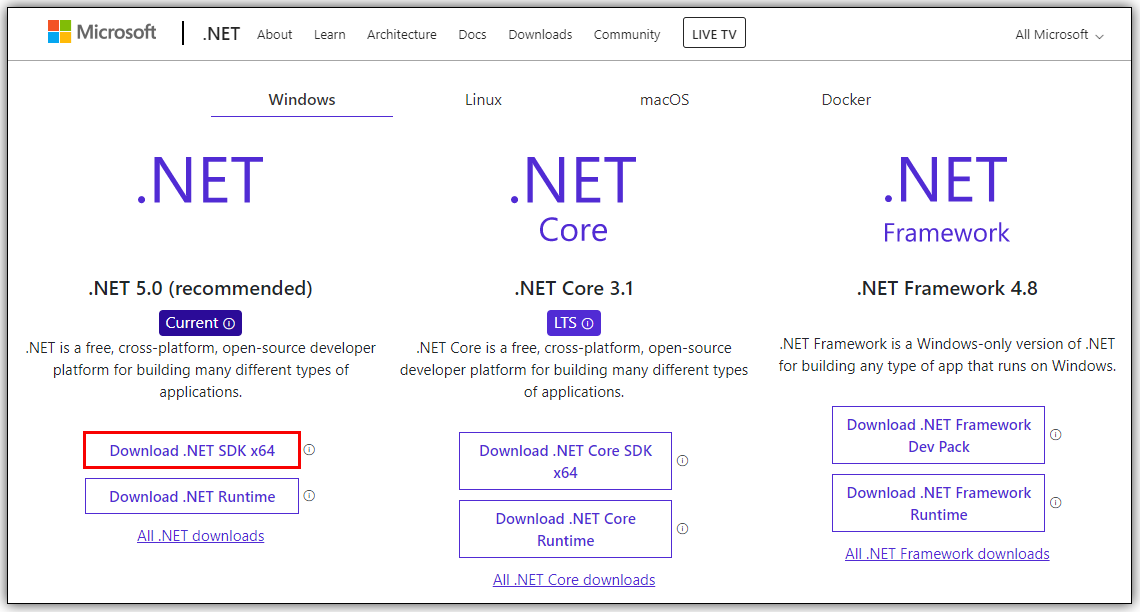
- Download and install a .NET SDK 5.0 or newer. Use the appropriate system when selecting the download file.

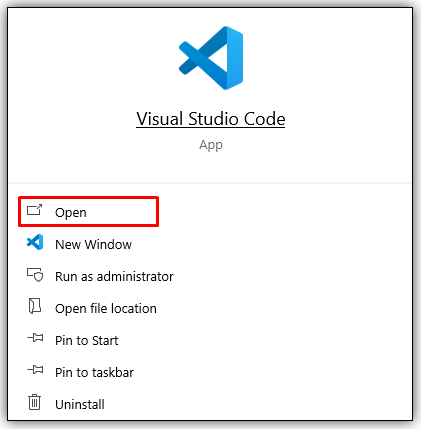
- Start VS Code.
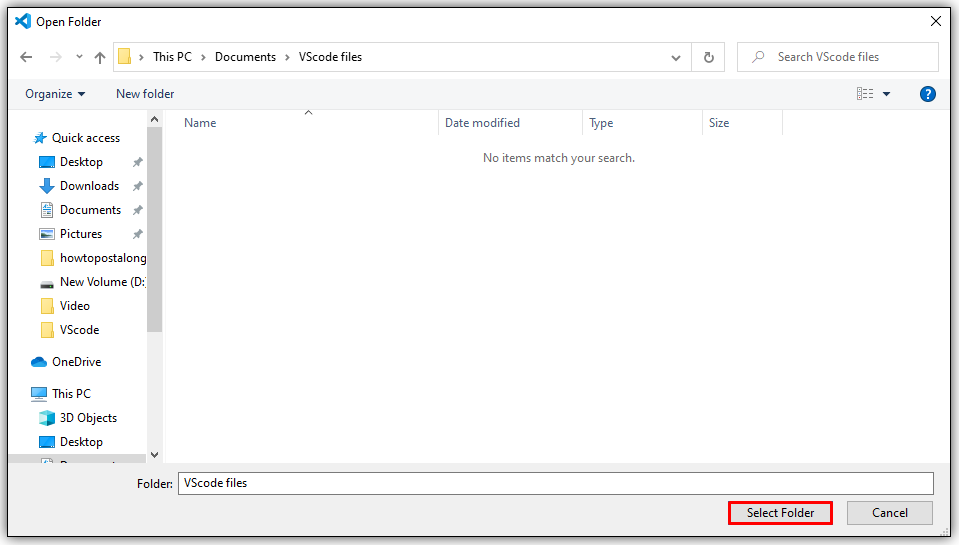
- Select “File > Open Folder” (or “File > Open” in macOS) from VS Code’s main menu.
- In the selection dialog, create a new folder, rename it accordingly, then click “Select Folder” (“Open” on macOS).
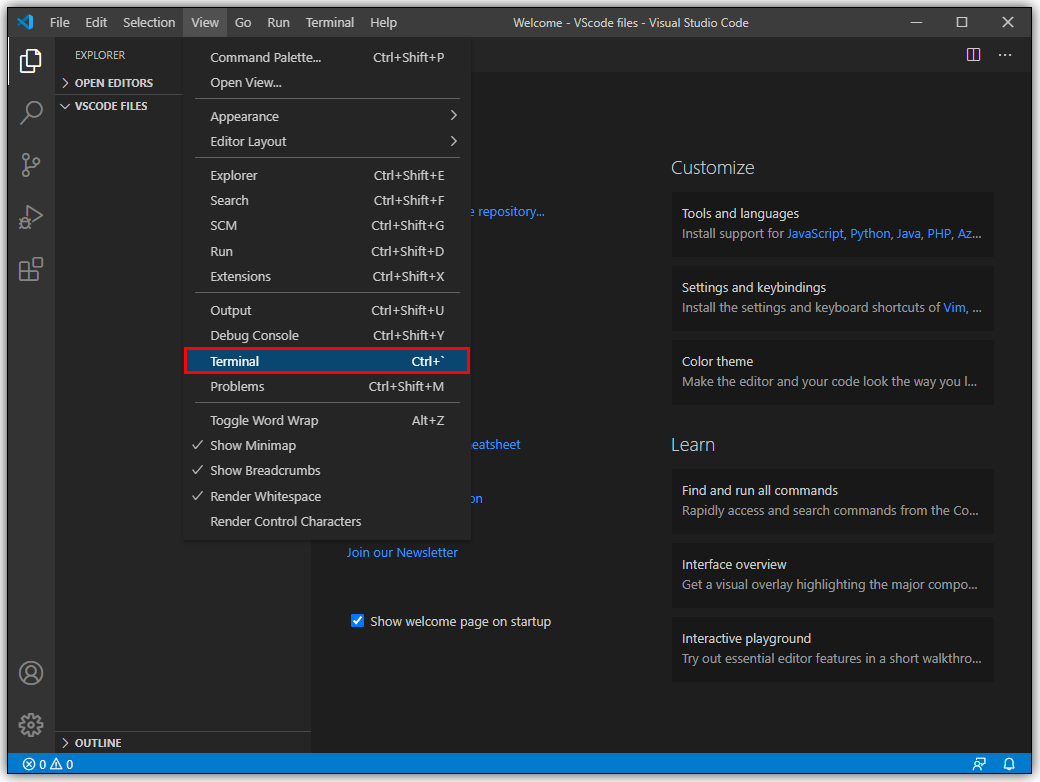
- Open VS Code’s terminal (command prompt) by selecting “View,” then click on “Terminal.”
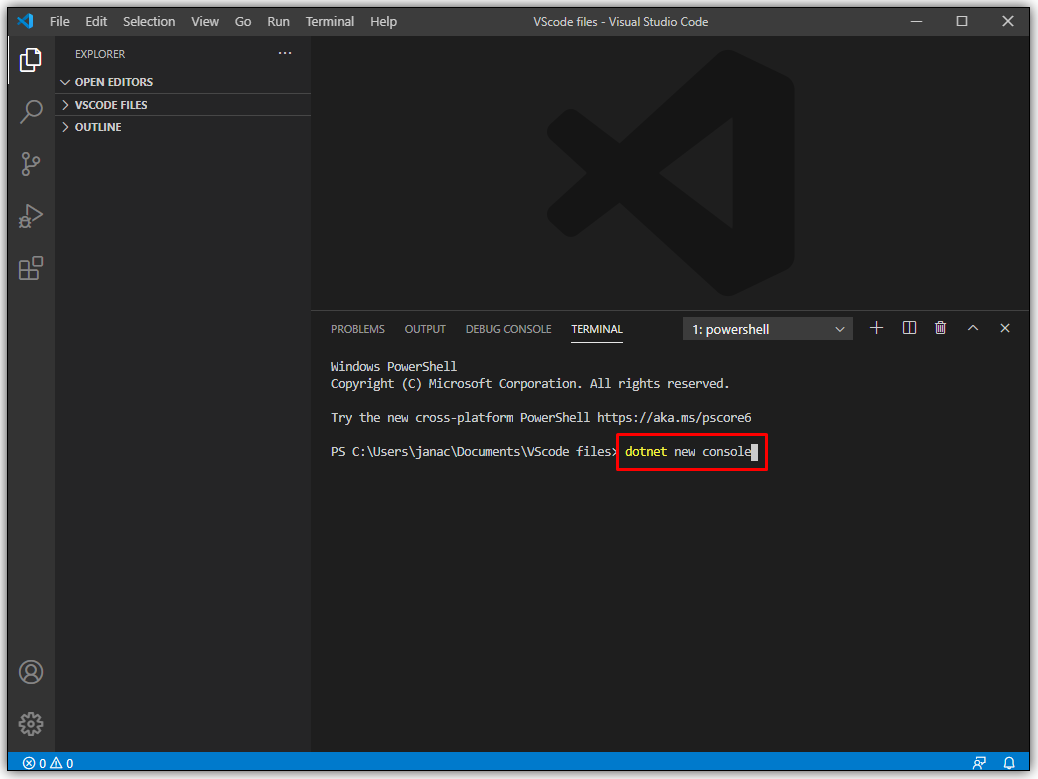
- Enter the following command: “dotnet new console.” This template will create a simple application with the same name as the folder it is in.
- VS Code will open a simple program that uses the namespace of your choosing. You can then go on to add more functionality to your program.
- You need to save changes to VS Code before the program can run. File changes aren’t saved when you start running the program.
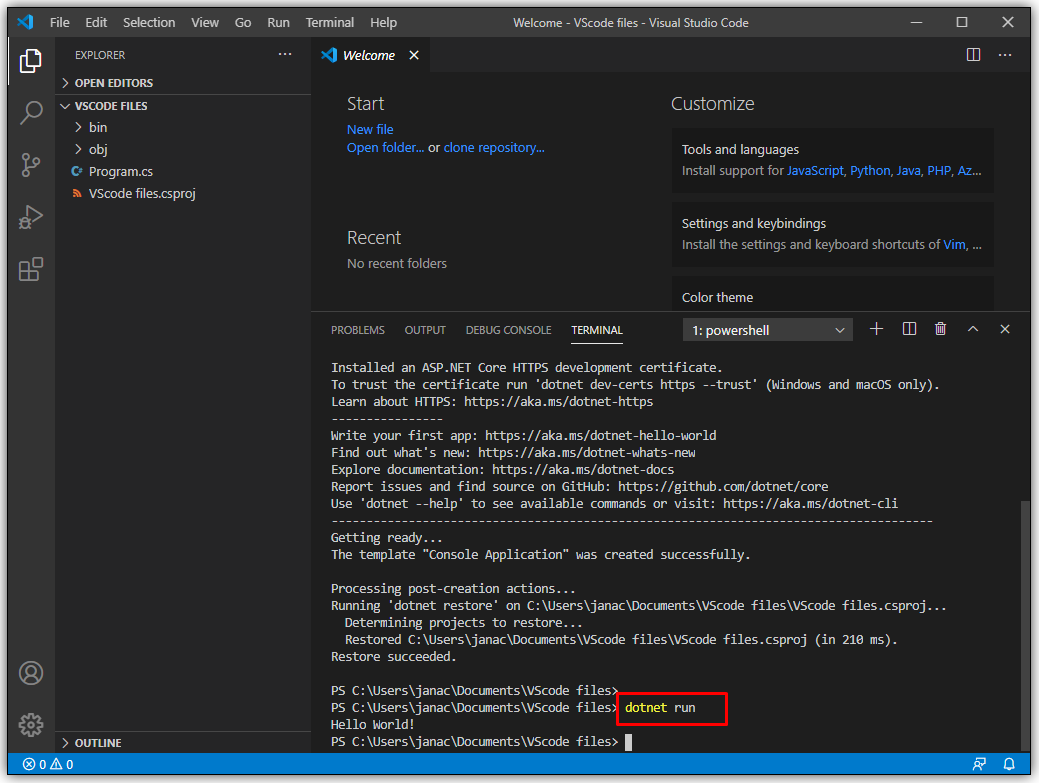
- Use the command line “dotnet run” to run the program after it has been saved.


That’s all there is to it. With a C# extension, you can make new folders and create new projects in them through the command prompt.
How to Create a New C++ Project in VS Code
Similar to C#, VS Code has a dedicated extension for C and C++. Here’s what you need to do to create a new C++ project:
- Install the C++ extension or Code Runner.
- If you have Visual Studio (not VS Code), then you already have a C++ compiler and debugger on your machine. Otherwise, you’ll need a dedicated C++ compiler. A popular example is MinGW for Windows or use macOS’ Clang with an extension.
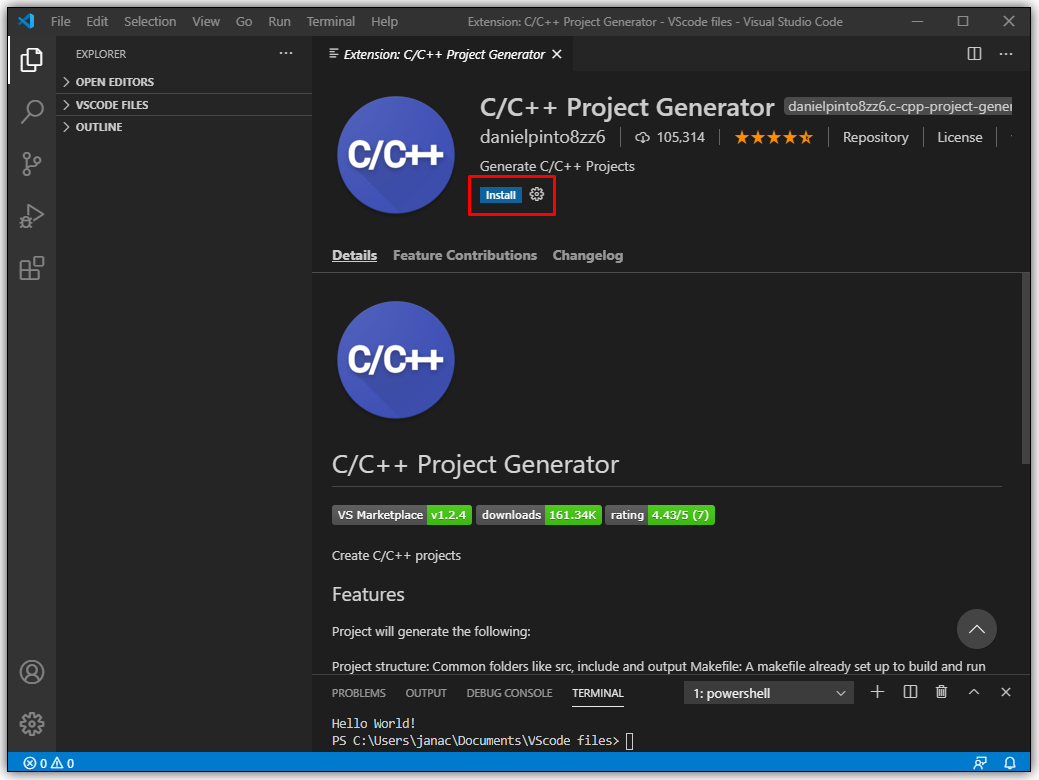
- Download the C++ Project Generator extension. It has specific download requirements depending on your OS, so make sure to download those as well.
- In VS Code, type in “Create C++ Project” in the main prompt. This is a functionality of the Generator extension, which will guide you through the project creation process.
- Use “Open > Folder” to open the newly created C++ project in VS Code.
- Open the main.cpp file in the file map. This is the main application that runs the program.
- The official C++ extension has more functionalities, such as breakpoint debugging, but Code Runner works better and is compatible with a wider array of languages.


How to Create a New Python Project in VS Code
Python is one of the more popular programming languages, and VS Code has extensions that make programming in Python easy. Here’s what you need to do:
- Install the official Python extension.
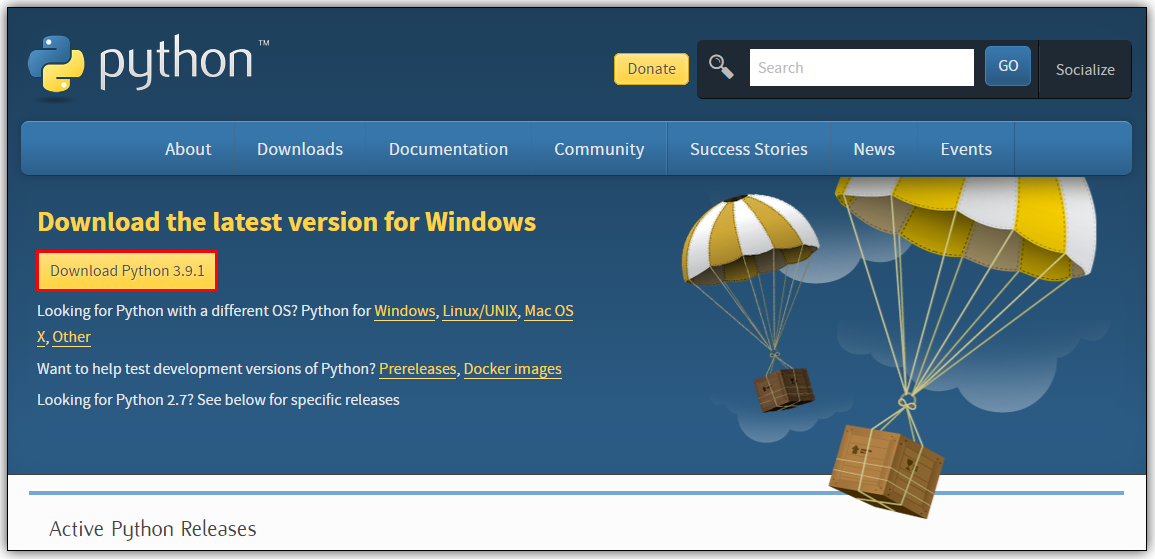
- Use a Python interpreter based on your OS. Windows users should use python.org, macOS users will need to use Homebrew and use the command “brew install python3,” while Linux users already have integrated Python and need only to use get-pip to obtain more functions.
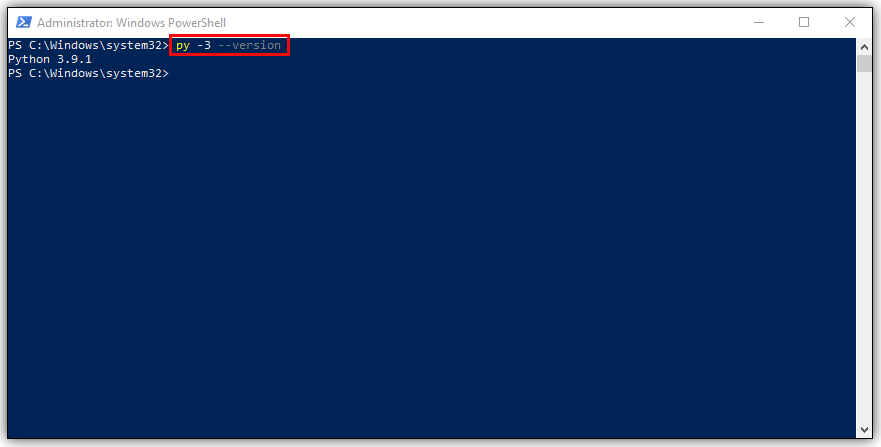
- Use a terminal to determine if Python has been properly installed. The command line “python3 –version” will work on macOS/Linux, while Windows needs the line “py -3 –version” instead.
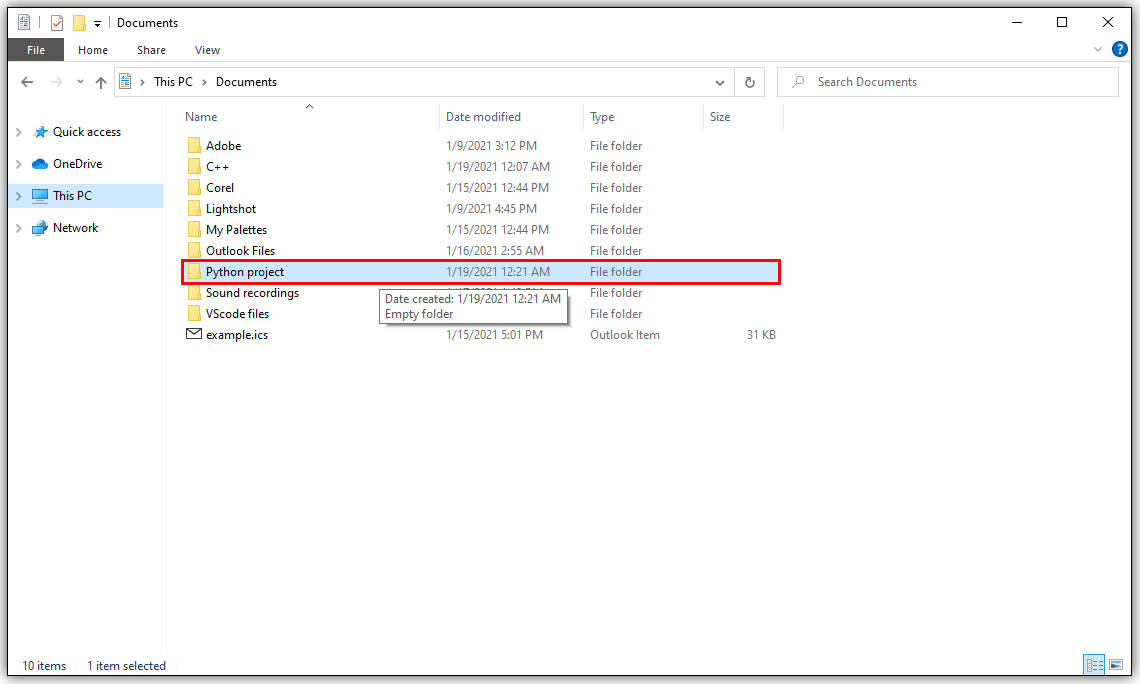
- Create an empty folder with the name of your project.
- Use VS Code to open the folder via “File > Open Folder” from the main menu.
- Configure the Python interpreter via the “Python: Select Interpreter” command in VS Code.
- On the file explorer toolbar (once you’ve opened the folder with VS Code), create a new file (use the “New File” button) with the same name as the folder and an extension “.py” (this will let VS Code know it’s a Python file).
- Edit your source code as needed, and save the result.
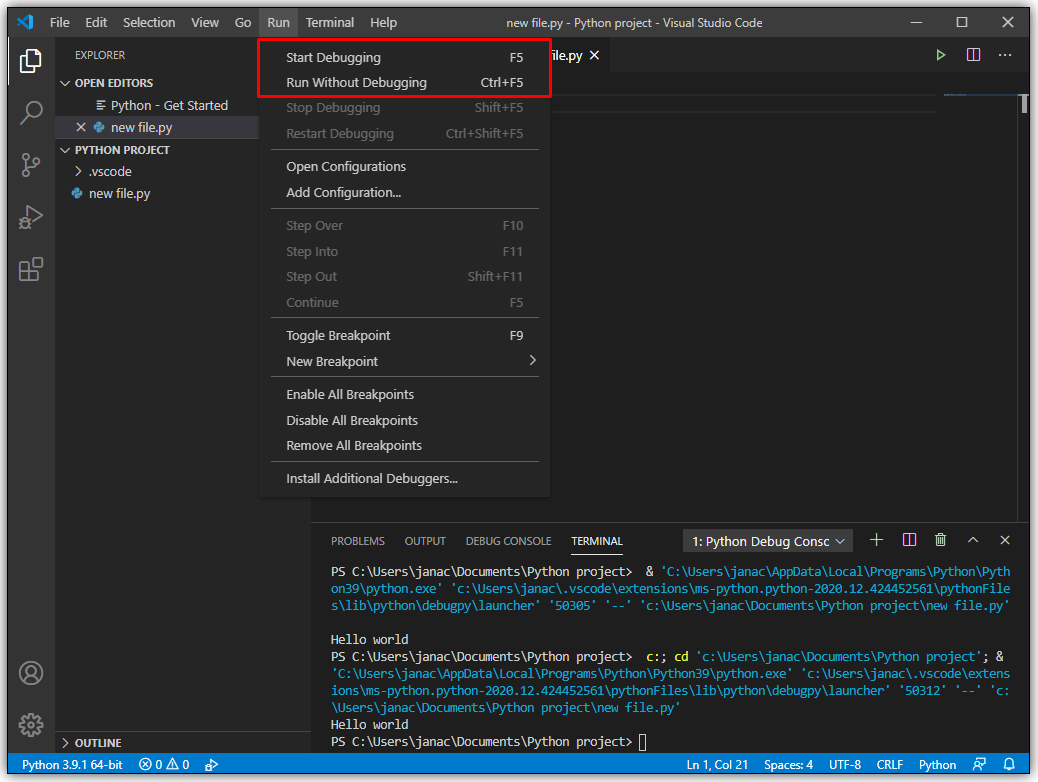
- Use the “Run” command on the top side of the editor to run the program.


How to Create a New Project from Git in VS Code
GitHub is one of the most popular ways to share and work on your code. While it may seem daunting, VS Code allows for a seamless Git integration and easy access to your code. Follow these steps:
- Download the Python extension.
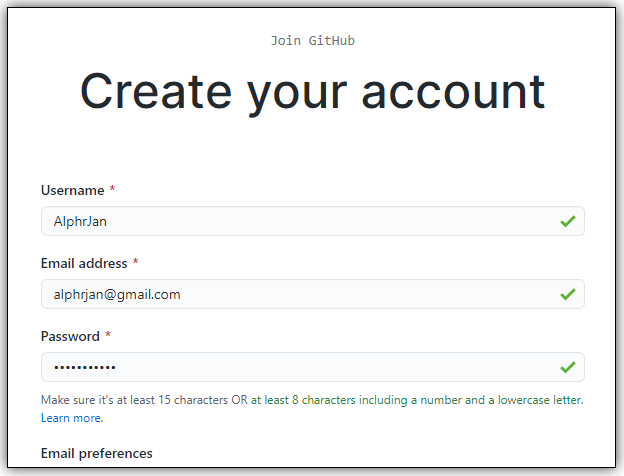
- Make a new account or log into GitHub.
- Install Git on your device.
- Open VS Code.
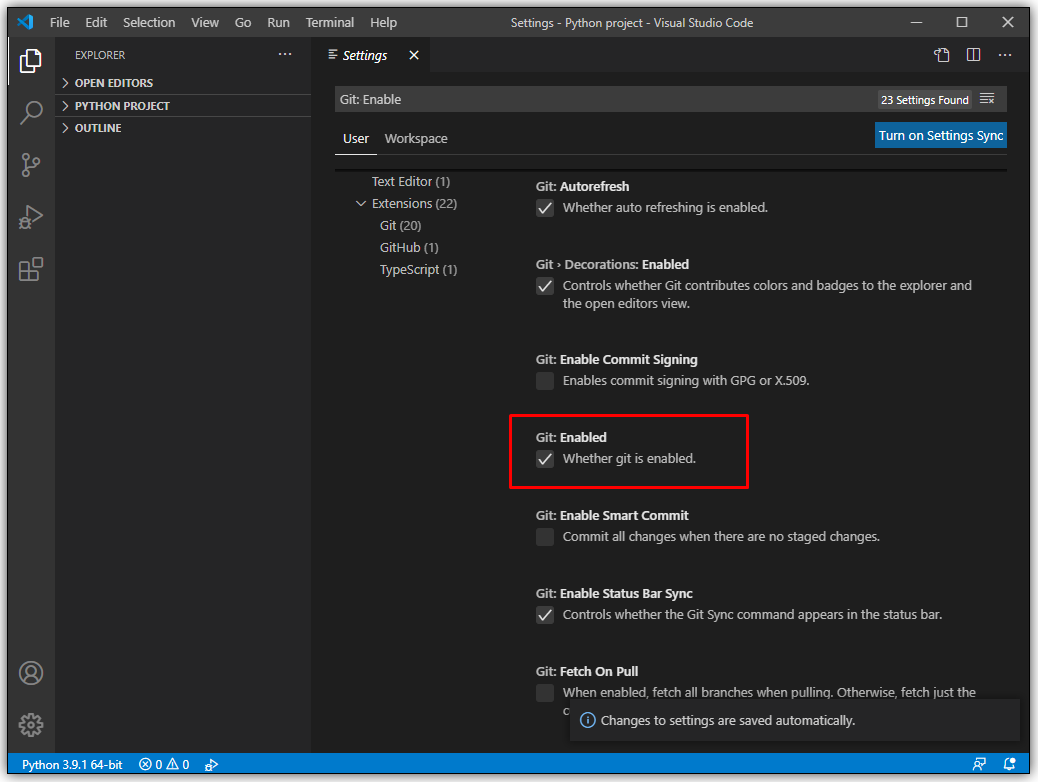
- Go to “File,” then “Settings.”
- Type “Git: Enabled” in the search bar.
- Check the box to ensure Git is integrated with VS Code.
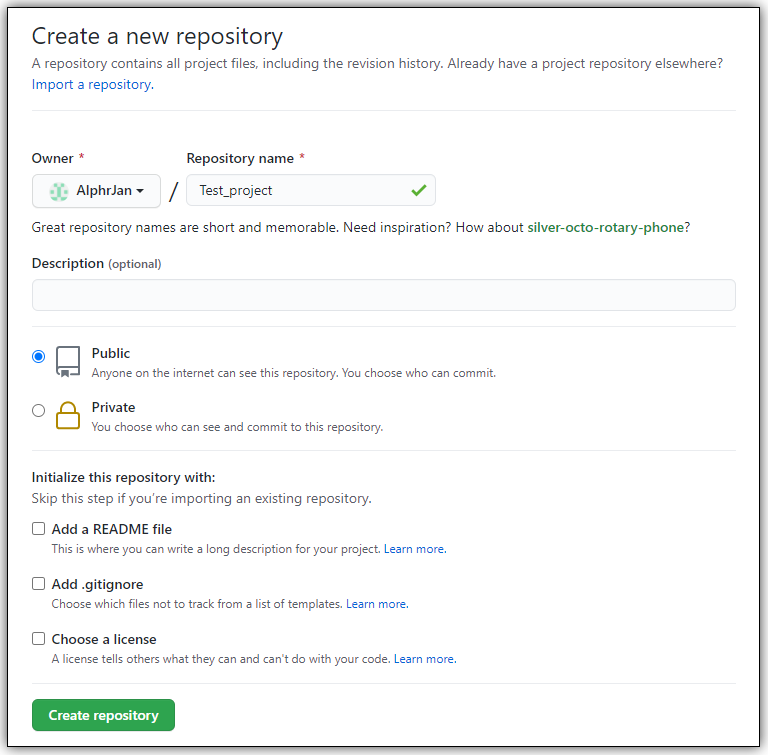
- Create a new repository on GitHub.
- Copy the URL of your repository.
- In VS Code, open the terminal (Ctrl+Shift+P) and type in “Git: Clone <url>” where <url> is the depository URL you just copied.
- You’ll get a confirmation prompt to clone the Git onto VS Code.
- Click on “Open” when prompted to open the new folder, or use the “File > Open Folder” dialog.
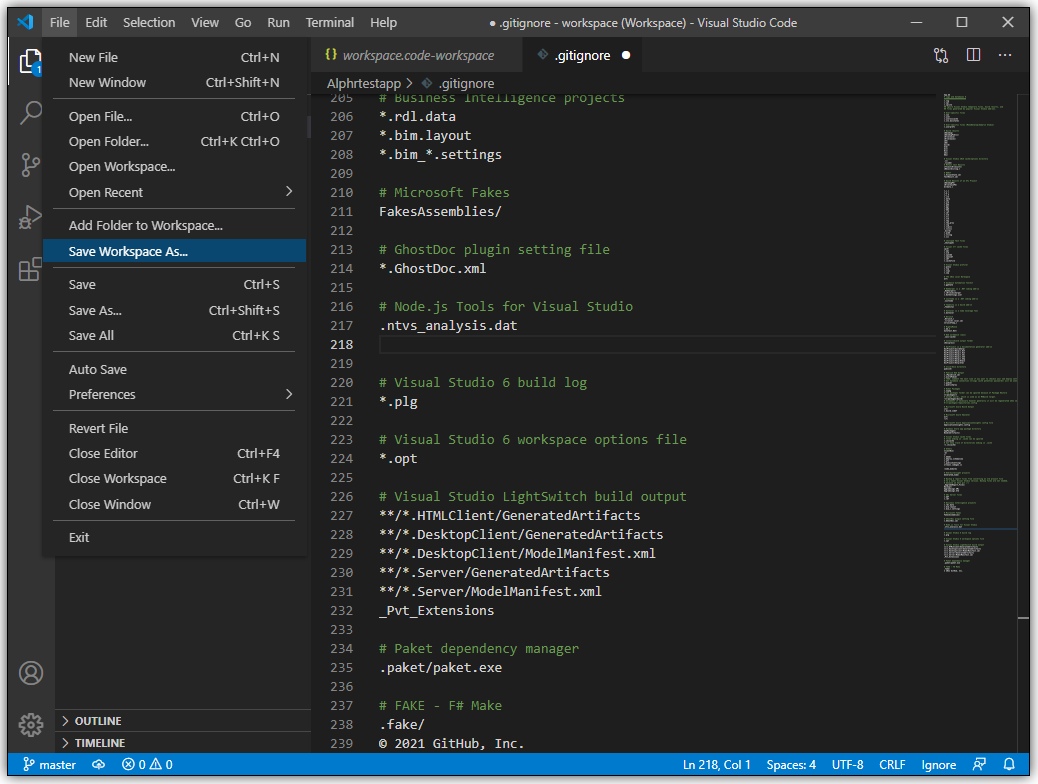
- Set up a .gitignore file in the project. Use a “New File” button on the file manager, then type in all file names that you don’t want to commit to GitHub (for security reasons, for example).
- Save the changes.
- Go to File, then “Save workspace as” to save the project in its folder as a workspace for easier access in the future.
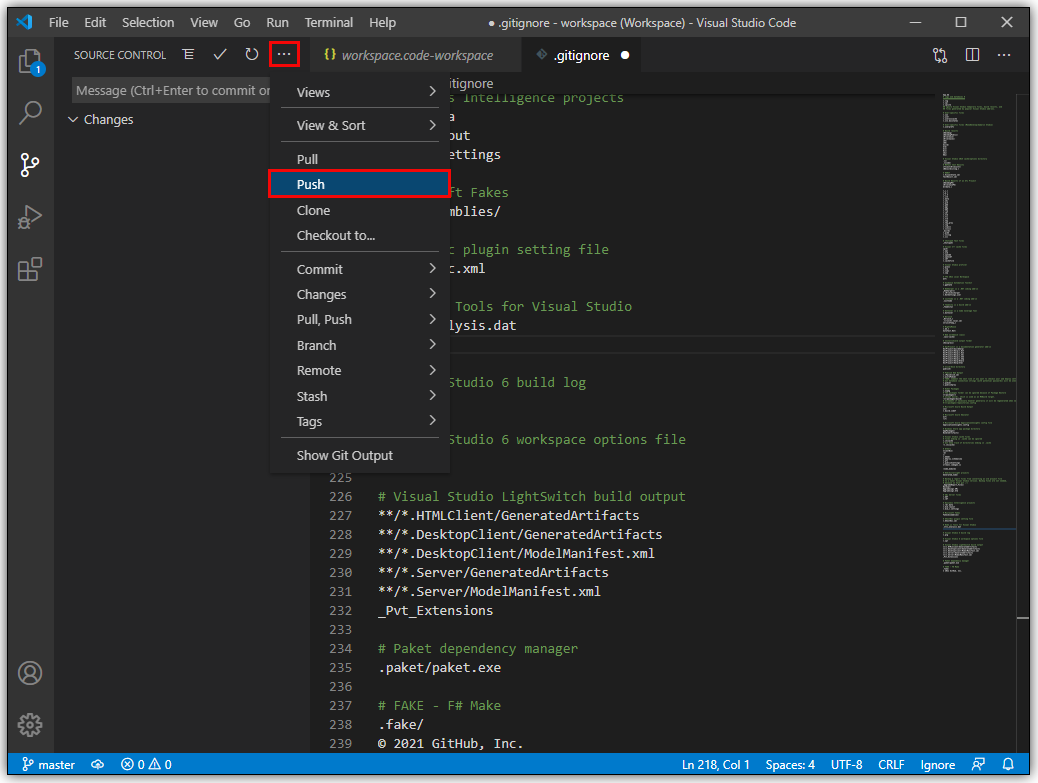
- To commit your VS Code folder to GitHub, use the Checkmark icon to commit your changes to the master branch. You can put a comment to let users know of the differences between the previous and current commit versions.
- Select the three dots icon in the corner of the Control Panel, then select “Push” to push the changes to GitHub.


You are now ready to start coding in VS Code and commit changes to GitHub.
Additional FAQ
How Do I Open Visual Studio Code?
VS Code is a lightweight application that uses about 200MB of memory when installed. Once you’ve installed VS Code from Microsoft’s website and followed all the installation instructions, open the application by double-clicking the resulting icon or shortcut.
Is VS Code an IDE?
Visual Studio Code is not classified as an IDE due to a lack of a dedicated debugger and compiler for a specific programming language. Visual Studio, on the other hand, is an IDE that supports a vast range of languages but is much more robust. Visual Studio Code is aptly referenced as a text editor. Although VS Code can gain capabilities through extensions, it can’t be considered a true IDE by these standards.
How Do I Create a New Branch in VS Code?
To create a new branch for Git projects, follow these steps:
• Click on the branch icon in the bottom left corner.
• Once the new branch is made, you need to save it.
• Switch over to the control window (Ctrl+Shift+G).
• Click on the ellipsis icon and press “Publish Branch.”
• This will publish the newly created branch on GitHub.
Make Projects Easy with VS Code
Visual Studio Code is one of the simplest solutions for reading and editing code in various programming languages. While it lacks the robust features of IDEs, its range of functions provided through extensions allows you to create and manage new projects quickly. With an intuitive UI and a lightweight design, it truly shines as one of the most popular text editors for programmers everywhere.
What projects are you doing in VS Code? Do you need a full IDE to finish your work? Let us know in the comments section below.
Disclaimer: Some pages on this site may include an affiliate link. This does not effect our editorial in any way.


