A DNS resolver cache is a temporary database on your computer’s OS, containing records of all of your recent and attempted visits to various sites and domains. In other words, it’s a storage area that acts as a quick reference guide for how your computer loads up the websites you’ve visited.
When visiting a website via domain name, like say, for instance, techjunkie.com, your browser doesn’t actually head there first. Instead, it will be directed to a DNS server where it learns and retains the IP address for the site, and afterward will direct you to the site itself. The reason it does this is to gather the information necessary to make your next visit much faster. Of course, if something goes wrong with the data for your DNS server, it can be worth flushing your DNS in order to speed up Windows 10 and make your daily web surfing that much faster. Let’s take a look at how to flush out your DNS.
Why Do We Need a DNS?
You can think of the DNS resolver cache as something like a phone book. It catalogs the numbers (IP addresses) for every public website so that we don’t have to remember them all. The DNS or Domain Name System, allows us to search the internet with actual website names instead of typing in the IP address every time we want to visit a specific site. This is a godsend for most people as they would likely go insane if they were forced to type in IP address 69.63.181.15 or 69.63.187.19 whenever wishing to visit Facebook.

How Does It All Work?
After you type in a URL, your browser will request the IP address from your router. If the router has a DNS server address stored, it will ask the DNS server for the IP address of that hostname. The DNS will then search and retrieve the IP address that belongs to the URL you’re attempting to reach. Once found, your browser can then load the appropriate page requested.
Every website you want to visit goes through the same process. If a website is not converted into an IP address for you to reach, then a page cannot be loaded. The DNS cache is where all the IP addresses are stored on your OS which attempts to expedite the process by resolving the name to IP conversion issue before ever needing to send out a request.
Can I View the Data in the DNS Resolver Cache?
In order to see the contents of a local DNS cache on Windows, you’ll need to get into “Command Prompt.” To view your DNS data, follow the steps below for your version of Windows.
Windows Vista, 7, and 8
- Click Start (the icon in the lower left of the screen) and select Run. Type in “Command” or “cmd” into the box. Start from step two below.

Windows 10
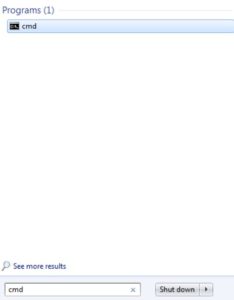
- Type “Command” into the search box on your taskbar.
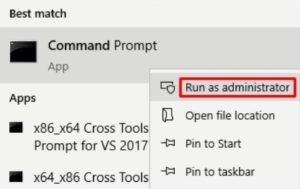
- Right-click the icon for Command Prompt and select Run as administrator.
- Once the Command Prompt window opens, type in “ipconfig /displaydns” and press Enter.

If done correctly, each cached domain should look something like this:
www.youtube.com
—————————————-
Record Name . . . . . : www.youtube.com
Record Type . . . . . : 5
Time To Live . . . . : 35
Data Length . . . . . : 8
Section . . . . . . . : Answer
CNAME Record . . . . : youtube-ui.l.google.com
Record Name . . . . . : youtube-ui.l.google.com
Record Type . . . . . : 1
Time To Live . . . . : 35
Data Length . . . . . : 4
Section . . . . . . . : Answer
A (Host) Record . . . : 216.58.199.14
The A (Host) Record is what contains the IP address for the given hostname. The information being displayed of the host DNS entry are the IP address (216.58.199.14), the requested website name (www.youtube.com), and a few other parameters. The local DNS cache will house all of this information for further use until a need for a DNS flush arises.

Why and How do I Flush the Windows DNS?
If an unauthorized domain name or IP address manages to infiltrate it, the DNS cache can become “poisoned” and cause client requests to become redirected to incorrect destinations. On occasion, this corruption can be the result of administrative mishaps or technical glitches. However, it is often associated with computer viruses or other forms of network attacks that may lead you to malicious or advertisement heavy websites resulting in potential phishing and malware complications. This is typically a major issue for larger, more popular websites.
So how do we resolve the issues that DNS cache poisoning or other internet connectivity problems bring about? We flush the DNS.
Clearing the DNS cache will remove all saved entries and in doing so, delete any unauthorized records from your OS. This will force your computer to repopulate the cache by once again accumulating IP addresses from future, visited sites.
To flush your DNS, head back into the Command Prompt, then follow the steps below for your version of Windows.
Windows Vista, 7, and 8
- Again, click Start, select Run, and then type in “Command” or “cmd” into the box. Start from step two below.
Windows 10
- Type “Command” into the search box on your taskbar.
- Right-click the icon for Command Prompt and select Run as administrator.
- Once the Command Prompt window is open, type in “ipconfig /flushdns” and press Enter.
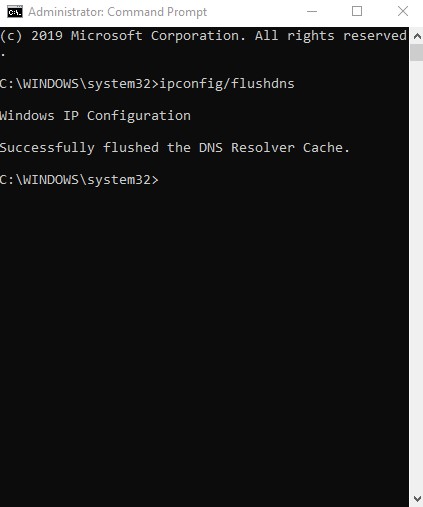
You should see:
Windows IP Configuration
Successfully flushed the DNS resolver cache.
This will indicate that the flush was a success and you can then type in “ipconfig /displaydns” to double check or simply exit the Command Prompt window.
***
With that, your DNS has been flushed and your browsing speeds should be back up to speed. Have any questions about DNS? Sound off in the comments below!
Disclaimer: Some pages on this site may include an affiliate link. This does not effect our editorial in any way.