The Windows key is the most versatile button on the keyboard. When used with other keys, it calls up shortcuts that make getting things done quick and easy.
While its versatility makes it worthwhile, it also wreaks havoc when the key doesn’t function. Unfortunately, there are several reasons the Windows key will stop working. This guide will walk you through a few methods to restore it to its working capacity.
Windows Key Not Working in Game
Gamers often make use of dedicated keys when playing a game on the computer. Of course, some games don’t require the use of the Windows key, in which case, whether or not it works is irrelevant.
However, if your game involves using the Windows key and it doesn’t function, this can cause frustration and hinder your ability to play the game well. Here are a few ways to fix an inactive Windows key:
Method One: Deactivate Gaming Mode
Windows has a unique feature called “Gaming Mode” that allows players to disable specific keys on the keyboard that they don’t want to press while playing a game. One of the keys that are deactivated while in Gaming Mode is the Windows key.
Activating and deactivating this mode often happens when you clean your keyboard. So here is how to go about getting your Windows key to work again:
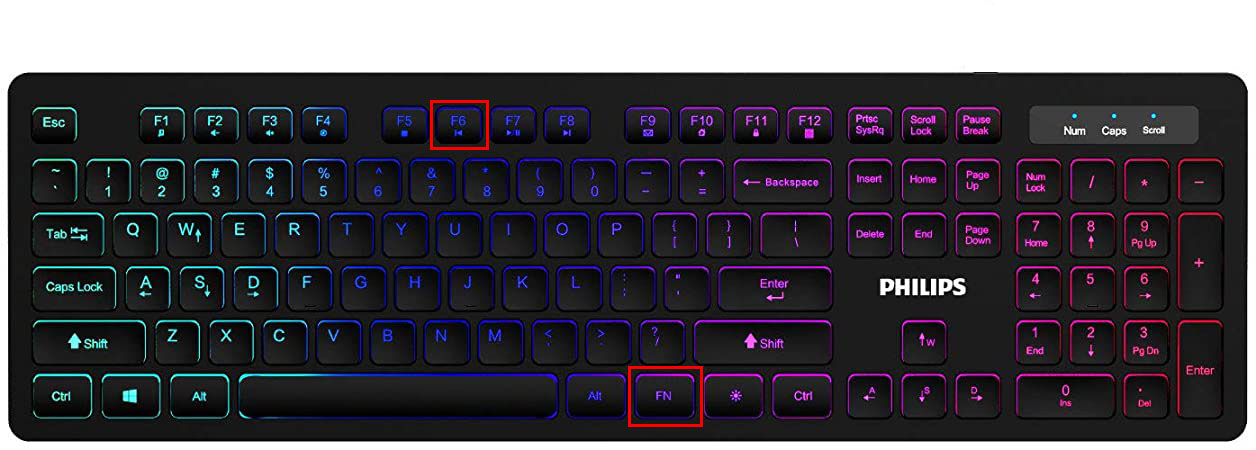
- Locate the “Fn” key on your keyboard.

- Find the “F6” key on your keyboard.

- Now gently press both these keys together at the same time. Doing this should activate or deactivate the Windows key.

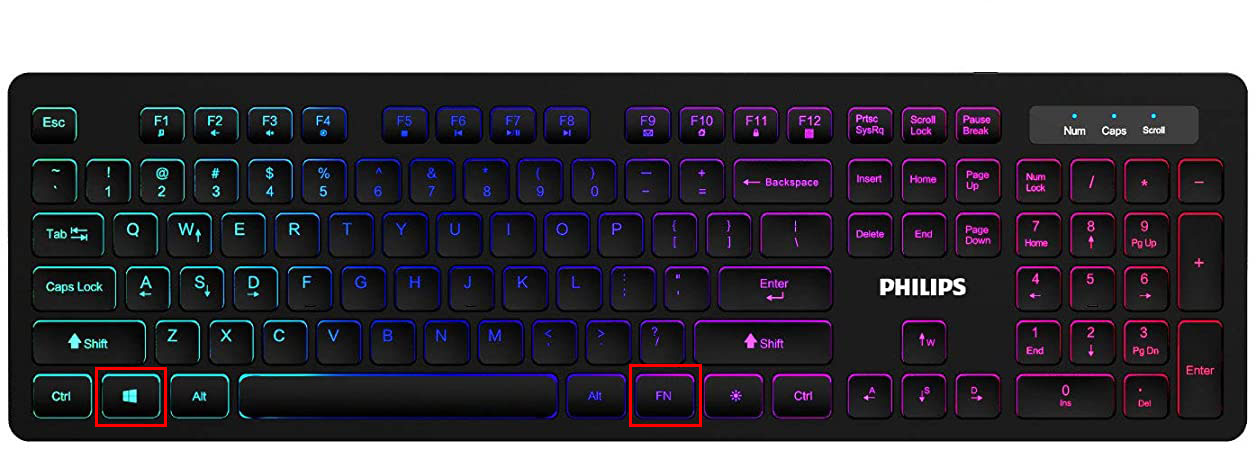
If this doesn’t work for your particular keyboard, you can try the following:
- Locate the “Fn” key and the “Windows” key.
- Now press these two keys simultaneously. Doing this should now activate your Windows button.
Method Two: Pressing Win Lock
Most gaming keyboards will feature a Win Lock Key. This button activates or deactivates the Windows key. Trying this method is quick and straightforward and takes just one step:
- Locate the “Win Lock” key and press it. That’s it!
Your Windows key, if it was deactivated, should now work.
Method Three: Change Your Registry Settings
If activating your Windows button with combination keys isn’t working, you may need to change the Registry Settings. The Registry allows but also restricts a lot of elements, including menus and keyboard keys. To enable your Windows key using this method, you will need to:
- Navigate to your “Start” icon and click on it.
- Then type “Run”. When the option comes up in the menu, click “Run.”
- A pop-up box will open with space for you to type. In that space, key in ‘regedt32’, and then click “Ok.” If a EULA message appears asking for confirmation, choose “Yes.”
- A Windows menu will then open. Look for “HKEY_LOCAL_ MACHINE” on “Local Machine” and click it.
- Scroll to find the “System\CurrentControlSet\Control” folder and double-click on it.
- Next, click the “Keyboard Layout” folder.
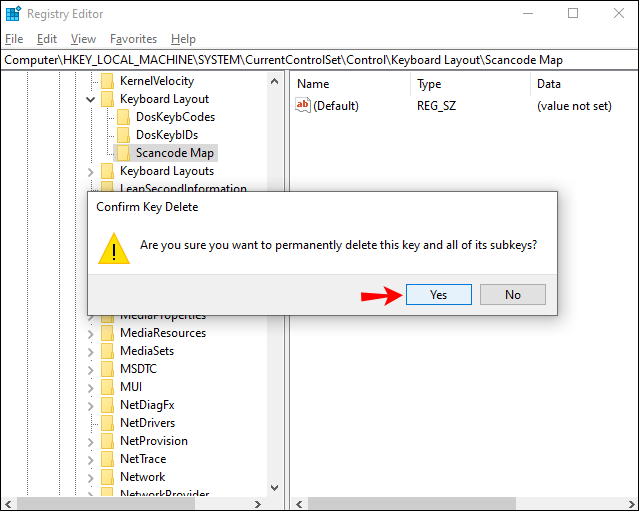
- Locate the “Scancode Map” registry entry and right-click on it. From the drop-down menu that comes up, choose “Delete.”
- A warning or confirmation message will then come up. Choose “Yes,” and the warning box will close.
- Now, close the Registry Editor and restart your computer.


This process should now activate the Windows key. If it doesn’t help, you can always try the following method.
Method Four: Restart Windows or File Explorer
Explorer controls your Windows user interface, so restarting it will help clear any errors or glitches preventing it from properly starting up. Here are the steps to follow to go about this method:
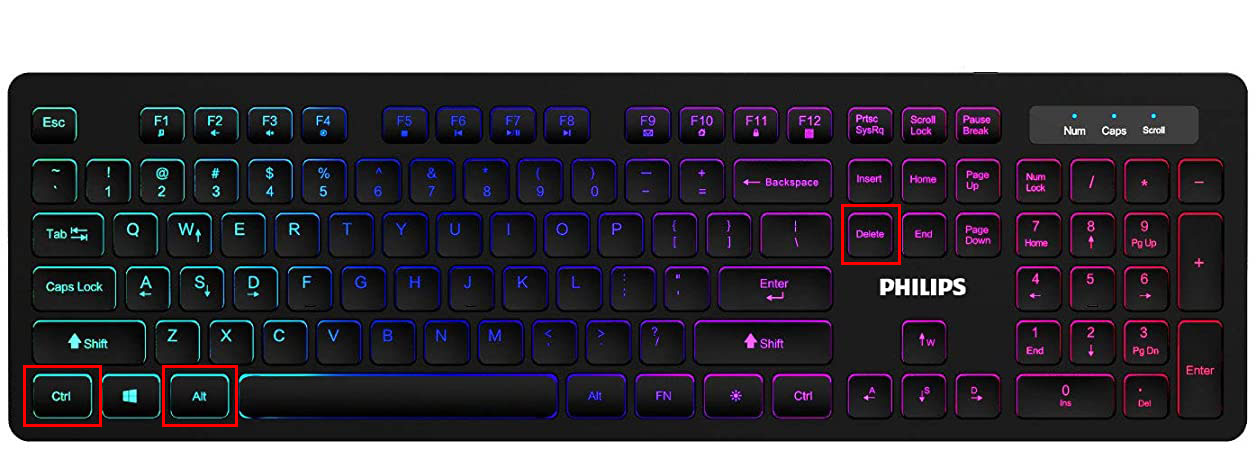
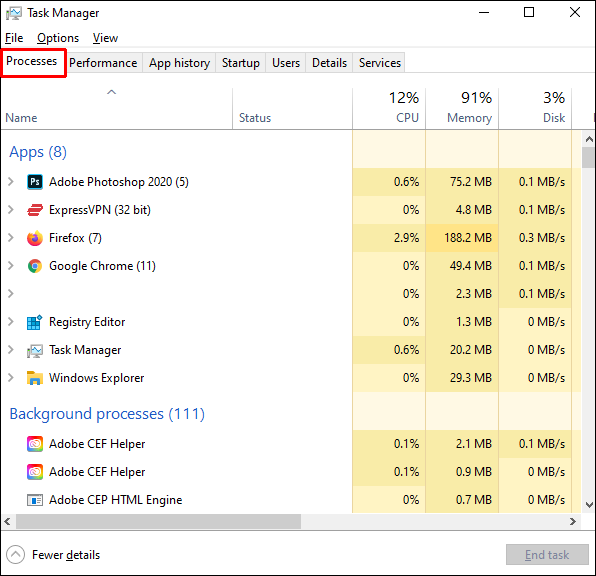
- Press the “Ctrl” + “Alt” + “Delete” keys simultaneously.
- A window will open with a few options. From this menu, select “Task Manager.”
- When the “Task Manager” window opens, navigate to the “Processes” tab and click on it.
- When this tab opens, scroll down until you find the “Windows Explorer” option. Right-click on this option. From the drop-down menu that pops up, choose “End Task.”
- Next, navigate to the top of the window and click on “File.” From the options that pop up, select “Run New Task.”
- A “Create New Task” window will open. In the bar, type ‘explorer.exe’ and then hit “Enter.”


Windows Key Not Working – Razer
Not all keyboards use the same keys to enable or disable the Windows key. The Razer keyboard offers dual functionality and is ideal for gaming and typing.
The following steps will show you how to activate the Windows key on your Razer keyboard:
Full-Sized and Tenkeyless Keyboards:
- Locate the “Fn” and “F10” keys.
- Press these keys at the same time.
- Your Windows key should now work again.

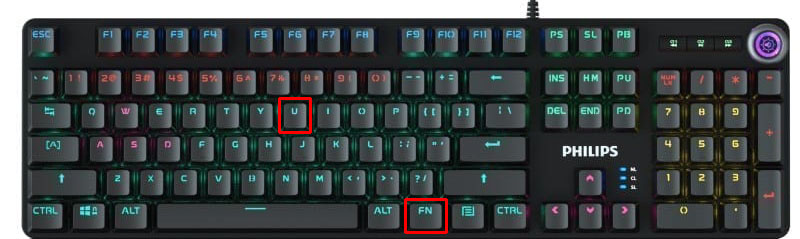
Mini or 60% and 65% Smaller Keyboards:
- Find the “Fn” and the letter “U” keys.
- Press these keys down simultaneously to reactivate your Windows key function.
Windows Key Not Working – RK61
The Royal Kludge 61 or RK61 keyboard is smaller than most other keyboards available, although it’s still in the 60% keyboard category. For this reason, you will need to use the Fn key combinations to perform tasks that most other keyboards have a dedicated button for.
To activate the Windows key, you will need to do the following:
- Find both the “Fn” key and the “Lock” key.
- Press these keys down together at the same time to enable the Windows key to start working again.
- If you wish to deactivate the Windows key, you can press these two keys down at the same time again.
Windows Key Not Working – Varmilo
Varmilo wireless mechanical keyboards are produced in Norway and, as a result, use a slightly different set of combination keys to enable and disable keyboard functions. It is understandable then that knowing how to activate the Windows key isn’t common knowledge. Nevertheless, here is how you go about getting the Windows key to work as it should on a Varmilo keyboard:
- Take a look at your Varmilo keyboard and find both the “Fn” and “Windows” keys.
- Press both these keys at the same time.
- This action should toggle the Windows key to turn it on.
- Repeating this action will toggle the Windows key off again.
Windows Key Not Working – SteelSeries
SteelSeries is a contemporary computing brand that specializes mainly in gaming tech. The SteelSeries keyboards are particularly popular amongst gamers, making it understandable why it comes with a function dedicated to placing the keyboard in Gaming Mode. To take your SteelSeries keyboard out of this mode and make the Windows key functional, you will need to complete these steps:
- Locate the dedicated “SteelSeries” key.
- Once you have found this key, look for the “Windows” key.
- Hold down the “SteelSeries” key.
- While holding this key down, tap the “Windows” key.
- Completing this process will enable the Windows key.
- Repeating these steps will disable the Windows key.
Windows Key Not Working – Mac
Apple Macs run off an entirely different operating system and don’t use Windows but instead use macOS. Because these computers don’t use Windows, there is no need for a Windows key. The Mac equivalent of a Windows key is the Command key.
The Command key on a Mac computer cannot be enabled or disabled; however, sometimes, the key is remapped and will need to be reset to work correctly. These are the steps to follow:
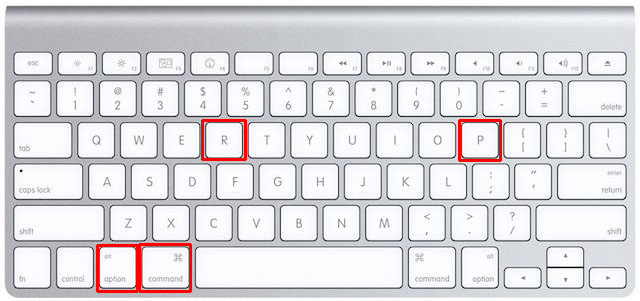
- Shut down your Mac.
- As soon as the computer restarts, press the “Option,” “Command,” “P,” and “R” keys simultaneously.
- Hold these keys down for approximately 20 seconds before letting go.
- If you have a Mac that plays a startup sound, release the keys after the second startup sound begins to play.
- Hold down the keys on a Mac with an Apple T2 Security Chip until the Apple logo has appeared and disappeared twice.
- Pressing these keys will make the Mac appear as though it is restarting.
- Once up and running again, the Command key should be back in working order.
When your Mac has restarted, you may notice that other elements such as the time zone, display resolution, and sound volume will need resetting. These can all be rest under “System Preferences.”
Windows Key Not Working – Alienware
Dell manufactures Alienware gaming computers, which means they use the Windows operating system. These computers also offer the option of enabling or disabling the Windows key. If you find that the Windows key on your Alienware computer is not functioning, try these steps:
- Take a look at your keyboard and find the ‘Fn” key.
- Next, you will want to locate the “F6” key.
- Once you have seen both keys, press them down simultaneously for a second or two.
- In doing this simple exercise, you will enable the Windows key, restoring its functionality.
Enabled and Functional
The vast number of keyboards and their unique methods for enabling and disabling the Windows key can be challenging. However, activating the Windows key on your keyboard is relatively easy once you know how. Follow these easy steps, and you may end up putting your local computer technician out of a job.
The only thing you’ll need to concern yourself with is what game to play next!
Have you found your Windows key disabled? Did you use a method similar to those outlined in this guide to enable it? Let us know in the comments section below.
Disclaimer: Some pages on this site may include an affiliate link. This does not effect our editorial in any way.


