Do you use ‘PicsArt’ to edit images? You probably know how with a few clicks you can make them even more stunning. But what if you’ve got a low-quality image? Can you change the resolution? Keep reading to find that out. Plus, we’ll share with you other ‘PicsArt’ tips.
Changing Resolution in PicsArt
Sometimes the photo you want to edit is low-quality. Whether you’ve downloaded it from a website, or your phone doesn’t boast a good-quality camera, this issue can occur. But there’s still a way to salvage the photo if you use ‘PicsArt.’ You can change resolution, thus improving the quality of the image. Wondering how to do it? Before we tell you, make sure to download the app. It’s available for Android and iPhone.
Now, if you’re using iPhone, you’re in luck. The resolution is already set to the highest level, depending on the camera capabilities of your phone. But if you’re an Android user, here’s what you need to do:
- Launch the app and create an account.
- Choose the subscription plan.
- Once that’s all set, click on the profile icon on the bottom right corner of the screen.
- Then, you’ll see three dots on the upper right corner of the screen. Tap on them and select ‘Settings.’
- In the ‘Settings,’ under ‘General,’ click on ‘Max image size.’
- Here, change the resolution to the highest option.
- Click on ‘OK.’
From then on, PicsArt will export all the images in high resolution. Piece of cake, right?

PicsArt Tips and Tricks
‘PicsArt’ is a fantastic image editing software that boasts a bunch of cool features such as adding effects to images and changing the background, besides using standard stickers. In the next section we’ll tell you how to make the most of the app and create stunning images.
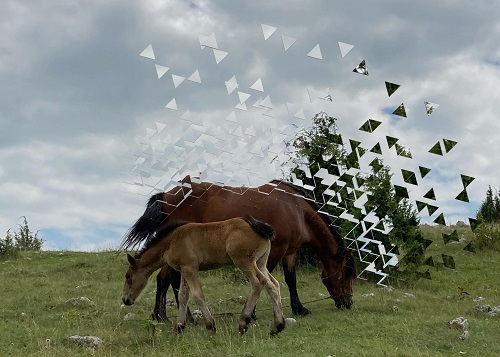
Dispersion
One of the most popular effects on ‘PicsArt’ is ‘Dispersion.’ With this option, your images can look like a pro photographer has edited them. Basically, this effect makes parts of your photo seem like they’re dispersing. It makes the images more attractive and adds motion. The steps are rather simple:
- Launch ‘PicsArt’ on your phone.
- Click on the plus button to add a photo.
- Chose the image you want to edit from your gallery.
- Next, tap on the ‘Tools’ option on the menu bar.
- Click on ‘Dispersion’ on the upper right corner.
- Now, select the area of the image where you want the effect to appear. You can also use the slider to change the brush size.
- When you’re done, click on the arrow on the upper right corner of the screen.
- You’ll notice the effect on your image.
You can now save the image and post it on your social media. Alternatively, you can add other effects to improve it even more. Below your image you’ll see some options. The first, ‘Stretch’ function lets you change the distance between pixels. If you move the slider to the right, the pixels will be far apart. If you move it towards the left, they’ll be closer together.
If you tap on ‘Size,’ you can change the size of individual pixels. Clicking on ‘Direction’ will let you decide on the way you want the pixels to go. By clicking on ‘Fade,’ you adjust the opacity of the effect. However, if you want dispersion to show, it’s best if the slider is on the far left. Finally, ‘Blend’ will allow you to change the overall effect of the image.
Once you finish, simply tap on ‘Apply’ on the upper right corner of the app. You can now post your unique photo to your Instagram and wow all your friends with your editing skills.
Change the Background
If you don’t like your image’s background, there’s a way to fix that. With the ‘Cutout’ option, you can easily paste the photo of yourself onto a different background.
To apply this effect, first launch the app. Then, upload the image. After that, you need to do the following:
- From the menu bar, select ‘Cutout.’ You’ll see different options, but choose ‘Person.’
- The app will automatically select the person in the photo. If you need to, you can use the ‘Erase’ option to delete the parts you don’t want to appear in a new photo.
- Then, click on ‘Save’ in the upper right corner of the screen.
Once you do this, leave the editing window. You can now upload your background or choose the one from PicsArt. Next, go to ‘Stickers,’ and then click on ‘My Stickers.’ Your image should be there. Click on it and paste it to a background. There are various other options you can use to edit the image. Add effects, borders, adjust contrast, etc.
Take Your Editing Skills to the Next Level
PicsArt is a fantastic editing app, even for beginners. Not only does it allow you to change the resolution of a poor-quality image, but it also contains other amazing features. Whether you add a dispersion effect or change the background of your image, your photos are going to be the talk of the town. How about you? What effects are your favorite? Let us know in the comments section below.
Disclaimer: Some pages on this site may include an affiliate link. This does not effect our editorial in any way.


