So, you’re curious about a streaming service, but you’re not sure if you want to commit. That’s perfectly understandable. In an era where every online business is trying to acquire your details and anonymity is scarce, you want to be careful where you leave your personal data. This includes your name, email address, and especially billing information.
The fact is, most streaming companies, whether it’s audio or video content, do offer free trials to help you decide if you should stick around for the long haul as a customer. The same applies to Roku, which has a very popular streaming player and a range of smart TVs.
It’s absolutely worth giving it a go, especially when there is a way to experience Roku without giving out your credit card details in the process.
Creating an Account
Everything everywhere requires you to have an account in order to use it. Slightly inconvenient sometimes, but necessary if you’re to move things along. To set up a Roku account, here are the steps:
Step 1
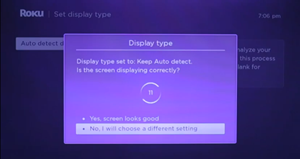
After hooking up your Roku player, Roku stick, or Roku TV, turn on everything and you’ll get to the Roku Setup page.
Step 2
Choose your Language preference and connect your device to the wireless network

Step 3
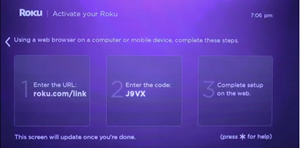
After Roku settles on the optimal screen resolution for your TV, it will ask you to activate your Roku by visiting the web browser
Step 4
A 4-digit number will appear on the screen and you should write that down somewhere. Or, try to remember it.
Step 5
At this point, it’s better to do this on your computer or smartphone than on the TV. In order to successfully sign up for Roku without using your credit card, you need to go to the Roku’s Sign Up page and add the following to the URL:
/nocc
Predictably, this will open the sign-up page that will ask you for your name, email, and password.

Step 6
The following page will give you an option to create a PIN code for purchase confirmation. You’ll have to enter the PIN before making any purchase. It’s probably best that you set up a PIN.

Now your Roku account is created. Wasn’t too hard, right? Your name will be displayed and you will always be able to change and update your credit card information in the Account section, if you choose to do so in the future.
Continue Setting Up Your Device
Until you’re absolutely certain that this is where you want to spend your hard-earned money, this is what you do instead. Follow these 6 very simple steps:
Step 1
Visit Roku and enter the 4-digit number from earlier.

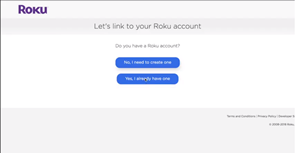
Step 2
The following screen will ask you about whether or not you have an existing Roku account. And since you’ve set up your Roku account, click on the “Yes, I already have one” option and proceed to sign in.
Step 3
If nothing is happening on the screen, you might need to refresh your browser.
Step 4
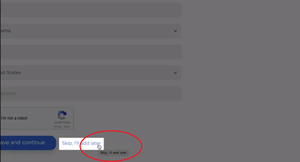
Surprise, you’re on the billing information page again and you’re absolutely annoyed! But, wait a minute, this is not the end. Just scroll down to the very bottom of the page. Look for an option to “Skip and Add later”. Don’t we all love this option every time we see it?
Step 5
Go ahead and name your device. This is your chance to be as creative as you want with a very limited number of characters. Make it rhyme or just type in your cat’s name.
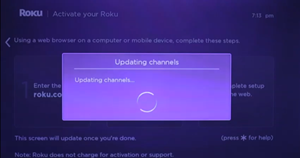
Step 6
Time to go back to your TV and set up your Roku device. Roku will update your channels and you’ll get to have some neat ones for sure.
Already a Roku user?
Maybe you’ve already set up your account and would like to remove your linked credit card. This is doable and in a few short steps, you can go back to the very beginning.
Grab your Roku remote and once you have your Home Screen in front of you this is what you do:
- Click on “System”
- Scroll to the “Advanced System Settings” option
- Select “Factory Reset”
- Enter the 4-digit number that will appear on the screen
These steps will reset your device and bring you to the beginning of setting up your Roku account. There you get to go through all the steps, such as choosing the language preference and feeling the excitement of naming your device. But, most importantly, you’ll get to not put in your credit card information.
Overview
Once everything is set up, all you get to do is maximize your Roku viewing experience. This, however, might be somewhat problematic because there is a downside to setting up your Roku account without giving out any billing information.
Some of the channels, mainly those from the UK and the US, might not be available. Depending on what you’re looking for, this might be perfectly fine. But, there is a possibility that not having all of the options might persuade you to go for a fully paid version.
Whichever the case, setting up a Roku account without a credit card is simple and hassle-free for those who wish to try it before going for the full version.
Let us know if you agree in the comments section below.
Disclaimer: Some pages on this site may include an affiliate link. This does not effect our editorial in any way.