Strava is an application that brings runners, cyclists, and hikers together. It’s not like social media, but it does allow those who are interested in outdoor activity to explore new terrains and paths. You can compete in local challenges and find new and interesting places to enjoy your favorite activity.
A segment in Strava is a specific piece of road or trail that is used by multiple riders and runners. It highlights a specific interest of like-minded athletes. Whether that’s top speed, hardest incline, or just an all-out point to point effort, it’s somewhere you can measure your efforts against those of other people. Segments are a major part of what makes Strava so useful, if you’re using the app you’ll need to be familiar with these features.
You will find that segments exist on most roads or trails already. The app is so popular that most riders will have ridden the region you’re in so many times that Strava has created segments automatically or other riders will have created them manually. If you are fortunate enough to find somewhere that would make a good segment that hasn’t already been claimed, you can make your own.
There are two main ways to create a segment. Identify a road or trail within an activity and mark it as a segment or to create a specific ride at the beginning and end of a road or trail, save it as a ride and create a segment from that. They both have their pros and cons but both end up in the same place.

Make a segment from an Activity in Strava
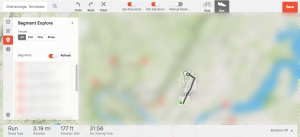
You can create a segment from a recorded activity within Strava. This is the default way to create one but it can be a little fiddly.
First, you will need to identify the activity that contains the stretch you want to include. Then you’ll need to make sure it isn’t already a segment. Then you can set it up as a segment on the map and save it.
It’s a fairly straightforward process in theory.
- Log into Strava. On the home page, click on ‘Training‘ at the top. Then, click on ‘My Activities.’

- Click on the Activity you’d like to use to create a segment.

- On the menu to the left, click on the three horizontal dots.
- In the pop-out menu, click ‘Create Segment.’
- Use the slider at the top of the Create Segment screen to identify the segment start and endpoint.
- Select Next once complete and allow Strava to check for duplicates.
- Name your segment and select Create.


The creation can be a little fiddly. The green dot on the map is the start of the segment and the red dot the end. You have to slide the green side of the top slider to the beginning of where you want to create and the red dot inwards to the end. The change will be reflected in the map underneath. It takes a lot of time and tiny adjustments to get it right but it is possible.
Once done, hit Next and name your segment something unique.
Uncheck the privacy box if you want to make it public and select Create. Your segment will be created and shared with everyone.

Use a ride as a segment
The above segment creation is a lot to process for new users. For a much more exact segment, you can use a ride as a complete segment. It will mean stopping and starting a ride but you can control the beginning and end to a much finer degree.
This method generally works well. You record your ride to the beginning of the segment you want to create, stop and then start a new ride. Stop exactly at the end of the segment and save the ride. Start a new ride to record your journey home. Then you can use the entirety of that middle ride as a segment.
- Use the Strava map to make sure the segment doesn’t already exist.
- Start recording your activity at the beginning of your proposed segment.
- Stop at the end of your proposed segment and save the ride.
- Upload the activity to Strava.
- Open that activity and select the three-dot menu icon.
- Select Create Segment.
- Select Next immediately and allow Strava to check for duplicates.
- Name your segment and select Create.

This uses exactly the same process as above but requires no messing around with sliders or the map. It reflects your segment to the exact beginning and end and is much faster. It does require you splitting a ride, stopping, and starting to record the segment but aside from that is much easier than the official way.
You can keep your segment private if you want but unless it’s within your circle of privacy, it’s much better to share it publicly. What’s the point in only competing against yourself? Give others the chance to beat your time and let the fun begin!
Strava Segment Not Showing Up
If you’re not seeing Segments in Strava, start by checking that the app permissions are set to access your device’s GPS. If you’re on a computer looking for Segments, input your Zip code or city and state in the app.
You may have issues with Segment tracking if you take long breaks or ride through your private zones.
Once you begin a ride (or another selected activity) be sure that you’re not going through your privacy zone. This is a zone that you can set up to 5/8 of a mile from your address. While you can share your activity with everyone, or with followers, setting up a privacy zone is an ideal way to keep your home address anonymous while interacting on the app.
As mentioned previously, users have the option to hide Segments. If you’re looking for a specific one, it may be private or simply; it hasn’t been created yet.
Creating a New Route
Strava lets users create their own routes as well as segments. Using this feature, you can create a path you enjoy and share it with friends on the app. Creating a route allows you to filter by your activity (riding or running) and the minimum elevation.
Visit the Strava website for creating a route and log in.
Once there, you’ll go through a short tutorial that tells you all of the features available and what each button does. Keep in mind that you can’t change your starting point. It automatically updates based on your current GPS location.
Tap where you’d like the route to end and choose waypoints along the way. Once your perfect route is done, just tap ‘Save’ in the upper right-hand corner.
Strava uses GPS to let you know the distance, elevation, and estimated time it will take to complete the route based on your chosen activity.
Frequently Asked Questions
Strava is the perfect adventure companion. In this section, we’ll answer more of your most frequently asked questions.
How do I edit a Segment on Strava?
You may want to update your segment after creating it. The good news is; you can! If you hover your cursor over the Dashboard tab and click on ‘My Segments.’ Then, click on ‘Created Segments.’
On this page, you’ll see the segments you’ve created. Click on the Segment you’d like and click on ‘Actions’ to the right side. Now, you can click ‘Edit.’
Disclaimer: Some pages on this site may include an affiliate link. This does not effect our editorial in any way.


