Google Forms are an excellent tool for creating all kinds of forms, surveys, and job submission forms. It’s a free tool with many pre-designed forms you can edit to your liking and post online for others to fill out.
Sometimes, however, you will need to change the original template to better suit your needs. Instead of creating a new form from scratch, you can edit an already submitted form at any point. This article will explain how you can do that.
Change Submitted forms
Google Forms templates are pre-designed, but you can make your own changes before posting. You can also make changes after posting. Here is what you have to do:
Method 1 – Set Up an Editing Link
The first method allows you to create an editing link you can use later to change the information in the Form. The edit response link has to be set up before submitting the Form for the first time so that it can allow you to make changes in the future.
- Open the Google Form you need.

- Click on the “Settings” in the upper portion of the document.

- When the new window pops up, select “Responses” and toggle “Allow response editing” to on.
- Click on the little eye icon to enter the information you want and click “Submit.”
- You’ll see a link that says “Edit your response.” Click the link to edit the information you submitted earlier.
- Copy the link and save it to your PC so you can edit the form at any time.


The method works well when you want to edit a single Google form response, but things get a little more complicated if you’re dealing with multiple responses. Here is what you have to do to set up unique editing links.
Method 2 – Create Your Script
- First, you have to create a spreadsheet with the responses you already have. Click on the “Responses” tab and then click on the little green spreadsheet icon.
- Open the form response spreadsheet. Click on “Extensions” and select “Apps Script.”
- Delete the text that appears when you open the script.
- Copy the following script into the script editor:
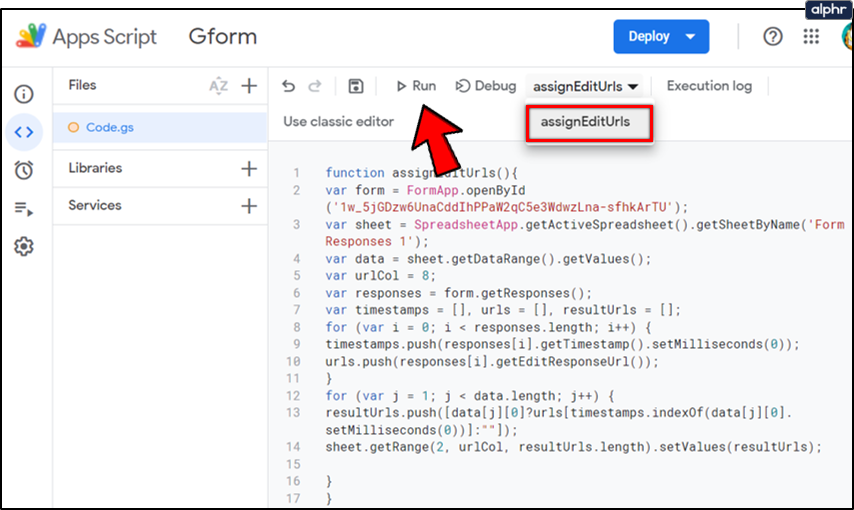
function assignEditUrls(){var form = FormApp.openById('Your form key goes here');var sheet = SpreadsheetApp.getActiveSpreadsheet().getSheetByName('Your responses Google Sheet name goes here – The tab name, not the file name');var urlCol = Enter column number where, the one where URLs are entered;var responses = form.getResponses();var timestamps = [], urls = [], resultUrls = [];for (var i = 0; i < responses.length; i++) {timestamps.push(responses[i].getTimestamp().setMilliseconds(0));urls.push(responses[i].getEditResponseUrl());}for (var j = 1; j < data.length; j++) {resultUrls.push([data[j][0]?urls[timestamps.indexOf(data[j][0].setMilliseconds(0))]:""]);sheet.getRange(2, urlCol, resultUrls.length).setValues(resultUrls);}} - Change the command (‘Your form key goes here’) with the right form key for each report.
- The form key is the lettering found in the address bar. Copy and paste to the required row in the script editor.
- Next, copy the name of the sheet and paste it to replace ‘Your responses Google Sheet name goes here.’ – You need the tab name, not the file name.’
- When that’s done, you will have to edit the var urlCol line in the script editor. Enter the number of the first empty column in your spreadsheet. In our case, it’s 8.
- Enter a name for it and save the script.
- When you’ve set up everything, select “assignEditUrls” and Run the function for your script.
- Review permissions and allow your account to use the script.
- Go back to the spreadsheet, and you will see that every entry has a unique link.
- Click on a link, and you can edit each link at any time.
- Run the script whenever you want to add more results to your form to get the unique links.


Frequently Asked Questions
Google Forms are a great way to find out more information about people, their opinions, and have fun while doing it. If you still have questions, keep reading this section.
Can I change the questions or description on a Form after sending it?
Absolutely! If you notice an error, need to add more questions, or realize an existing question is too confusing, you can easily make edits to a Form after sending it. Here’s what to do:
1. Open Google Forms and sign in using the same login information you used to create the Form.

2. Click on the Form in question. Now, you can edit the Description by clicking on the Description box at the top and typing what you need to. Then, hit Tab on your keyboard until the text box isn’t highlighted.

3. If you need to replace a question or get rid of one, hover your cursor over the selection. Then, press the X icon to the right.

4. To add a new question, click Add option. Type the question and click somewhere else on the screen.

Unfortunately, you can’t edit a question but you can delete one and add a new one. After making edits ask your respondents to refresh their screens. The updates will appear automatically.
Save Time by Using This Simple Method
The second method does require you to create a script, but that script gets most of the work done automatically. Creating the script might look complicated, but it’s not. It takes only a few minutes to set up, and once you do, you can re-use the same script as many times as you want. You will then get direct links to each form, so you can change all results whenever you need to.
Did you ever use Google Forms? Do you know some other method for changing already submitted forms? Share your wisdom with the community in the comment section below.
Disclaimer: Some pages on this site may include an affiliate link. This does not effect our editorial in any way.


