Although the internet is a great thing, there are numerous threats lurking around every corner. That’s especially true when the children are old enough to start surfing the Internet on their own. Malicious websites, phishing attempts, adult content, and other threats may take advantage of an unsuspecting child.
That’s why it’s important to at least keep your own home network safe for surfing. You can do that by installing a network router that has decent parental controls. One of the best in the business is Netgear, with the NETGEAR genie app that can help keep your family safe while online.
Installing the NETGEAR Genie App
Netgear routers allow you to set up surfing restrictions for each device individually on your home network. To start setting up parental controls on your children’s devices, you’ll have to install the NETGEAR genie app first. For a more convenient experience, it’s best to use the desktop app.
Before you proceed, just make sure that you’ve connected your computer to the home network (on the Netgear router). To download the app, visit www.netgear.com/lpc and choose the Windows or macOS version. Once the download is complete, simply install the app by following the steps in the setup wizard.
Now that you’ve installed NETGEAR genie, it’s time to set up parental controls for your entire network.

Setting the Filtering for the Entire Network
The first step in protecting your family against online threats is to set up Parental Controls. This feature is provided with the support of OpenDNS, which acts as a third-party provider in this case.
- Open the NETGEAR genie app on your computer.
- Click the “Parental Controls” button on the menu to the left.
- “Parental Controls” setup menu will open, notifying you that this feature is powered by OpenDNS. Click “Next” to continue.
- Now you’ll see another notification reminding you that this feature isn’t foolproof. To keep the online security of your family at the top level, it’s important to monitor what your children are doing on the web. Click “Next” to continue.
- If you don’t have an OpenDNS account, select “No, I need to create a free OpenDNS account.” Otherwise, select “Yes, use my existing OpenDNS account.” Click “Next” to continue.
- To create a new OpenDNS account, you first need to create a username. Type in the username that you’d like to use and click the “Check availability” button next to it. This will verify if that specific username is available. Or else you have to try a different username and check again.
- Once you’ve created the username, enter the password that you’d like to use for OpenDNS.
- Finally, enter your e-mail address and confirm it by entering it again in the field below.
- With that done, click “Next.”
- The final step is to define the filtering level. Note that the restrictions will apply to your entire network and all the devices that connect to it. You can set it “None,” “Minimal,” or “Low” and then set higher filtering levels for certain devices. Click “Next” to finish the setup.
Applying Filtering on a Device Level
Now that you’ve set Parental Controls for your network, it’s time to apply filtering for individual devices. This should pertain to the devices that your children use to keep them safe from threats.
- Open the NETGEAR genie app.
- Click the “Home” button from the menu to the left.
- Click the “Network Map” icon from the main screen.
- The app will now ask for the router login parameters. First, set “Login as:” by choosing “At home” from the drop-down menu.
- Now enter your username and password. If you haven’t changed these parameters previously, the default username is “admin” and the password is “password”. Also, you may want to change these after the first login.
- You can check the “Remember password” checkbox for convenience.
- Make sure you haven’t checked the “Enter router’s IP address manually” checkbox.
- Click “OK.”
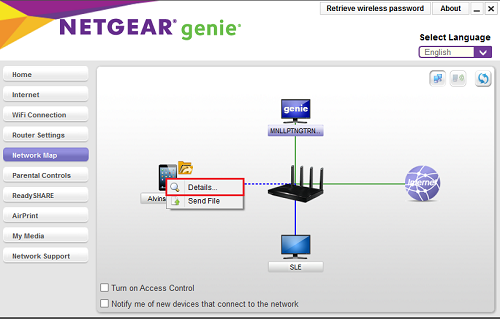
- Now you should see the map of your home network with every connected device. Click the right mouse button on the device for which you want to enable parental controls.
- Click “Details.”
- Click “Modify.”
- At the bottom of the pop-up menu you’ll see the “Parental Control Filtering:” option. Click the drop-down menu next to it and select the filtering level you want to use for this device.
- Finally, click the “Apply” button to confirm your changes.
With that done, you’ve successfully set up parental control filtering on that device. Now you can proceed to do the same for other connected devices, if applicable.
Please note that if you choose the “Bypass Login for Parental Control Filtering” option, there’s one additional step you’ll have to do. To be able to use the bypassing option, you also need to install Netgear’s genie app on that device as well. After that, the device will have the global filtering you’ve chosen for your network. The only way to obtain unrestricted access on that device after that is to use the Bypass Login.
Safe with Netgear
Hopefully you’ve managed to set up parental controls for your network. Thanks to sophisticated software such as NETGEAR genie, you can fine-tune the restrictions for each device separately. Knowing that your children are significantly safer this way, your peace of mind may just go up significantly.
Have you managed to set up parental controls on your Netgear router? Are the filtering settings working well enough for you? Please share your thoughts in the comments below.
Disclaimer: Some pages on this site may include an affiliate link. This does not effect our editorial in any way.