If you’re running an older version of Android, such as Lollipop (5.0) or even Marshmallow (6.0.1), it may be time to update to the newest version of Android 10. Depending on your device, it’s probably time to upgrade to a newer model, but those who want to keep their phone may update it to get the latest features and benefits of the Android OS. Bear in mind that the older Android devices may not upgrade at all or function as effectively since more recent versions are designed to utilize newer technology and different components. There are also manufacturer OS forks that include special features, functions, and bloatware.
Updating your phone to the latest version of Android is an incredibly simple task, although when it becomes available is very much dependent on your phone manufacturer and mobile carrier. This could take anywhere between one and nine months to happen, if it does at all.
Tips Before Updating
Anytime you’re updating your older hardware to newer software, it’s a good idea to perform a backup of everything on your device. Cell phones are no different in that aspect. Performing a simple backup to Google Drive, Google Photos, or another cloud service ensures that you haven’t lost irreplaceable data if something happens.
Next, make sure that you have enough memory on your phone or tablet. A new update is going to take up more space on your device. If you’re running a phone that only has 16GB (or even 32GB) of internal storage, be leary of what storage capacity you’ll have left after the update.
Lastly, check your connections. To avoid any interference in the update, ensure that you’re on a stable wifi network and that your device is charged. The last thing we want while performing a massive software overall is for something to crash and interrupt it.
Android 10 Upgrading via OTA (Over The Air) Updates
Once your phone manufacturer makes Android 10 available for your device, you can upgrade to it via an “over the air” (OTA) update. These OTA updates are incredibly simple to do and take only a couple of minutes.
- Open your phone and head to “Settings.”
- In “Settings” scroll down and tap on “About Phone” or “About Device.”
- Select “Software update” or “System update” to check for the latest version of Android.
Be aware that you may have to update your phone to the latest version of Android Lollipop or Marshmallow before Android 10 is available. You’ll need to be running Android 5.1 or higher to update seamlessly.
Once downloaded, your phone will reset and install and launch into Android 10.
How to Force an Android Upgrade (via Factory Image)
For those who feel a little braver with their phone update and really want to get their hands on the newest version of Android before anyone else, Google does offer Android factory images for download.
However, this process is only for advanced users. Using an Android factory image will wipe all your data, so make sure you backup your phone’s contents before updating. Also, bear in mind that manufacturers have their own forked versions of Android OS, which includes custom features and often bloatware too.
Generally, Google only releases factory images for its Nexus devices, so if you run one of those, you can definitely upgrade via this method. For those using other phone models, be warned: while the images will work, they may not be optimized to run on your phone correctly.
Currently, Google hasn’t made the Android Marshmallow factory image available for download, but when it does, this is how you can upgrade your nexus device.
- Download and install the latest Android SDK on your computer
- Add the SDK folder to the PATH:
- In Windows:
- Open “My Computer > Properties.”
- Then, go to “Advanced System Settings.”
- From here, go to “System Properties > Advanced > Environment Variables.”
 Select “Path,” then click “Edit” and type in the directory for where you installed the SDK (remember, each entry is separated by a semicolon).
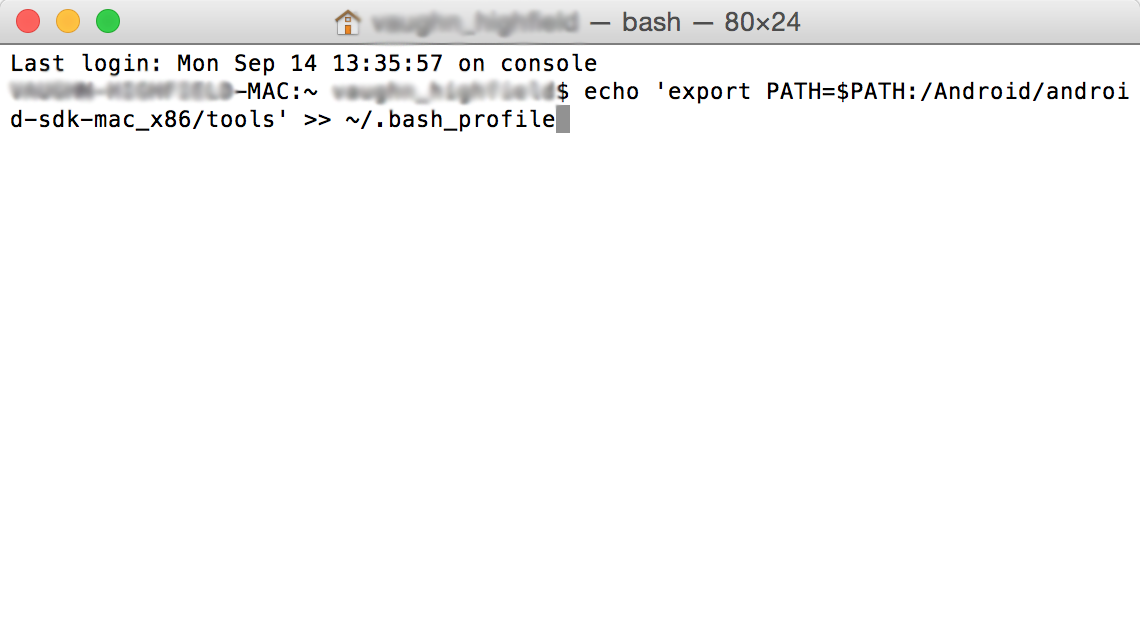
- In Mac OS X:
- Make a note of where the SDK ZIP file is unpacked to (by default it ends up in a directory called “android-sdk-mac_x86”).
- Open Terminal and paste “echo ‘export PATH=$PATH:/Android/android-sdk-mac_x86/tools’ >> ~/.bash_profile” to set PATH.

- Enable USB debugging on your Android device in “Settings > About phone > Software information.”
- If you haven’t already enabled “Developer Mode,” tap the “Build Number” seven times to activate it.
- Once done, go to the newly accessible “Developer options” menu in “Settings” and tick “USB debugging.”
- Download the factory images for each device (Google will make these available once launched).
- Extract the image on your computer and connect your Android device to the computer via USB.
- Boot your phone into fastboot by holding down the volume up, volume down, and power button when turning your device on. If you don’t own a Nexus device, here’s a list of other ways to boot into fastboot.
- Open up a command terminal on your computer and execute “flash-all.bat” to install the necessary files and OS onto your phone.
- Once done, Google recommends you lock your phone’s bootloader for security. This is done by rebooting your phone back into fastboot mode while connected via USB and then execute “fastboot oem lock” from a command terminal on your computer.
- That’s it, you’re done!
Update Workaround
As all Android users know by now, actually getting your hands on the update is problematic. While most users check online tech sites and their device’s settings for the newest update, there is one method that gets you the update just a little faster.
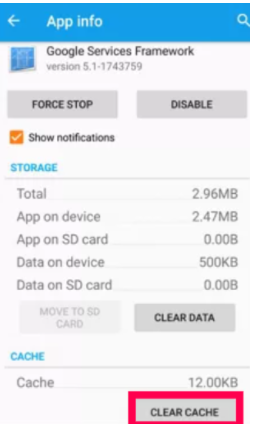
- Go to the “Settings” on your Android device and tap on your “App Manager.”
- From here, locate “Google Services Framework” and clear the cache as you would any app.
- Close the “Settings” app and open it back up to check for the update. Many users have stated they did need to do this several times, but finally, the update appeared.
Troubleshooting
There are several reasons you may run into trouble when updating an Android device.
Not Enough Storage Space
One would be a memory management issue (i.e., there isn’t enough free storage space). In this case, you can offload content you don’t need but be sure that after the update, your phone will still have some free storage available so that it will function.
Your phone is Rooted
If you have rooted your phone, you’ll need to un-root it or find another method to upgrade the software. Using SuperSu or another downloadable application, you can un-root your device, perform the update, then root it again.
If that doesn’t work for you, try ODIN Pro to update your software. Whichever you choose, both are tedious tasks that require more than a basic level of technological understanding.
Your device model isn’t compatible with Android 10
This doesn’t mean that Android 10 will never be available for your device; it simply means that it may not be released for your device yet. As we mentioned above, there are some things you can do to try and force the update, but some users may have to wait just a bit longer.
Your battery life is too low
The update won’t work if your phone isn’t charged up enough (usually more than fifty percent). This may seem like a nuisance, but it’s more a fail-safe. If your phone’s battery were to drain during the update, it could have catastrophic consequences (and by catastrophic, we mean a massive headache that could have been easily avoided). If you’re struggling to get your phone to cooperate with an update, try charging it a little more.
Frequently Asked Questions
Here are some more answers to your questions about Android updates.
What is the latest version of Android?
As of January 2022, the latest Android version available to the public is Android 12. Although some users still don’t have access to the newest software, it’s a good idea to keep checking your phone’s settings for the update.
Disclaimer: Some pages on this site may include an affiliate link. This does not effect our editorial in any way.