Notion is a productivity tool that can gather all your various notes, tasks, and documents from different apps and unite them into one functioning workplace. There’s so much you can do with Notion, from creating a simple to-do list to organizing your team and creating extensive databases.
But regardless of the type of project you’re working on, you’ll need to know how to add and manage checkboxes in Notion. It’s an essential feature that provides a straightforward way to check off a task or an item from your calendar. In this article, we’ll show you how to add checkboxes and elaborate on other Notion features.
How to Add a Checkbox in Notion
You can create a free Notion account by registering with your Google or Apple account, or any email address. The process is super quick and straightforward. Immediately, you’ll be able to see the control panel on the left side of the screen. There, you’ll have everything you need to organize your tasks and documents.
Before we go through the steps of explaining how to add a checkbox in Notion, it’s important to understand that almost every type of page or database in Notion allows users to add checkboxes. But in this tutorial, we’ll show you how to do that on an empty page. Here’s what you need to do:
- On the left side panel, click on the + Add a Page option. Or + New Page at the very bottom corner on the left side of the screen.

- You select Empty with an icon or just Empty from the list, or just press Enter. You can also name your page or leave “Untitled”.

- To add a checkbox, hover with the cursor over the + symbol under your page’s title. The pop-up box will say, Click to add a block below.
- Once you click, you’ll see a drop-down window of basic Notion blocks. Among them is the To-do list. Click on the checkbox symbol.
- The checkbox will automatically appear. And you can repeat the process to add more checkboxes.


Next to the added checkboxes, you can write your tasks and check them off after completing them. The checkbox will go from blank to bright blue, and the text will show a strikethrough and turn grey. You can use the same steps to embed a page, add a subheading, add bullet points, links, etc.
Using Notion Habit Tracker Templates
Notion has many incredibly useful templates that allow you to add different blocks such as checkboxes and utilize them for various purposes. However, the template that makes the most of the Notion checkbox block is the Habit Tracker.
It does exactly what it implies. It helps you track your daily habits. All you need to do is check or leave unchecked an activity you were supposed to perform. Here’s how you can use it:
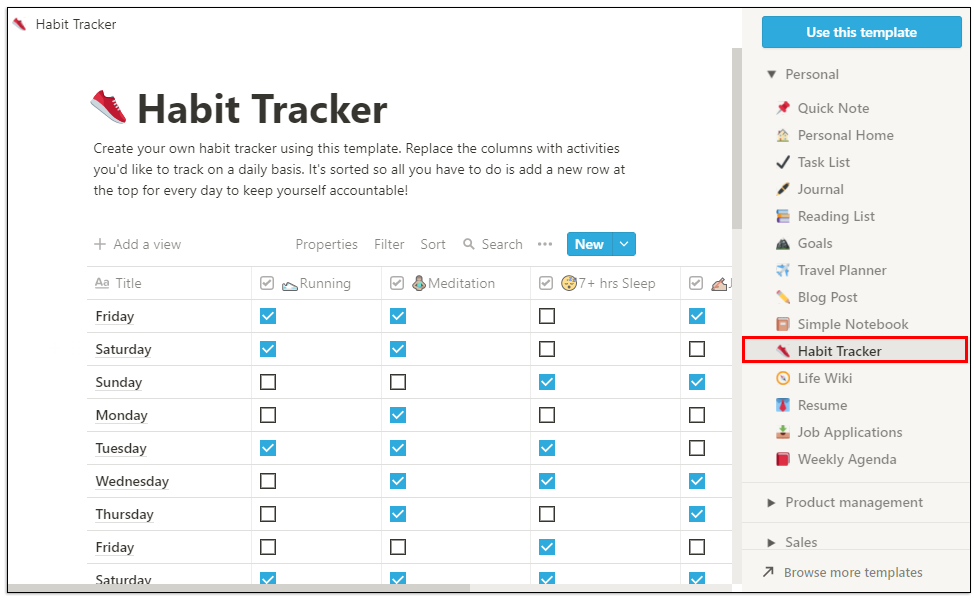
- Start a New Page in Notion. Select the colorful Templates icon.
- On the right-side panel, click on Personal, and then from the drop-down menu, click on Habit Tracker, followed by Use this Template.
- When Notion creates the page, you will be able to customize it.
- You’ll see the days of the week and checkboxes in a row and columns. You can click on the top of each column and change the habit.
- You can also change the block type from checkbox to email, hashtag, date, or other.


The Habit Tracker template also tracks how many of the tasks are checked and can even give you the exact percentage of how your habit development is going.
How to Uncheck All Row Checkboxes in Notion
Depending on how you use Notion, you might have rows and columns of tasks that you’ve checked after some time.
If you notice incorrect information in your task list, perhaps it might be easier to uncheck all checkboxes first and then accurately check the completed tasks. You could do this manually, but it’s likely going to take up much more of your time.
And Notion is all about saving as much time as possible. That is why you can use the somewhat hidden feature to uncheck all checkboxes. All you need to do is:
- Select all tasks with your cursor.
- Check or uncheck all checkboxes by clicking the first one in the row.


This is a convenient feature when you’re dealing with the pages you’ve created from scratch and rows of checkboxes you’ve manually added. However, you won’t be able to use this shortcut when you’re working in one of the Notion templates, such as the Habit Tracker.
Additional FAQs
How Do You Add Checkbox Symbols?
As a productivity tool, Notion is quite intuitive – users like that you get the hang of how it works relatively quickly. One of the reasons it’s so good at saving time is that it has a shortcut for nearly every command.
There are symbols and controls you can use to expedite the process of building your workspace. When it comes to checkboxes, there are three methods to use symbols and controls to add a checkbox.
Method 1
Notion suggests this step as soon as you create a new page. Here’s what you do:
• Press the / symbol on your keyboard.

• Select To-do list from the drop-down menu.

Method 2
There are many Notion shortcuts, and to quickly add a checkbox, simply type two square brackets “[]” without space, and the checkbox will appear.
Method 3
Lastly, you can use the slash command to create a checkbox. All you have to do is enter “/todo” on the, and Notion will automatically create a checkbox.

How Do You Use Tasks in Notion?
You can use Notion to create and organize tasks. One way you can do that is to use the Task List template you will find by selecting the Template option when you click on the new page.
But if that template doesn’t work for you, there is another option. You can create the tasks page from the empty page in Notion. Here’s how:
• Open a blank page in Notion. And title it Tasks. The titled page will appear in the left side panel immediately. You can even add a special icon if you want.

• Start creating headings and adding checkboxes by pressing / on your keyboard and selecting blocks from the drop-down menu.

• The titled subheadings can be moved and placed in rows and columns by grabbing the six-dotted handle next to the subheading and dragging it to another location.

• In the upper right corner of the screen, you’ll see three horizontal dots. By clicking them, you’ll choose the text size and whether you want to use the full-width feature. Both are controlled by toggle buttons.

You can organize your tasks any way you need them. You can create days of the week or even create priority categories for your task.
How to Archive a Task in Notion?
When you’re done with the task, you don’t have to leave it active forever. After a while, the tasks will add up, and it can become challenging to track the task list. However, Notion doesn’t have a built-in function that can archive the tasks.
But there is a workaround solution. Essentially, what you need to do is embed another page into the Tasks page and move your completed tasks there to archive them. Here’s how it works:
• Place the cursor at the top of the Tasks page.
• Hit / on your keyboard and either type page or select Embed sub-page inside this page from the drop-down menu and hit Enter.

• For clarity, name your sub-page Archive and add an icon if you want.

• Your Archive page now sits at the top of your tasks list.

• You can click the six-dotted handle next to the completed task and drag and drop it to the Archive page.

Keep in mind that you can always go to the Archive page and return the dropped items. Also, every task can be moved around easily from column to column with the drag-and-drop feature.
How to Create a Database in Notion?
In Notion, a database is a more advanced type of page you can use. Instead of an “Empty” page, you start out either with a table, board, calendar, gallery, timeline, or list.
These databases are, in many ways, a more interactive spreadsheet. To create a completely new database, here are the steps to follow:
• Click on the New Page option in the bottom left corner of the screen.
• Under Database, select the type of database you want to create.
• If you select Table, you can title your page and immediately start entering text into tables.
Notion gives you two primary columns, “Name” and “Tags.” But you can change that by clicking on the top of the column and entering the text of your choosing.
If you need more categories, select + and add another column and name it. You can customize your database by changing types of blocks and adding checkboxes, simple text, URLs, files, dates, emails, and others.
Is Notion the All-in-One App It Claims to Be?
One thing is for certain – Notion tries very hard to be everything you might want from a productivity app. The fact is that there’s a lot of competition in the market for productivity tools, and some of them are well-established and have millions of happy customers.
But Notion does too, and chances are, once you learn how to make the most of it, you won’t have to spread out your tasks across productivity platforms. The company emphasizes that they are the only app you’ll need, and that’s a worthy goal and a high bar.
Notion uses pages and blocks to help its users get organized. You can start from a completely empty page or use a well-designed template or database. It also allows users to embed videos and images, save bookmarks, add audio tracks, and display PDFs. Advanced blocks feature math equations, table of contents, and provide the breadcrumbs feature. Another reason why users love Notion is that it permits easy integration with other apps.
You can integrate Google Drive, Twitter, Google Maps, Framer, CodePen, and several others. If we had to list a few more prominent advantages of Notion, that would be that it’s highly customizable, accessible across devices, allows unlimited file upload, and offers databases. Disadvantages are not insufficient font customization and that it doesn’t sync with other calendar services.
Does Notion Check All Your Boxes?
If you’re only starting to learn how to use Notion in a way that will help you in your daily life, understanding checkboxes should be at the top of the to-do list. Regardless of what type of workspace you’re going to build, you’ll likely need to incorporate checkboxes differently.
Most templates already have checkboxes you can either rename, add, or delete. Hopefully, Notion will be able to deliver all the tools and features you need to organize your tasks and projects.
Do you use Notion? If so, how do you use checkboxes to your advantage? Let us know in the comments section below.
Disclaimer: Some pages on this site may include an affiliate link. This does not effect our editorial in any way.