Keeping up with Instagram Reels file size limits can be quite a challenge. The app gets frequent updates, with new features and changes being added all the time. Before you go through the whole process of creating, editing, and adding songs to your Reels, you need to familiarize yourself with the requirements.
Uploading Reels that don’t fit in with Instagram’s rules might end up looking blurry, pixelated, or distorted. In order to avoid this issue, here are the file size limits for Instagram Reels.
File Size

The maximum file size Instagram supports is 4 GB, so always aim to stay within this limit. Numerous factors contribute to your video size, from how many frames you’ve used as well as the resolution. If you aren’t able to upload your Reel due to its size, try to compress it by using another app or piece of software.
Aspect Ratio

Aspect ratio, in this instance, refers to the size of your video on the screen. Instagram requires you to upload Reels with an aspect ratio between 1.91:1 and 9:16. The first number refers to the width, while the second number refers to the height of the video. Try to stay within this range to avoid your Reels looking distorted.
Similar to Instagram Stories, TikToks, and YouTube Shorts, this ratio takes over your entire phone screen, which maximizes the engagement of your Reels. Aim to shoot videos in this ratio, by holding your phone camera vertically instead of horizontally while filming.
Video Resolution

Instagram requires Reels to have at least 720 pixels. This is the standard for videos in this app, and you can adjust your camera settings to fit this requirement. Of course, you aren’t limited only to 720p, as Instagram supports higher resolution videos as well, such as 1080p and 4K.
Always aim to shoot videos in high resolution, which will make your Reels clear and of high quality. Try to stay under the 4 GB size limit when uploading longer videos that are high in resolution. As such, it might be best to stick to shorter formats in 4K.
Length

When Instagram first introduced Reels to their audience, the maximum length was 15 seconds. This changed over time, and now you can upload Reels that are up to 90 seconds long. Depending on the type of content, you can opt for shorter or longer options. Reels also have the 30 and 60 second formats, which you can select before you start taking your videos in the app.
Here are some Reels lengths that help improve user engagement:
- Ideal Reel length for more views: 3-15 seconds
- Ideal Reel length for more comments: 7-18 seconds
Shooting Within the App

The best way to never have to worry about the ratio, length, resolution, and file formats is to use Instagram’s built-in recording tool. When you open Reels and tap the camera in the right upper corner of the screen, you can start taking videos that already fit with the requirements. This way, you can focus on the more creative part of Reels, and don’t have to bother with the technicalities.
Reels offer you many options when you’re shooting:
- Effects and filters that make your videos more aesthetically pleasing
- Layouts for shooting your Reels in multiple frames
- Dual mode for filming with both the front and the back camera
- Timer for wider shots
- Gesture control for and hands-free shooting
Room for Captions

Try and leave some space at the bottom part of your Reels. To be more precise, the bottom fifth of your screen. The description is placed there, and you can include a caption with additional information about your video, as well as some relevant hashtags.
It’s important to note that there’s a limit of 2,200 characters on the caption and you can use up to 30 hashtags that can help boost your videos. Avoid having text at the bottom of your Reels, as this can lead to an overlap with the caption, making it difficult to read.
Reels Frame Rate

Instagram’s minimum requirement for frames per second is 30. Make sure your camera’s settings comply with this to avoid having your videos compressed and changed when you post them. Also, when you use the built-in camera on Instagram while shooting your videos, you don’t have to worry about this rule.
Feed View of Reels

Reels can also show up on the Instagram homepage. This is your standard feed which is the first thing you see when you open the app. You can choose to have your Reels on the feed as well, which is a great option for getting more views.
However, the ratio changes in this case when the app displays the video. It goes from the fullscreen 9:16 to a 4:5 ratio. This means that your Reel gets cropped so make sure you place the most important parts of your videos in the center. Also, avoid placing text on the top and bottom section of your Reels, as your viewers might not be able to see it entirely.
Reels Cover Photo
The importance of the cover photo for your Reels shouldn’t be overlooked. This is one of the first things people can see in the Reels section of your profile. It’s important to have an eye-catching image that makes someone want to click on your video. Instagram will automatically choose one for you, but this isn’t ideal.
You can easily change the cover photo yourself:
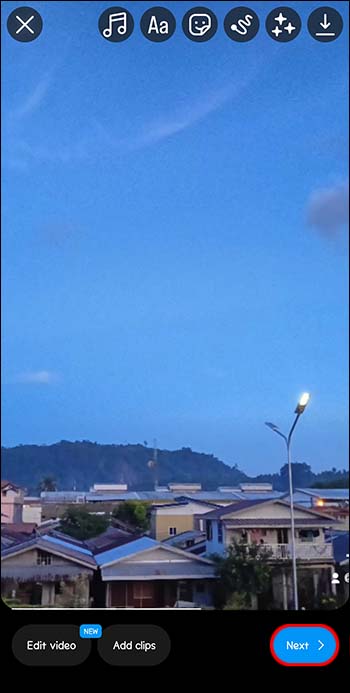
- Create your Reel, then click “Next.”

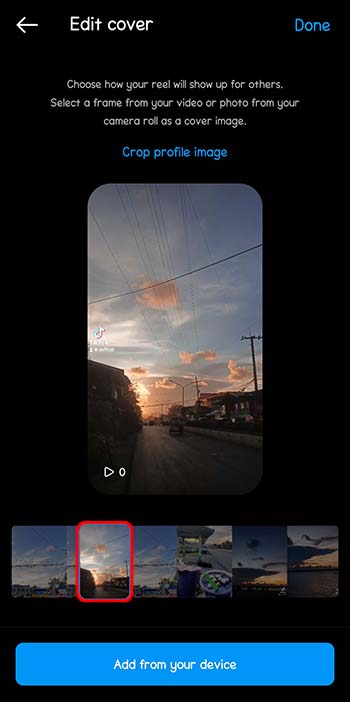
- Tap the “Edit cover” on the Reel preview.
- Select the frame from your video as a cover image or choose one from your phone gallery.

Video Format
If you don’t wish to use the built-in Instagram Reels camera and editor, you can always upload clips from your gallery. This works for videos you’ve taken in the past, as well as downloaded content you want to use.
Instagram only supports the MOV and mp4 formats, so make sure you save your videos in one or the other. If they’re saved in a different format, they’ll be unusable. Opt for converting your videos online or by using an app.
Up Your Reels Game
Whether you use Reels for fun or for business, making sure your videos fit in with Instagram’s requirements is key. Understanding the formats, resolutions, ratios, and size limits can help you produce professional content that doesn’t change when you click post. But if you’re the kind of person who uses Reels just for fun, shooting them within the app provides you with everything you need.
Do you have issues while uploading your Reels? Were you already familiar with the requirements? Let us know in the comments section below.
Disclaimer: Some pages on this site may include an affiliate link. This does not effect our editorial in any way.