Many PC users get used to their desktop icons being in one place. However, if the desktop icons get rearranged, getting used to the new order can be inconvenient and confusing. Rearrangements can happen because of the Windows auto-arrange feature or because other desktop users decided to rearrange them.
Luckily there are ways to turn off the auto-arrange feature and to prevent your icons from being moved. This article will discuss the different ways you can lock your desktop icons on various Windows systems.
Lock Desktop Icons in Windows 11
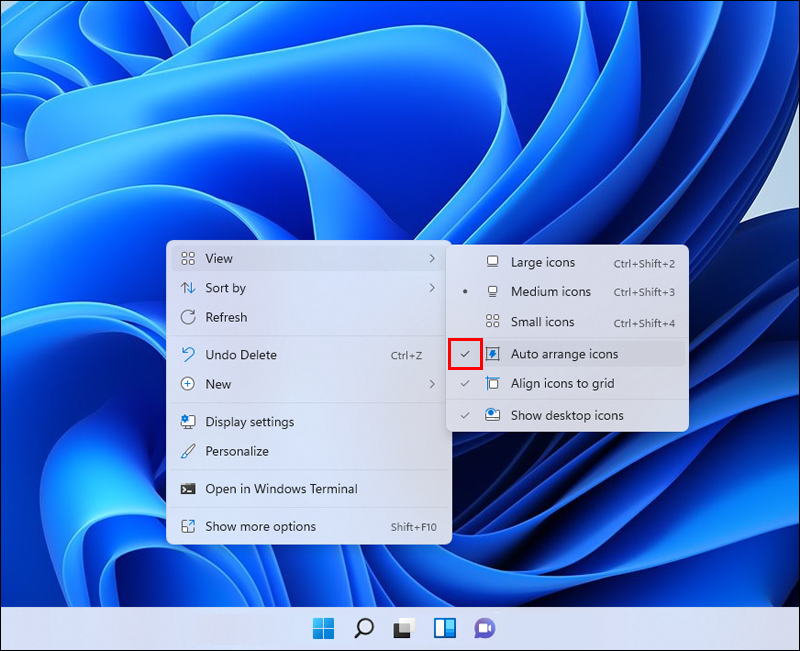
Windows 11 will rearrange your icons if you’ve installed or deleted an app or even if you’ve changed the display resolution settings. You’ll need to turn off the auto-arrange feature to prevent this from happening. Follow these steps to do so:
- Right-click anywhere on the desktop.

- Hover your mouse over “View” in the menu.

- A drop-down menu will appear. Go to “Auto-arrange Icons.”
- Uncheck the option to disable it.
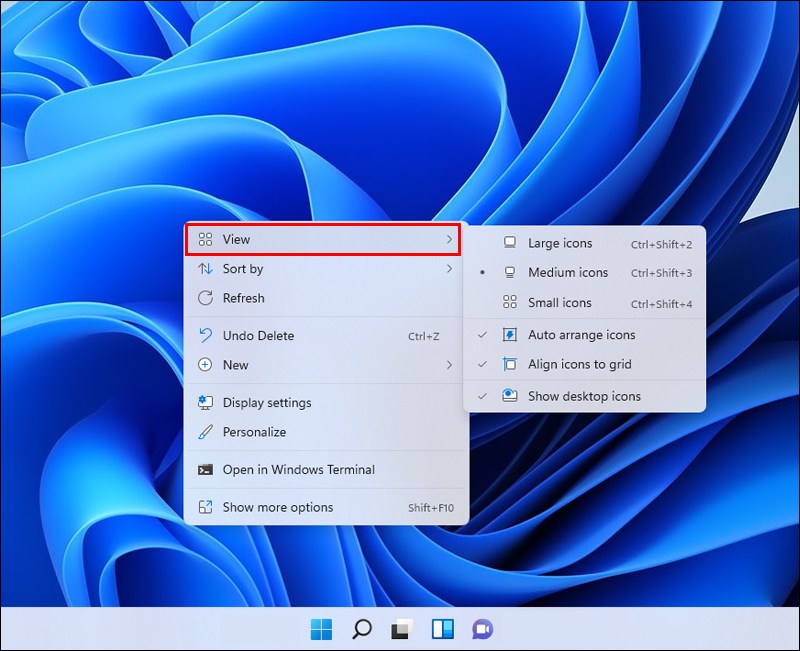

If you wish each row and column of icons to be aligned, you can adjust that here by clicking “Align Icons to Grid.”
Lock Desktop Icons in Windows 10
It is possible to change the theme of your Windows 10 device. When you change the theme, you change the colors of the windows, the background picture wallpaper, the system noises, and the screensaver all at once. Some themes, however, provide icon packs as well.
A theme contains all of these pre-configured options, and they also tend to rearrange the icons on your desktop. Themes will rearrange the icons on your desktop to improve the visual aesthetics if you do not block Windows from rearranging them.
To disable the auto-arrange feature, the steps are:
- Right-click on any empty spot on your desktop.
- Hover over “View” to get further options.
- Uncheck the box next to the “Auto organize” icons.
- Make sure the “Align icons to grid” option is turned on. This will constrain your desktop icons to a grid arrangement, resulting in perfectly spaced icons.


Disabling the auto-arrange feature should prevent Windows from rearranging your desktop icons.
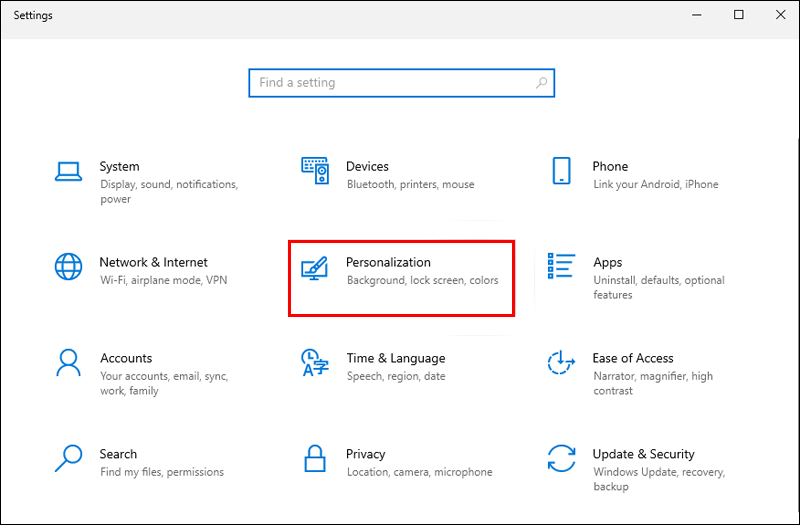
Another way to lock your Desktop icons on Windows 10 is through the “Settings” app. The steps to do so are:
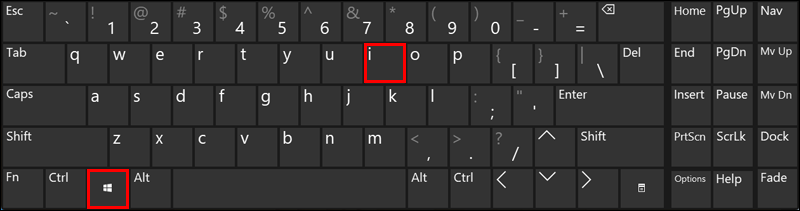
- Open the Windows 10 Settings app or press the Win button+ I shortcut.
- Select “Personalization.”
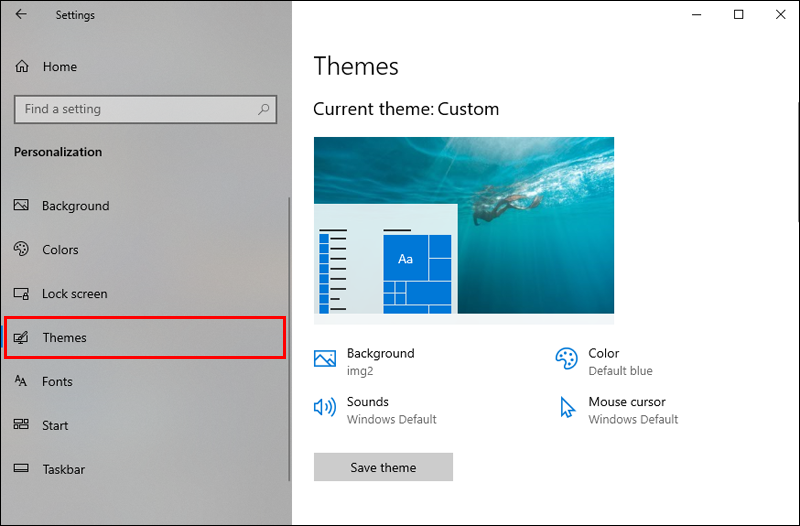
- Choose “Themes” from the left pane menu.
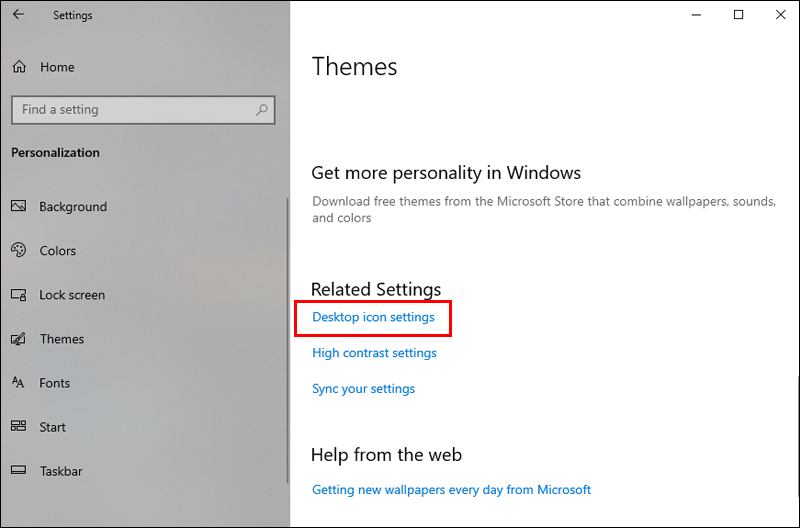
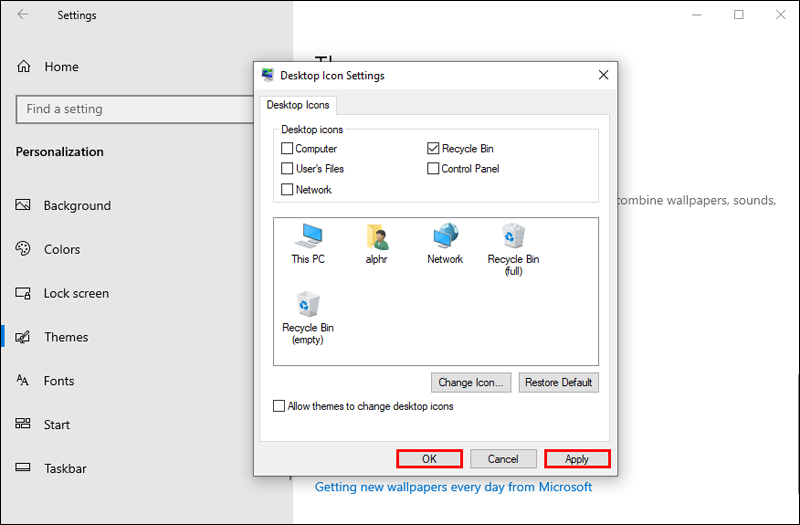
- Click on “Desktop Icon Settings” in the right menu under “Related Settings.” This should bring up a new setup window.
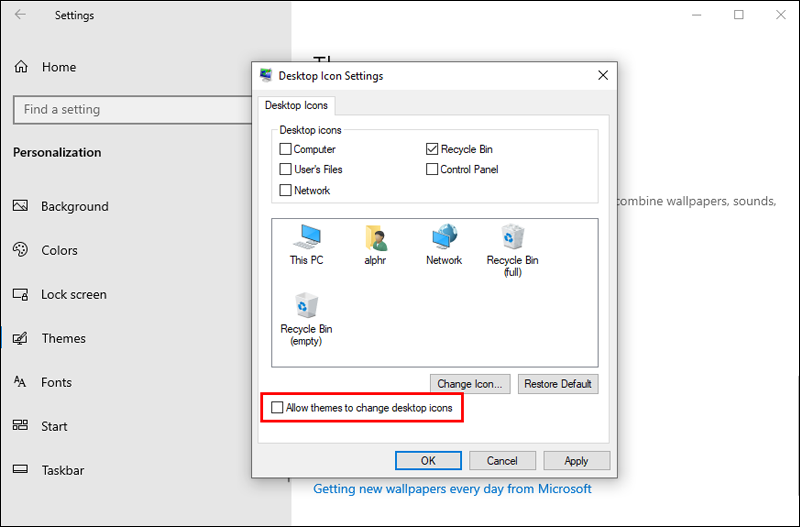
- Uncheck the box next to “Allow themes to change desktop icons.”
- Select “Apply,” then “OK.”
You also have the option to use a third-party app like DeskLock. After downloading and installing it, the steps for using it are similar to using it with Windows 11.
- Organize your icons in the order that you want them to stay.
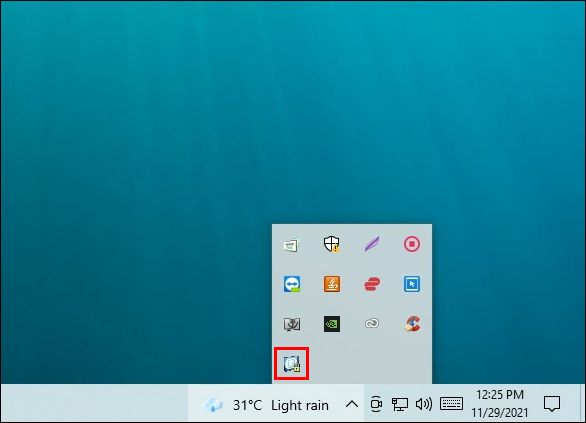
- Run Desklock.exe by double-clicking on it.
- Right-click on the Desklock symbol in your Taskbar.
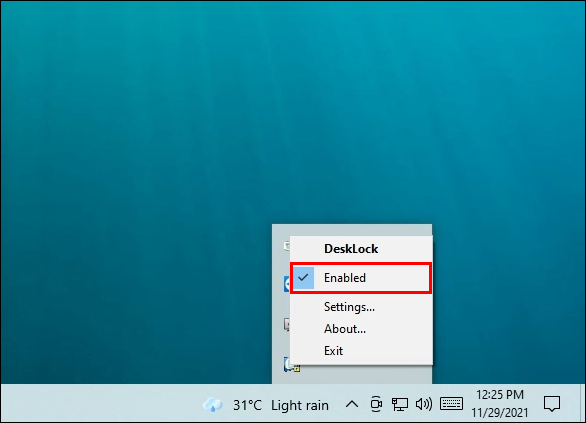
- From the menu, select “Enable.
Another way is to download a third-party app. DeskLock is a free, simple application that locks your Windows 10 desktop icons in place. The app’s icon in the system tray allows you to turn it on and off as needed. To get the program, go to their webpage and click the “Download Now” option, then save the ZIP file to your PC.
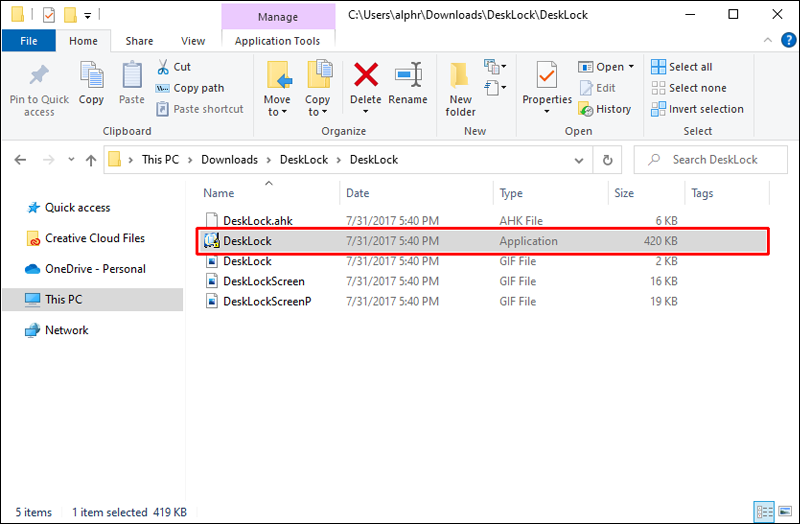
After you’ve finished downloading the file, it’s time to install it. To do so, the steps are:
- To open File Explorer, use the Windows key + E on your keyboard.
- Double-click the Downloads folder.
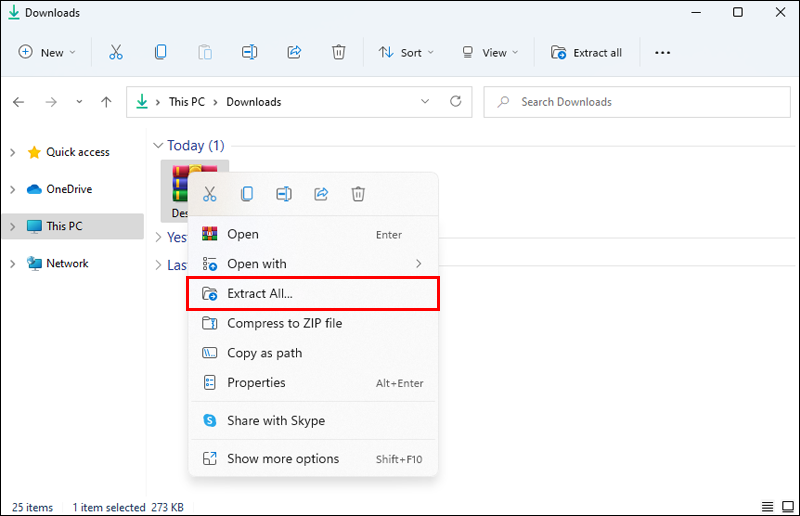
- Select “Extract All…” from the menu that appears when you right-click DeskLock.zip.
- Choose a location for the new DeskLock files. If you like, you can use the default placement in your Downloads folder.
- Select “Extract.”
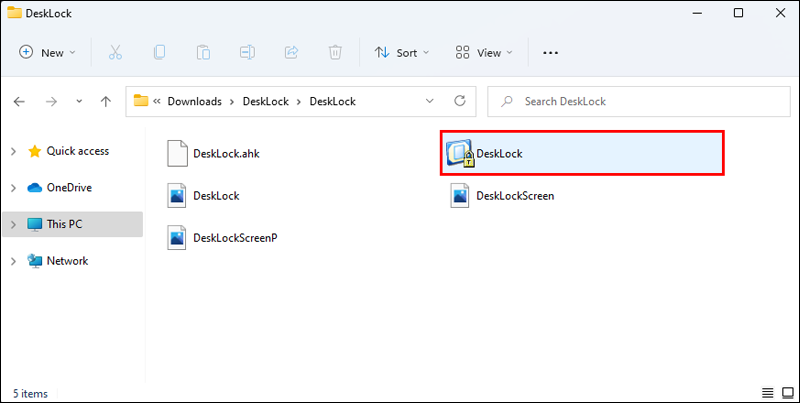
- To open the DeskLock folder, double-click it.


Now to lock your icons, the steps are the following:
- Arrange your icons in the order you wish them to remain. If your icons keep reverting to their former places, right-click the desktop, select View, and uncheck “Auto-arrange icons.”
- Double-click on Desklock.exe to run it.
- In your Taskbar, right-click on the Desklock icon.
- Select “Enable” from the menu.
Lock Desktop Icons in Windows 8.1
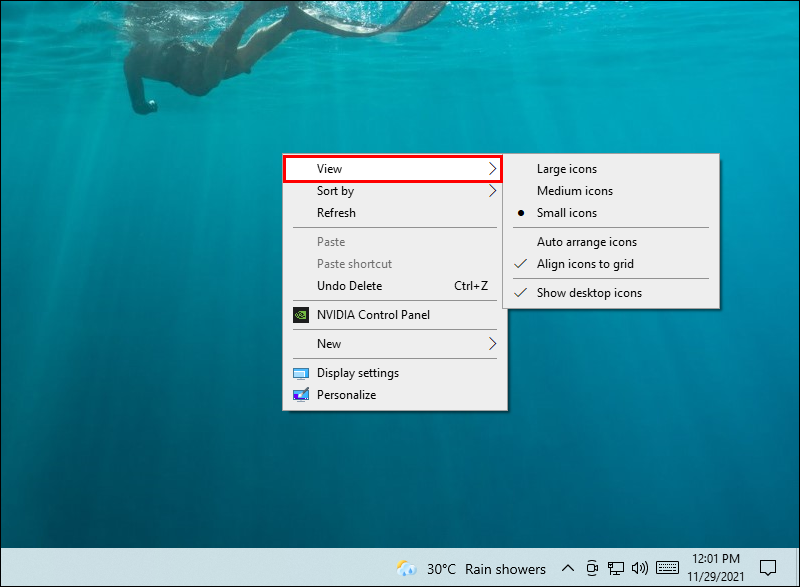
The steps to lock your desktop icons on Windows 8.1 are very similar to Windows 10 and 11. The first way to do so is:
- Right-click on an empty place on the desktop.
- Select “View” from the drop-down menu.
- Uncheck the “Auto-arrange icons” box.
You can also use DeskLock. After downloading and installing it, the steps are the following:
- Arrange your icons in the order you want them to appear.
- Double-click Desklock.exe to start it.
- Right-click on the Desklock icon in your Taskbar.
- Select “Enable” from the menu.
Lock Desktop Icons in Windows 7
Windows 7 also allows for locking your desktop icons. The options you have are similar to Windows 10. You can disable the auto-arrange feature by following these steps:
- Right-click anywhere on your desktop.
- Hover over “View” to see other options.
- Uncheck the checkbox next to the “Auto organize” icons.
- Ensure that the “Align icons to grid” option is enabled. This will force your desktop icons to be arranged in a grid, resulting in properly spaced icons.
The “Settings” app is another option to lock your desktop icons in Windows 7. The steps are as follows:
- Launch the “Settings” app on Windows 7. You can do so by pressing the Win button + I.
- Choose “Personalization.”
- From the left side menu, select “Themes.”
- In the menu on the right side, under “Related Settings,” select “Desktop Icon Settings.” This should open a new configuration window.
- Uncheck the option labeled “Allow themes to update desktop icons.”
- Click “Apply” and then “OK.”
And finally, you can use third-party apps like Desklock here as well. After setting up the app, the steps are:
- Organize your icons in the order you want them to be displayed.
- Run Desklock.exe by double-clicking it.
- Right-click on the Desklock icon in your Taskbar.
- From the menu, select “Enable.”
Keep Everything in Place
Even though the Windows auto-arrange feature can be helpful, it sometimes causes more inconveniences than the benefits are worth. Turning it off will solve the issue of constantly moving icons and help you keep your desktop organized to your needs and preferences.
Unfortunately, even if you uncheck the auto-arrange Icon’s feature, your desktop icons may be rearranged in some instances. For example, when you alter your screen resolution, your icons may move. If Windows randomly changes the resolution without your intervention, it might be due to an outdated driver. In this situation, you should try updating your driver to see if that resolves the problem.
Do you keep your icons locked? What is your preferred method of locking icons? Let us know in the comment section below!
Disclaimer: Some pages on this site may include an affiliate link. This does not effect our editorial in any way.


