Microsoft Excel is a very powerful and customizable program that can require some time to get used to. When making a spreadsheet for a presentation or any other purpose, you might find yourself wanting to get rid of the dotted lines that separate the cells. Fortunately, making this change is very easy to do and only requires a few simple steps.
Here’s how to deal with dotted lines in Excel, and a few other useful tips for bonus.
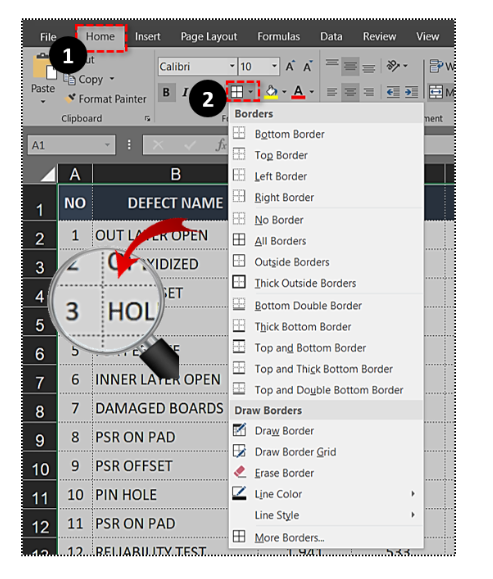
How to Remove Dotted Cell Borders in Excel
Removing dotted cell borders doesn’t necessarily mean removing borders altogether. It might mean changing the borders by adding a different style.
- To start, select the Home tab in Excel, located at the top of the screen.
- Click the Borders drop-down menu to reveal a list of border options for the selected cell or a range of cells. If your currently selected borders are dotted lines, simply change the border options to a desirable choice, or turn off the borders altogether.
Removing Spreadsheet Gridlines in Excel
Excel displays gridlines by default. These are the faint lines that show the borders around individual cells or within merged cells. These might not be displayed as dotted lines in the newer versions of Microsoft Excel, but they still might be annoying.
Unlike borders, which are customizable for any cell, these lines affect the entire spreadsheet. If you’re looking to present your data in printed form, you don’t really need to worry about gridlines, because these don’t appear in print, while cell borders do. However, if you want to make a virtual presentation, you might want to remove the gridlines.
- To do so, select the View tab at the top and then uncheck the box next to Gridlines.


Removing a Page Break in Excel
Strange dotted lines might also be due to a page break. When you’ve formatted your spreadsheet for print, page breaks are shown as lines. In newer versions of Excel, the manually-added page breaks are presented as solid lines, whereas automatic page breaks are displayed as dotted lines.
- To remove these dotted lines, select a cell in a row that immediately follows the primary page break.
- Tap on Page Layout tab at the top, select Breaks in the Page Setup section, and click on Remove Page Break.


This is how you remove solid horizontal lines in Normal View, however, the dotted lines that are generated automatically will still be there.
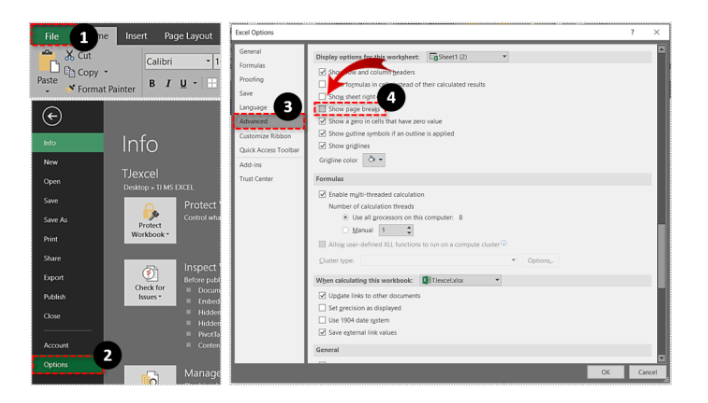
- Remove them by selecting the File tab at the top of the screen.
- Then, navigate to Options, located in the menu on the left.
- Click Advanced and scroll down to Display options for this worksheet.
- Uncheck the box next to the Show page breaks option.
Contact Microsoft Support
More often than not, trying to fix an Excel problem on your own will lead to a lot of wasted time. In fact, sometimes the problem is even more complex than you would think, which is exactly why Excel tech support is available 24/7.
If you’re having trouble fixing the dotted lines in your spreadsheet and the above methods aren’t working, contact the tech support and let them take over.
Final Thoughts
Microsoft Excel is a great, powerful tool and has a variety of practical uses. However, some problems can be difficult to fix, like getting rid of dotted lines. Following the above methods should fix your problem, and if not, Microsoft support is available at all hours to help you.
Do you know another way to remove dotted lines in Excel? Let us know in the comments section below.
Disclaimer: Some pages on this site may include an affiliate link. This does not effect our editorial in any way.


