When you order Internet service for your home or office, you will invariably end up setting up a complete home network. This permits all your devices – computers, tablets, smartphones, printers and scanners, smart TVs, and connected devices like smart outlets and appliances – to use the network connection. This is almost always done by means of a router, a box that connects to your cable modem or satellite modem and distributes Internet services throughout the area, both wirelessly and using Ethernet cables. (Many service providers combine the router and the modem into one unit, but that will not make any real difference to consumers.)
Wireless Range – Theory and Practice
One common problem that wireless network installations often run into is the fact that radio waves, which WiFi networks use to communicate, carry very well through open-air but are much less effective when asked to propagate through solid objects, such as walls or doors. Radio waves can penetrate such obstacles, but it uses up a considerable amount of their power to do so. You may note that a piece of wireless hardware has a nominal range of 600 feet, for example. If you set that equipment up outside, in perfect weather, in a giant open field, with nothing in between the two network components, you would indeed find that they would work pretty well even if they were 600 feet apart.
Now do the same thing inside a house full of walls and refrigerators, doorways, and staircases. Your network might have trouble reaching something 60 feet away, just 10% of the nominal range. Weak WiFi can be extremely frustrating and can have a number of different causes. You may have a router that simply doesn’t broadcast with enough power to reach all the nooks and crannies of your home, or there may be obstacles in the way of the signal. Obstacles are generally things like especially thick walls or floors, but other household items can and do cause signal problems. I once spent about four hours trying to figure out why a wireless router wasn’t quite able to reach nearby rooms in my home before realizing that I was asking the signal to go directly through a home gym setup – about 500 pounds of cast iron directly in the signal path.
If you have a large home or office or are trying to extend your Internet connection to an outlying building such as a shed, garage, or patio area, then a wireless network extender may be the product that you need. TP-Link is a networking company that makes a wide variety of networking products, from whole-home wireless routers to range extenders to modems and switches. For this article, we will concentrate on their line of range extenders.
Range extenders are generally inexpensive, and they work very well, but home networking can be something of an acquired skill. In this article, you will learn how range extenders work, why you might need one (or more), and how to set up your TP-Link extender model.
How Range Extenders Work
Wireless network extenders work by receiving and rebroadcasting WiFi signals from your wireless router in order to boost signal in areas that may have been physically blocked beforehand. There are two basic types of extenders: antenna-based extenders, which basically just add another broadcasting node to your network, and powerline-based extenders, which use your home’s electrical system as a wired network to transmit wireless signals across (or through) obstacles.
For example, take a look at this typical house plan. The router is located in the living room. Areas of a strong signal, good signal, weak signal, and no signal are indicated on the plan (note that this is a simplified example; in real life, a house this size would be adequately served by one router, but I don’t want to fill your screen with a giant house floorplan.)
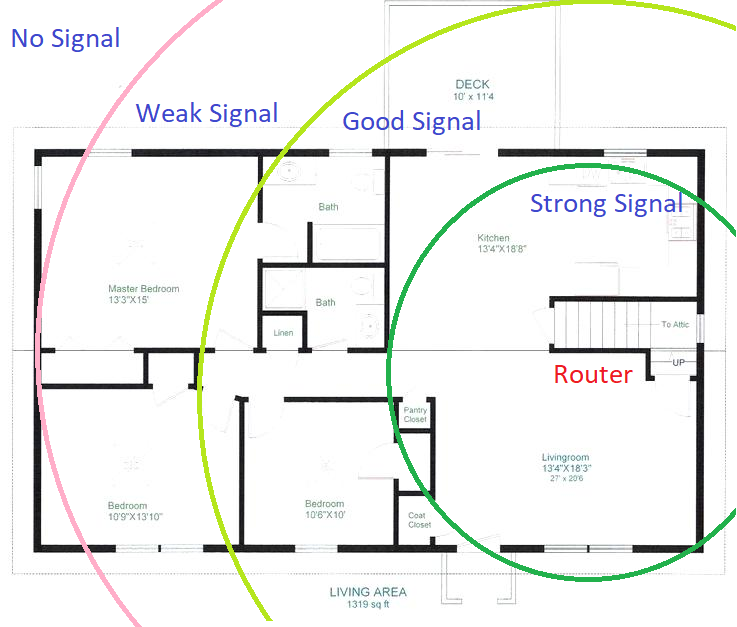
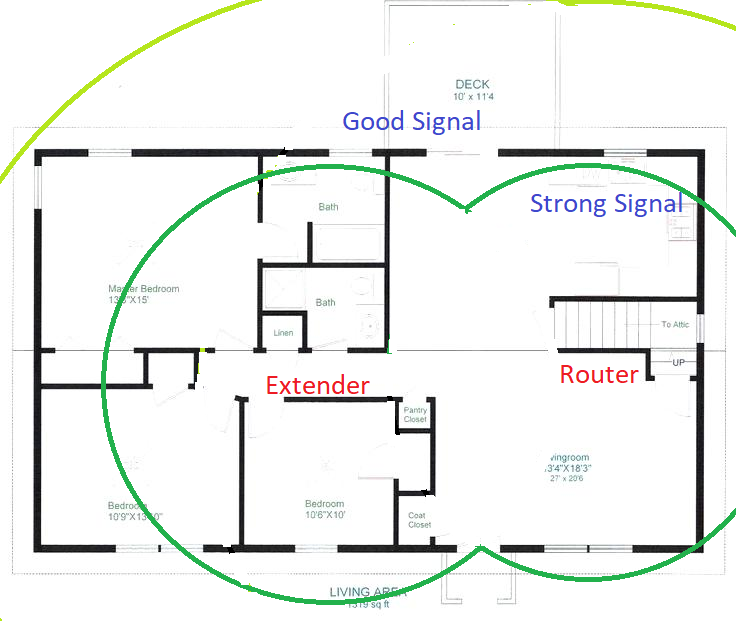
In this example, there is a good signal in most of the house, but in the bedrooms on the left side of the plan, there is only a weak signal or no signal at all. This problem could be resolved by moving the router to a more central location, but that might not be convenient or possible. However, you could place a wireless extender in the hallway leading from the living room to the bedrooms. That would change the signal map to look something like this:
Maximizing Network Range
There are things you can do to maximize your range that might save you from needing to install extenders. Many people simply stick their network router wherever it’s convenient and hope for the best – and in a small apartment or house, that is usually perfectly adequate.
Homes and businesses with larger or more complex layouts, however, need to plan to get the best range and performance out of their network. It’s important to remember that for a wireless network, throughput/speed and distance/signal strength are related; the same computer will get a much faster network signal at ten feet from the router through open air than it will at sixty feet from the router through three walls and a stairwell.
There are three main factors to consider: barrier thickness and material type, sources of interference, and the physical environment of the antennas in operational conditions.
Barrier Thickness
Every physical barrier will affect the strength of a wireless connection. A single ordinary wall can reduce the signal by 25 or even 50 percent. There are two factors to consider: the thickness of the barrier and its material composition.
Plywood, drywall, ordinary wood, and regular glass are all relatively porous to radio waves and won’t damage your signal too severely. Heavier walls made from brick, cement, metal, plaster, stone, or double-glazed glass are significantly more resistant, as are floor and ceiling panels.
In general, non-porous materials are much more resistant to radio waves than porous materials. Elevators and stairwells, which both often contain large quantities of steel, are challenging terrain for radio waves.
Electromagnetic Interference
A major source of network slowdowns and unreliability is the presence of electromagnetic frequency. Many of the devices we rely on in modern life all share the use of a relatively narrow range of the electromagnetic spectrum.
The problem is further complicated by the fact that current home and office WiFi technology uses two different frequency bands to connect, and a different set of electronic equipment also uses each of those bands.
The older 2.4 GHz frequency is a bit better at punching through obstacles than the newer 5 GHz band; the 5 GHz band has a slightly higher top speed. However, in most situations, the network frequency doesn’t make a major difference.
Microwave ovens also use the 2.4 GHz band, as do 2.4 GHz cordless cell phones, some fluorescent bulbs, video cameras, elevator motors, cauterizing devices, plasma cutters, BlueTooth devices, old-style 802.11, 802.11b, and 802.11g wireless networks.
The 5 GHz band is used by 5 GHz cordless phones, radar, certain kinds of sensors, digital satellite signals, nearby 802.11a or 802.11n wireless networks, and other outdoor 5 GHz bridges.
Physical Environment
The physical alignment of WiFi antennas can be essential to performance. For example, a signal expected to travel down a long narrow hallway should have a semi-directional antenna pointing the signal in the right direction, rather than a multidirectional antenna that radiates equally in all directions.
For outdoor situations (such as installing wireless surveillance cameras), be aware that precipitation (rain, snow, even fog) can be disruptive to range and speed. Both trees and large numbers of people can attenuate the signal.
You should position access points, routers, receiving antennas, etc., as high up off the floor as is reasonable. Signal strengths are almost invariably highest at the height of the room.
What Kind of Extenders Are There?
There are a number of different types of hardware that can extend your WiFi network, and what you should get depends in large part on your networking needs. Here I am going to break out the two basic categories of WiFi boosting technology and how they function.
WiFi Repeaters
WiFi repeaters were the first type of technology that could extend a WiFi network. Repeaters work straightforwardly – the repeater contains a wireless antenna, and the device connects to your existing WiFi network just like another computer or smartphone would connect. It then rebroadcasts that signal in its local area, as well as picks up the signals from other devices in the area. For example, if you have a laptop that is closer to the WiFi repeater than to the router, it will connect to the repeater rather than directly to the router.
WiFi repeaters have some significant disadvantages. The primary downside is that because their connection to the router uses the same radio waves as many other technologies in your home, the repeater’s link is susceptible to interference from other devices.
Phones, microwave ovens, and many different types of devices can cause interference, which ends up causing the connection to the router to slow down or even to drop altogether. The other main disadvantage is that WiFi repeaters use the same frequency to connect both to the local devices and the router. This means that half the repeater’s bandwidth is available for the locally connected devices; WiFi connections for those devices will accordingly be slow.
Because WiFi repeaters are using a wireless signal, they must have a clear signal path back to the router. Walls, doors, floors, and ceilings all block significant portions of the radio signal from being transmitted. Also, the distance of the repeater from the router will significantly impact the signal strength; a repeater at the extreme range of the router will be of very little use because it will have a prolonged and weak signal.
There are applications for which a WiFi repeater may be appropriate, for example, in such a case where you have one area of the house that needs more signal where the main router won’t quite reach.
Another such example would be a place where no heavy applications are to be expected – perhaps in a guest bedroom where the only need for Internet access will be an occasional overnight visitor who wants to use their smartphone. However, in general, this is older technology and should not be your first choice.
WiFi Extender
WiFi extenders are more advanced technology for extending a WiFi network. They have critical improvements over WiFi repeaters, with the main one being a technology called “backhaul” which extends your signal without using up wireless bandwidth.
The concept of backhaul is a fundamental part of telecommunications technology, and it means carrying a signal from one site to another using a high-capacity physical cable or line. WiFi extenders use backhaul by connecting the router end of the extender to the extender module itself over a wire. In-home and office installations, the cable can either be the building’s existing electrical wiring, or the building’s existing coaxial cable wiring. The backhauled signal goes back and forth over the physical connection. The WiFi extender itself then acts as a clone of the existing router/modem, providing a new radius of wireless service that is very fast.
Two types of wiring can be used with a WiFi extender. Many homes and offices are already wired with coaxial cable from cable television installations or older network technologies. This coaxial cable has a huge transmission capacity, most of which will go unused even by the most advanced digital cable systems. The standard method for using this cable for WiFi extension is known as Multimedia over Coax Alliance (MoCA) and is designed not to interfere with existing cable TV usage; your Internet and your cable TV will be using the same wiring, but will not interact. For a MoCA install, you would connect one MoCA adapter to the router and a coaxial cable port and then connect another MoCA adapter at the location where you want to place your WiFi extender.
However, not all homes or offices have coaxial cable installed, or if they do, it only runs to one room or area of the house and doesn’t connect anywhere else. You could run a coaxial cable through your walls and create the new wiring required to support MoCA, but this could be expensive and require a lot of opening up of walls and floor spaces. A relatively short and straightforward coax extension might be doable for $200 or less, depending on your location, and might be worth it for the enhanced reliability of the MoCA solution. However, renters and other individuals may have situations that simply prohibit that option.
Power line technology is the answer to provide backhaul for people in those circumstances. Power line adapters use the home or office’s existing copper power wires as a transmission medium. Power line networking technology has actually been around for at least a couple of decades. Early implementations of the technology were interesting as an alternative to Ethernet networks, which at the time were the only alternative. However, they were slow, glitch-ridden, and failed to capture much of a market. Development of the technology continued, and today’s power line networking adapters are actually relatively functional.
Their main disadvantage is that power lines are not anywhere near as fast as a coaxial cable for transmitting data. Although power line adapters boast nominal speed rates of 200, 500, 600, and 1200 Mbps (compared to coaxial cable, which transmits at about 1000 MBps), in reality, the achievable speeds are only a fraction of the nominal rate. The age of your existing copper wiring, the distance between the two adapters, fluctuations in your home’s electrical system, and interference from other devices plugged into the system all combine to slow down power line adapter speeds. Realistically a power line adapter will get about 20% of the rated speed under the right conditions, and the more things deteriorate, the slower the speed becomes. However, that can translate to a 200+ MBps signal for the highest-end adapters, which is more than suitable for most applications.
Which technology should you choose? If MoCA is an option, then MoCA is the correct choice. It is faster, more reliable, and more robust than power line wiring. A power line is fine for most gaming, web surfing, and even regular definition video, but if you are going to stream HD or ultra HD content, then MoCA is recommended. A power line is an adequate but imperfect substitute that you should opt for only when it is the only alternative.
Features and Options
TP-Link extenders come in a variety of configurations and speeds. Note that no matter how fast or powerful your extender may be, it can’t outperform your base Internet connectivity. If you have an extender that can handle speeds of 800 MBps, but your Internet service itself is only delivering 100 MBps, then your home WiFi network is going to be running at 100 MBps, no more than that. So there is no need to purchase an extender that provides more bandwidth than you currently have or plan to acquire.
One nice feature to have in an extender is a built-in wired Ethernet port. This means that at the physical location of the extender, you can connect the wired internet to any nearby devices. This can be very handy if you have desktop computers or game consoles that need a physical connection rather than a wireless one. Another useful feature found in many TP-Link devices is a beamformer, which is a physically configurable antenna that you can point in the direction of the device(s) that will be connecting to the extender. This can increase range somewhat and dramatically enhance Internet performance at that device, albeit at the cost of slightly reduced effectiveness of the extender in the areas not being beamformed. Beamform-equipped extenders often have multiple beamformers, however, allowing an optimized Internet connection for multiple devices at once.
Another useful feature is the ability to use the range extender as an access point. Many TP-Link extenders have this feature. This means that rather than extending the range of your existing wireless network, you can plug the range extender into an existing wired network, and it will become a WiFi hotspot for nearby devices.
This is very handy for businesses especially, which often have extensive wired networks already put in place (usually at great expense) years ago – now that wired networks can become the spine of a wireless system without having to put extenders everywhere in the building.
Regardless of the features and options you choose, you will need to connect and configure your TP-Link extender to get it working. In the next section, I’ll talk about how to do that.
(Still need to purchase a TP-Link WiFi extender? Here’s the link to their product catalog on Amazon.)
First Steps
Before doing anything with the extender, you need to collect some information about your existing router. You need to identify the router’s IP address, the WiFi SSID (broadcast name), the type of encryption it uses, and the password to access the network.
- Log into your router. This is usually achieved by typing its IP address into a browser. Most often, it’s 192.168.1.1, but it can be something else. To find your IP address, open your computer’s network tab, right-click on your wireless network, and select Properties. Scroll down, and your IP address will be listed next to IPv4.
- Access the wireless part of your router’s GUI and write down the details above: the router IP address, SSID, encryption method, and password to access the network.
- Stay logged into the router for now.
If your router doesn’t respond to 192.168.1.1, it may have a different IP address. Linksys uses the 10.XXX range. If yours is the same, try this:

- Right-click the Windows Taskbar and select Task Manager.
- Select File, New Task, and check the Run as Admin checkbox.
- Type CMD into the box to open a command line box.
- Type ipconfig /all into that CMD box and hit Enter.
- Look for Default Gateway. This is your router IP address.
Setting up your TP-Link extender
To begin with, we need to connect the TP-Link extender to your computer with an Ethernet cable. This is so we can program the wireless settings into it so it can connect.
- Plug your TP-Link extender into a wall outlet.
- Connect it to your computer with an Ethernet cable.
- Open a browser on your computer and navigate to http://tplinkrepeater.net. If that doesn’t work, try http://192.168.0.254. You should see a TP-Link web page appear.
- Select Quick Setup and Next.
- Select your region and Next.
- Let the TP-Link extender scan for wireless networks. It might take a minute or two, depending on how many networks there are around you.
- Select your wireless network from the list, and select Next.
- Enter the wireless password when prompted.
- Select Copy from the main router if you want a single larger wireless network or Customize if you want to create a different network.
- Select Next.
- Review the network settings in the final window and select Finish if all is correct.
The TP-Link extender will reboot and will hopefully allow access to the internet. Test it first with the Ethernet cable and then without it using wireless. Depending on your model of TP-Link extender, there may be a light on the front, which signifies whether it’s connected to the network or not. Monitor this to ensure it’s able to maintain a connection.
Configure TP-Link extender with WPS button
If your router has a WPS button, you can use that to set everything up too. WPS is WiFi Protected Setup that allows you to configure networks automatically and safely. The button is a physical button, usually found on the back of a router, hopefully labeled WPS.
Some TP-Link extenders also have WPS buttons, so you can use this to set it up.
- Plug the TP-Link extender into a power outlet close to your wireless router.
- Press the WPS button on the back of the router. You should see a WPS LED blink. If not, press it again.
- Press the WPS button on the TP-Link extender. The WPS light should blink here too. Press it again if it doesn’t.
Using WPS means you don’t have to manually configure the settings on your TP-Link extender. By physically pressing the WPS button, you tell the router that you’re authorizing it to connect with a device that has also had WiFi Protected Setup enabled. There is a finite, two-minute window within which the router will accept connections to add a little security.
WPS can be a little hit-and-miss, which is why I didn’t suggest using this method first. If it doesn’t pick up the wireless network, reset both devices and try again. If that doesn’t work, configure it manually as above.
Once you follow the basic procedure for setting up your TP-Link extender, you should enjoy a fast connection from every corner of the house. If you’re not getting the desired results, experiment with placing the extender in different locations until you find the one that delivers the best results.
Need help with other WiFi-related issues? TechJunkie has tutorials on how to connect to WiFi without the password, how to tell if someone is stealing your WiFi service, how to block someone from using your WiFi, how to connect to WiFi using a Kindle Fire, finding the best outdoor WiFi antennas, and how to diagnose and fix problems where your WiFi works but your Internet doesn’t.
Disclaimer: Some pages on this site may include an affiliate link. This does not effect our editorial in any way.