Whether you’re new to the Chromebook ecosystem, or you’re looking to upgrade your day-to-day use with some new tricks, there are plenty of hidden secrets in Chrome OS that you should learn when you start using a Chromebook. Though the operating system might seem simple to most power users—Chrome OS is, after all, “just” a web browser—Google has added a ton of simple shortcuts and tweaks to their operating system over the years to make things a bit simpler for every Chrome user.
From small shortcuts to huge changes, we’ve gathered some of the best tips and tricks for your new Chromebook below, in our newest guide.
Shortcuts You Should Know
Let’s start off with something everyone loves: keyboard shortcuts! That’s right, despite detractors calling Chrome OS a simple web browser, Google’s packed it full of goodies, and keyboard shortcuts are included in the mix for some good fun. Sure, you get the basics everyone already knows, like Ctrl+X, C, and V for cut, copy, and paste respectively, but are there any other shortcuts most new users might not know? You bet there is—let’s break them down.

System Shortcuts
We’ll start with some simple shortcuts for making your Chrome usage a bit faster and easier each day. While you might not log out of your Chromebook very often, it’s easy to do so with just a click of Ctrl+Shift+Q. If you use the keyboard shortcut twice you can quickly switch users.
Need to access your files? Alt+Shift+M will open your file browser, and if you need to view hidden system files, Ctrl+. (period) will access any files Chrome OS is hiding from you. You can even preview files in your file browser by selecting the file with your mouse and hitting Space.
If you need to quick-launch one of the first eight app shortcuts on your shelf at the bottom of the display, Alt+(1-8) will open the corresponding numbered app; Alt+9 will open the last app on your shelf.
Display Shortcuts

Occasionally, you might find it necessary to have to modify the display of your computer, but the settings menu might be a bit confusing or hard to follow. That’s okay; the most important display settings can be changed by keyboard shortcuts alone. Chrome OS isn’t the best when it comes to scaling for high-resolution, 1080p (or higher) displays.
It can be tough to read text and icons on the display. If you need to change the resolution of the display, just tap Ctrl+Shift and either + or – to increase or decrease the resolution as you need it. If you’re constantly changing resolutions, this can save you a lot of time.
If you aren’t sure what your display’s default resolution is, just tap Ctrl+Shift+0 to reset it entirely.
And one more neat display setting—if you’ve ever opened a PDF that’s rotated incorrectly, you know the pain of twisting your neck or holding the device awkwardly to read your document. On Chrome OS, it isn’t a problem: tap Ctrl+Shift+ ![]() and your display will rotate 90 degrees. Keep tapping the shortcut to continue rotating, or to return back to the standard display.
and your display will rotate 90 degrees. Keep tapping the shortcut to continue rotating, or to return back to the standard display.
Browser Shortcuts

Sure, you probably know a lot of browser shortcuts if you’re a long-time user of Chrome, but we should mention some lesser-known settings anyway. You can quickly scroll to the top or bottom of the current web page by hitting Ctrl+Alt+(up arrow) or (down arrow), and page up and down can be achieved by hitting Alt/Search+(up arrow) or (down arrow). If you need to zoom in or out on a particular page, Ctrl and + or – will control your zoom level on individual pages, and Ctrl+0 will reset the zoom level.
If you need to open a link in a new tab, holding Ctrl while clicking the link will do just that. While holding Alt while clicking constitutes a right-click on a link. You can save your current page as a bookmark by hitting Ctrl+D, and you can find specific text on a page by hitting Ctrl+F.
One of the most useful shortcuts when you’re trying to head to a URL—type your text in the URL bar, and then hit Ctrl+Enter to automatically insert the ‘www.’ and ‘.com’ of a URL. One more browser shortcut: everyone knows Ctrl+H will open your history, but if you need to view your previous downloads, Ctrl+J will display the downloads page inside Chrome. Pretty useful stuff.

Utilities and Other Shortcuts
Here are just a few more miscellaneous shortcuts we think are really useful. First, one of the most important, hardest-to-find shortcuts is the ability to take screenshots on Chrome OS, but it’s actually pretty easy. There are two different ways to take screenshots.
The first, Ctrl+ ![]() , will take a screenshot of the entire display, while the second, Ctrl+Shift+
, will take a screenshot of the entire display, while the second, Ctrl+Shift+ ![]() , will enable a cursor on your display. Drag the cursor around the area of the screen you want to take a shot, and the partial screenshot will save to your system memory.
, will enable a cursor on your display. Drag the cursor around the area of the screen you want to take a shot, and the partial screenshot will save to your system memory.
Another hidden shortcut: Chromebooks don’t have a caps lock key, with the infamous toggle replaced by the Search function.
Caps lock isn’t missing on Chrome OS, though—rather, it’s just hidden. To access it, just hold Alt and tap the Search button. A pop-up will appear on your display letting you know caps lock is on, and an icon will appear in the info panel of your shelf until you disable caps lock with the same shortcut.
And hey, if you forget any of these shortcuts—or want to learn the ones we didn’t mention here—just tap Ctrl+Alt+? (question mark) to see a keyboard map of every Chrome OS shortcut.

Launcher Tricks and Tweaks
You might not know this, but just like Android, Chrome uses a “launcher” as a way to start apps, web pages, games, and so much more. Chrome’s launcher isn’t quite as fully-featured as some of the launchers we’ve seen on Android, but that doesn’t mean there aren’t any neat tricks you can do from your desktop that don’t require launching other applications or Chrome tabs.
A lot of these tips depend on using the circle icon for your menu in the bottom-left corner of your screen, so if you haven’t familiarized yourself with that menu, this is a great way to do that too.

So first: the app launcher has a bunch of hidden features, including using the launcher as both a calculator and a unit converter. Because the app launcher’s search functions as a Google search, any of the tricks you know to search stuff in Google can work here too. For example, if you need to check a simple formula quickly, just enter it into your app launcher (which launchers either from the circle icon in the left corner of your shelf, or by hitting the search button on your Chromebook’s keyboard). You won’t even have to hit enter—your answer will display in the central box on your desktop.
The same goes for unit conversions, so you can try entering 4 miles in feet or 3 inches in centimeters, and your answer will pop up without having to hit the search button. If you don’t see your answer, hitting enter will load the page inside your browser, where you can find your answer using the full power of Google’s search functions.

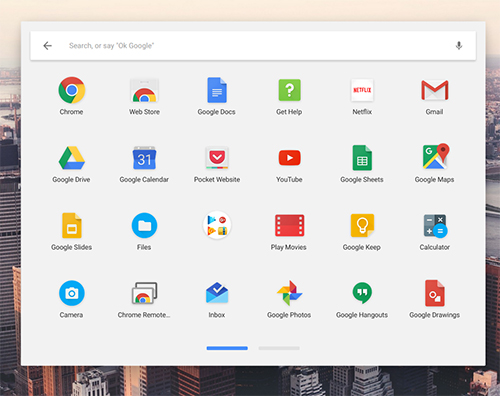
Here’s another trick: you can use that app launcher to open apps with your voice, similar to how you would on Android. You do have to enable the option inside your settings, but it’s really easy. Open your settings app by accessing the menu through the notification center in the bottom-right corner of your display, and type “OK Google” into the search box.
On the corresponding card for your search engine settings, turn on “Enable ‘OK Google’ to start a voice search.” While you’re at this screen, you might want to consider enabling Google Now cards for your app launcher as well.
Now, instead of hitting that search button, you can just say “OK Google” the way you would to any phone, tablet, or Google Home device to begin searching. You don’t even have to have an app open—you can do it from any new tab, the app launcher, or Google’s own website. And just like with any of your other devices, Google will talk right back to you, while also display the results of your search on your Chromebook’s screen.
One more neat trick for your launcher: you can divide apps into folders to make finding your applications a lot easier. Launch the app launcher by hitting the search button and selecting “All Apps” from the corresponding list. When you’re looking at the list of apps installed, select the one you want to use to start a folder.
Drag and drop the app on top of another app to create a folder. To access the folder you just made, just tap the folder icon with your mouse or finger. You can name the folder from inside this menu at the top of this display.
Hidden System Apps and Functions
Sure, we mentioned that caps lock is included in Chrome OS—it’s just hidden behind a keyboard shortcut. But there are plenty of other similar hidden apps and functions that are disguised or buried inside of Chrome OS that can make your daily usage a little bit easier or more advanced.
While not every user will need these tweaks, we’ve highlighted the three best functions hidden by Google which most users will be able to take advantage of. Let’s take a look.

Our first hidden app: a task manager. That’s right—despite being based on a browser, Chrome OS has a built-in task manager that users can deploy whenever a tab, extension, or Chrome app freezes up and takes your Chromebook with it.
Similar to Windows or macOS, you launch Chrome OS’s task manager with a keyboard shortcut: Search+Esc. You can also use Shift+Esc to launch the task manager, but you’ll receive a warning that the shortcut has moved, and we aren’t sure how long you’ll be able to use the Shift key to gain access.
The task manager launches as its own window on the desktop and works as any other task manager would. Every Chrome tab, extension, and app running in the background will appear, and you can sort based on CPU usage, memory consumption, or alphabetically. Highlight any task you need to close and hit the “End Process” button at the bottom of the window. Once you’re done with the task manager, just exit out like you would any other window.

Next up: guest mode. That’s right, you can securely hand your Chromebook to anyone who needs to use your laptop, with the knowledge they won’t have access to any of your data, passwords, or applications.
Like most of the tips in our guide, you’ll have to dive into your settings menu to get started, and select “Manage other people” under “People.” Inside this menu, you’ll find a toggle for “Enable Guest Browsing.” Just flip it on, and that’s pretty much it.
Now, when you log out of your user on Chromebook, you’ll find an option to load Guest mode, giving your friends or family a way to browse the web or check their email without going into any of your accounts or settings.

One more hidden feature: though Chrome OS has a dedicated Downloads folder, it also syncs up with Google Drive, with a link to your Drive account built right into the file browser. Since most Chromebooks have a small amount of local storage, you might want to consider changing your Downloads destination to your Google Drive account.
It’ll still appear right inside your file browser like normal, and you’ll have the added benefit of being able to view your files on any device signed into Google Drive. To enable the feature, open your settings menu again and this time hit “Show advanced settings” at the bottom of the display. Find the “Downloads” section, or search for it using the search function at the top of settings.
You’ll see a few different settings; we’re looking for “Location.” Hit the “Change” button on the right side of the settings and select your Google Drive folder or any folder inside of Drive. You can also use this method to change your save destination to an SD or microSD card.
Extensions for Everyone
Though Firefox popularized the idea of using extensions to add functionality to boring old browsers, Chrome was the browser that really brought that idea into the modern era. There are so many third-party extensions for Chrome, Google offers an entire extension store for browsing and adding extensions you might be interested in.
Your Chromebook even comes with a few pre-installed, but if you’re looking for more extensions to help with your daily browsing, check out some of these suggestions below. They’re easy to add and install—just a few clicks and you’re done!

- Honey – Honey is one of our favorite shopping extensions, and a near lifesaver when it comes to shopping online and looking for the best deals. Honey will automatically search and apply any coupon code it can when you’re checking out from nearly any website, including Amazon, Walmart, Newegg, and so much more. The app works nearly automatically and averages near a full five out of five stars on the Chrome Web Store.
- Turn Off The Lights – No, this won’t make it so your computer controls all the lights in your house. What it does do, however, is dims the white space around YouTube and other similar video players, making it easier for your video to stand out and be less distracting. It’s off by default, and only turns on when you want. The app is super lightweight, and in addition to YouTube, it works with Hulu, Dailymotion, and so much more.
- LastPass – When it comes to security, you can’t be too careful. LastPass makes it easy to keep all your passwords in one place, generate random passwords of any length and combination of characters, and autofill your passwords. It’s one of the best password managers on the market, in part because it’s easy to set up and has an entirely free tier.
- uBlock Origin – More and more people are using ad blockers these days, and it’s easy to see why. Some ad networks have gotten a bit too out of control lately, with large, full-screen ads stopping you from viewing content, and other ads stealing your personal data. While AdBlock Plus is one of the most popular blockers out there, we recommend the newer and lesser-known uBlock Origin, a much-lighter ad blocker that doesn’t consume nearly as much memory as AdBlock Plus while offering the same abilities.
- Google Translate – Though you might not use it very often, Google Translate can save you a lot of time if you load up a page in a foreign language or you don’t recognize a word. It can quickly and easily translate both individual sentences and entire pages of text with just a couple of clicks, saving you a lot of time and frustration if you aren’t familiar with the source language.
- Currently – One of our favorite new-tab modifiers is Currently, which refreshes your new tab page with some actual information you can use to benefit your everyday life. Instead of links to your most-viewed pages, Currently shows you your current time and weather, as well as the extended forecast over the next few days. Currently is gorgeous, with brilliant colors, typography, and visual effects like starry nights. If you want a new look for your browser, check this one out.
- Pocket – This wouldn’t be a list of the best extensions for Chrome without mentioning Pocket. If you’re an avid consumer of articles and media online, Pocket helps save and sync articles, videos, and anything else between your devices for later. You can save articles for offline consumption, you can read articles in an enhanced reading view, and everything syncs between your tablet, phone, and laptop
In Case of Emergency, Break Glass
When you’re busy tweaking your Chromebook, accessing hidden files and folders, and installing a ton of applications and extensions, you might forget that your Chromebook is still a computer, complete with bugs and occasional crashes.
While most of these can be fixed with a simple reboot, sometimes you might go a bit too far in your quest to revolutionize the Chrome OS experience, and your computer will need a hard reset to get back to working order. Google’s thought ahead, however, and developed a Chromebook Recover Utility, which can help if you ever run into a serious problem.
Chromebooks don’t have recovery partitions like most Macs or PCs—there just isn’t enough room on the flash storage included in your device. The good news: it’s really easy to make an external recovery device for your laptop, and all you need is a 4GB or larger SD card or flash drive.

Head over to the Chrome Web Store and grab the Chromebook Recovery Utility for your device. It’s a small utility, and though it’s not super-highly rated, most complaints spawn from a number of problems with users not being able to use their specific flash drives, so make sure your device is supported beforehand by reading through some of the recommendations.
If you’re already experiencing issues with your Chromebook, you can also use the utility on any Mac or PC. Using the utility, just input your model or enter the model number in to the given field, and insert your storage device into the computer.
The Recovery Utility will guide you through making the recovery key, and once you have it, you’ll be safe and secure should anything happen to your device. IF you do run into an issue where your Chromebook is displaying a “Chrome OS is missing or damaged” error, just insert the recovery media you made with the utility, and you’ll be guided through re-installation instructions for your Chromebook.
Though you might never have to use the recovery key for your device, it’s still a good idea to keep one lying around just for emergencies. It can be the difference between completing your big paper or presentation the night before it’s due and facing failure or embarrassment at work or school.
For Advanced Users Only
If you come this far in the guide and you’re still looking for some more tweaks and changes for your Chromebook, you’re probably a tech-savvy user looking for some extra functionality. We’ve got you covered. Our best advice for getting some additional use of your Chromebook is installing Linux on your Chromebook—and we have a whole guide for it you can check out right here or by using the link at the top of the page. Installing Linux onto your Chromebook is really easy, though not without its fair share of risks.
Our guide walks you right through every step using a program developed by a Google employee called Crouton. Your Chromebook will still run Chrome OS after you’re done, but you’ll be able to side boot into a Linux distro called Xfce4.
From gaming to development, running Linux on your Chromebook can change how you use the device day-to-day, so if you’re ready to take the plunge, check out our guide.

We aren’t out of tips, however. One you might want to check out: unlocking your Chromebook with your phone. Chromebooks require your Google password every time you unlock your device, which can get annoying fast if you have a complicated password—or if you use LastPass as we mentioned above.
Luckily, Chrome OS plays well with Android, almost like a key to a lock. Open your settings menu and click “Show advanced settings” at the bottom of the page. Find Smart Lock using the search function and his Set Up to pair your phone to your Chromebook. If it isn’t, make sure Bluetooth is enabled on both devices. The setup process only takes a few moments, and after that, you’ll be able to unlock your Chromebook with an unlock of your phone. Do note you need a lock on your smartphone to use this tweak.

If all that isn’t enough to satisfy your need for new features, we have one more trick up our sleeve: Chrome channels. Since Chrome OS updates the same time as the browser version, you can change your version of Chrome all the same, without needing to install any additional software.
In addition to the default stable channel, Google offers Beta and Developer channels, which bring new, untested features and, in some cases, a lot of bugs. If you’re ready to welcome the problems with the benefits, open your settings display, and click “About Chrome OS” to view your system information. Hit “Detailed built information” at the bottom of the panel, and you’ll be prompted to change the version of Chrome you’re using.
If you’re wondering what each version is, Google does a good job breaking down each channel here. The short version”
- Stable: A fully tested version of Chrome, updated every 2-3 weeks with minor changes and every 6 weeks for major changes.
- Beta: Lets the user test upcoming changes while remaining low risk. Beta is updated every week, with major updates every 6 weeks, up to a month before Stable.
- Developer: The newest of the new features, but very untested and highly unstable. Developer is updated once or twice a week.
We recommend only moving to Beta; the Developer channel is a bit more unstable than most users will like. Once you make your change, your Chromebook will reboot into the newer version. Your Chromebook will only be wiped if you move to a more stable version (ie, Developer to Beta or Beta to Stable), so keep that in mind before you dive right to the Developer edition.
Disclaimer: Some pages on this site may include an affiliate link. This does not effect our editorial in any way.