Excel’s IF statements are one of the most used and useful features, and for a good reason. They are very powerful to help sort and assess data based on the values you put in the function. IF statements are one of the most flexible and customizable functions of Excel, that can be used for various purposes.
If you are new to Excel or want to learn how to make the best of this function, read on. In this article, we are going to explain the basics of constructing a fully working IF-THEN function.
How to Use IF-THEN Statements in Excel
IF-THEN statements in Excel work by creating a paradigm for delivering logical conclusions based on the values you enter in the formula. The formula is quite plain and easy to understand, consisting of two main parts: the IF and THEN parts.
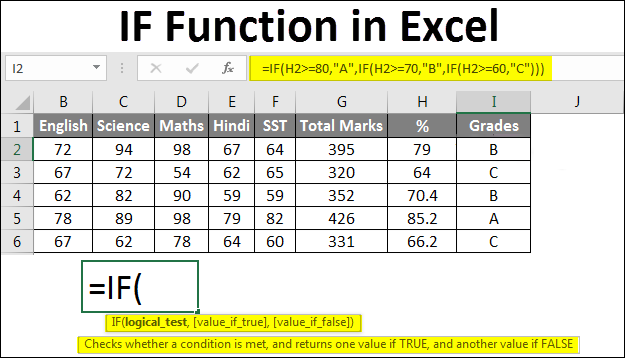
The basic IF-THEN formula in a cell looks like this:
=IF(logicaltest,value if true,value if false)
The following paragraphs will further explain the logical test and resulting values.
IF: Logical Condition
In simple words, the IF part of the formula sets up the logical test which will be used to divert to the “value if true” or “value if false” statements. The IF part must have a Boolean type, which is a specific type that can be either TRUE or FALSE. The logical test part also accepts numbers, where anything other than 0 is considered TRUE.
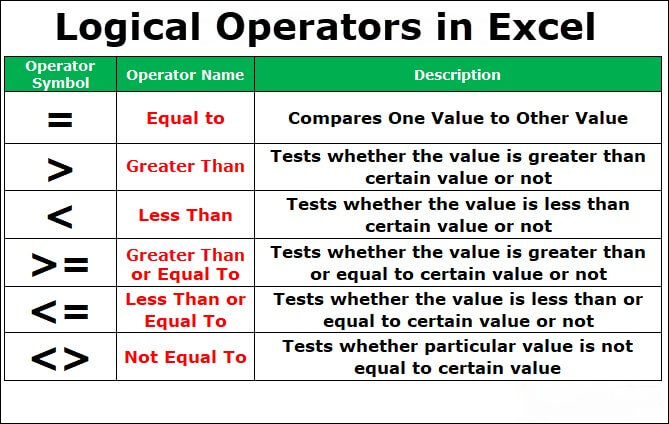
This IF statement commonly contains various values or cell references coupled with comparison operators and functions that will determine the result of the logical test.
- > (more than)
- < (less than)
- = (equal to)
- >= (more than or equal to)
- <= (less than or equal to)
- <> (not equal to)
A properly-made IF statement will provide one of the two possible Boolean values, which will determine which branch of the THEN statement will be used. Otherwise, the formula will produce a “#VALUE!” error.
Let’s see how to create the logical test on a simple example: “=(B2>C2).”
To make it straightforward, consider that both B2 and C2 cells contain a numeric value. In this case, this logical test returns TRUE if B2 has a higher number than C2, and FALSE if C2 is equal to or larger than B2.
It’s possible to compare values of a different type (for example text strings and numbers), but these have various rules which might not align with what would be considered useful (“paper”>45 returns TRUE).
THEN: Values if TRUE or FALSE
Now to the concrete part of the formula. The THEN part of the statement is silent here, meaning you never write it explicitly – but think of it as existing after the logical test part.
If the logical test contains the condition, the arguments in the THEN form are the results that you wish to appear in the cell’s value.
The values in Excel can refer only to a certain type of data: text, numbers, dates, and finally, Boolean data. String (text) values you use must be put into quotation marks.
What is important when forming a working IF-THEN statement is that the “value if true” will only be used if the condition you set is TRUE, and so on.
Note that you must separate all three formula parts with commas. When separating parts of the formula, pay attention to which separators you use. Global Excel versions require the semicolon as the separator. On the other hand, older versions of Microsoft Excel still use commas to divide the condition and the values.
After you have added values to the statement, the formula will work by the condition you set earlier. Going back to the example given above, if the B2 truly is greater than C2, the result will be the value that was put under “value if true” and vice versa.
How to Create a Fully Working IF-THEN Statement
To input the IF-THEN formula in a cell, you can choose either of the following ways:
- Select the cell and type the formula in the formula bar or the cell itself. The formula bar is positioned above the worksheet.

- Select the cell, then click on the formula icon (fx) next to the text input bar on the top and choose “IF” from the list of formulas. Click on “OK” to continue to the formula builder.


When choosing the first option, keep in mind that you have to accurately track which value types you’re using for the conditions and outputs.
If you use the formula selection dialog and use the builder, you get a better visual overview of the formula. The builder will directly put the necessary punctuation marks, and all you have to do is populate the three fields. The builder also displays the results of the logical test considering available information (TRUE or FALSE) and the overall result. You can look at how the builder words the formula based on your textboxes for future reference.
How to Use Multiple IF-THEN Statements
Excel users love the IF-THEN statements for their ease of use and customizability. That means that, aside from its basic functionality, you can embed multiple other formulas inside the main IF statement. You can even put IF statements in one another, with Excel allowing seven IFs at a time.
Sounds like too much math, doesn’t it? It is quite simple and we are going to show you how you can use more than one IF-THEN statement in an Excel cell.
How to Nest a Function

Inserting another formula as an argument in Excel is called nesting. A single IF-THEN formula can contain up to 7 different nested functions (according to the formula builder; Microsoft support suggests up to 64 nests).
You don’t have to nest the same function, and combining IF-THEN formulas with sums or averages is pretty common. Nesting IF-THEN functions, on the other hand, requires a decent amount of practice and logical progression. If a formula is not done well, it can be difficult to follow and produce incorrect results.
One of the easiest examples to showcase IF-THEN nesting is for grading assignments. Let’s consider an example when test scores are assigned grades of A to F with common benchmarks (90, 80, 70, and 60).
Here’s how that would work in practice for a cell: “=IF(C2>=90,”A”,IF(C2>=80,”B”,IF(C2>=70,”C”,IF(C2>=60,”D”,”F”))))”
Let’s break it down a bit. If the numeric score in cell C2 (between 0 and 100) is greater than or equal to 90, the assigned grade will be A. Otherwise, the formula continues to the second part of the statement, which is the second IF function, and so on. If the score in C2 is less than 60, Excel will pass through all IF-THEN functions and determine the result as “F.”
Nesting formulas is a useful tool to perform more complex calculations if needed. They are fairly easy to construct and can provide you with fast results, which probably would take up a lot of time if you did them “by hand.”
The IF-THEN Function Will Do What You Tell It to Do
The possibilities of using the IF-THEN function are as limitless as the criteria you give it. The key is to stick to the plain format of the formula and play with the details. Know which part of the formula goes where, and then give it meaning to your own needs.
The Excel formulas work by logic and don’t question your intentions much. You must know exactly what you want to achieve with the statement and then speak to the program in the only language it understands. That means understanding and knowing how to write a clean formula.
What’s the most creative way you used the IF-THEN formula in your Excel sheets? Tell us in the comments below!
Disclaimer: Some pages on this site may include an affiliate link. This does not effect our editorial in any way.


