Matroska video, popularly known as MKV, is a container format designed for holding multiple multimedia files. But, the MKV container format isn’t as common as the MP4 and tends to have trouble uploading. The process of finding devices that are compatible with this format can also be exasperating.
Most users prefer to convert the MKV file to MP4 to access and enjoy higher video and audio quality content. So, how do you go about this? The VLC media player provides a fairly straightforward way to convert this format.
In this article, you will get to learn how to use VLC to convert MKV to MP4 and some conversion troubleshooting tips.
Using VLC Media Player
VLC is a firm favorite for many because it incorporates a wide range of video and audio formats, including MKV. But you can also use its Convert feature to change your video format if you still need your files in MP4. Check out the steps below to get started.
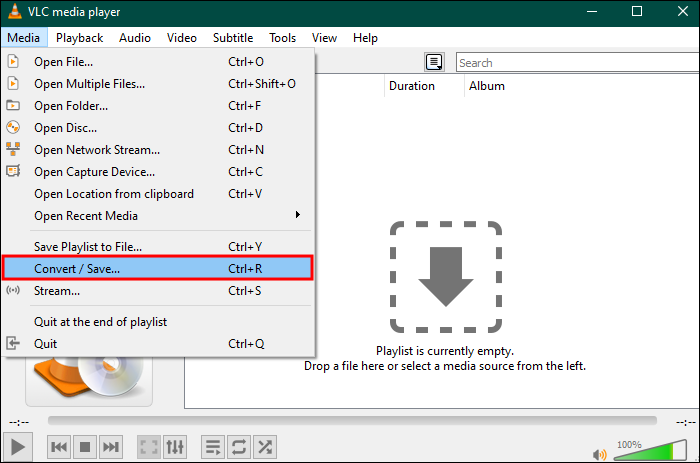
- Click on the “Media” option at the top left of your VLC main window.

- Scroll down the dropdown menu and click on “Convert/Save.”

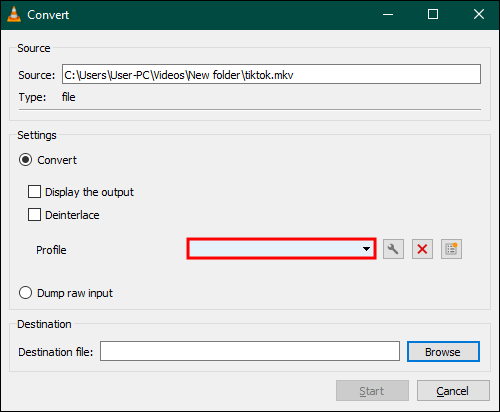
- Select “Add” and find the MKV video you want to convert.
- Click “Convert/Save” once the video is uploaded.
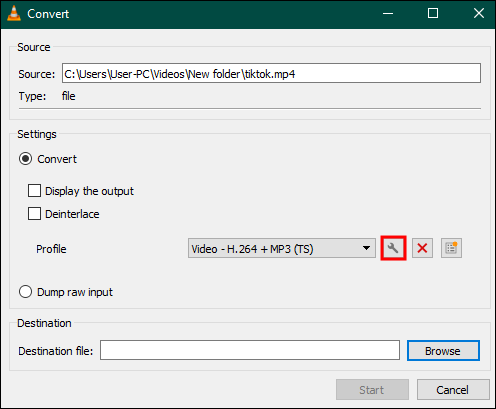
- A “Convert” dialog box will appear. Click on the dropdown arrow under the “Profile” option.
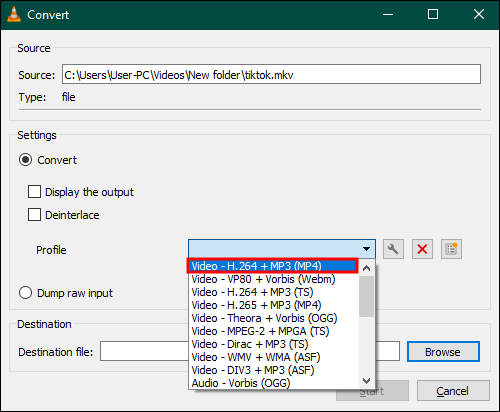
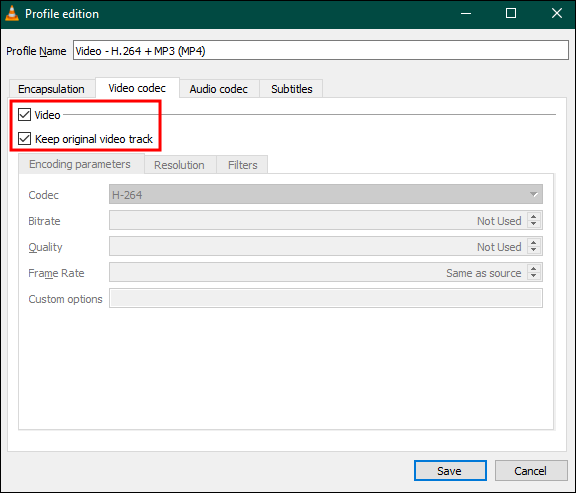
- Choose “Video – H.264 + MP3 (MP4)” and click the “Settings” icon to its right.
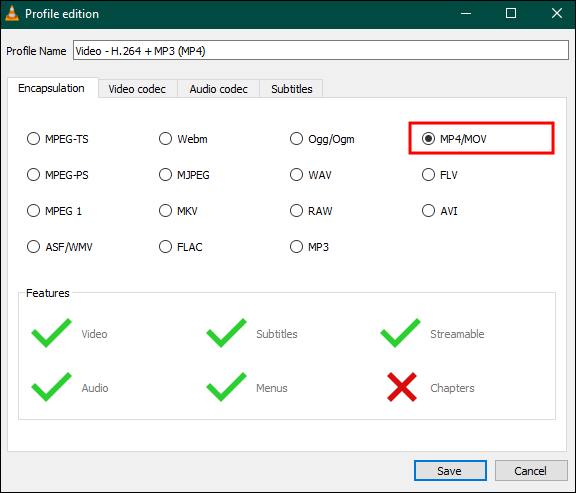
- Select “MP4/MOV” under the “Encapsulation” tab.
- Navigate to the “Video codec” tab and check both the “Video and “Keep original video track” boxes, then click the “Save” button.
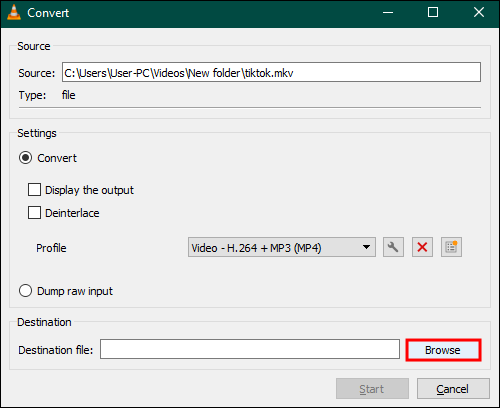
- Click the “Browse” option under “Destination file.”
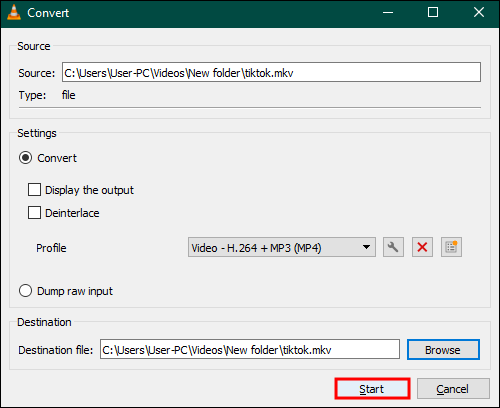
- Find the “Start” button on your current dialog box and click on it to complete the process.


Pro tip: If you find that you’re still unable to convert your MKV file to MP4 using this method, change the “Input Video – H.264 + MP3 (MP4)” to “Video – H.265 + MP3 (MP4).” Set up your Video codec to “Codec= H- 264” and Audio Codec to “MPEG 4 (AAC).” This is known to do the trick.
VLC will display the conversion progress and automatically save your video under the destination folder once the conversion is complete. If you notice that after converting your MKV video to MP4 that there is an audio synchronization issue, here’s what you can do:
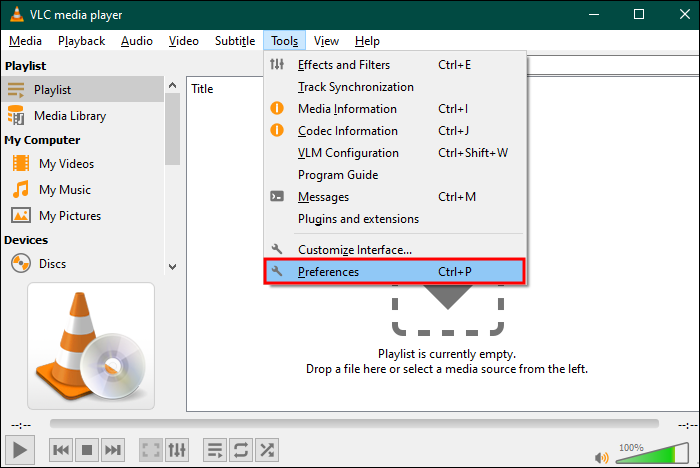
- Open your VLC main menu and navigate to “Tools.”
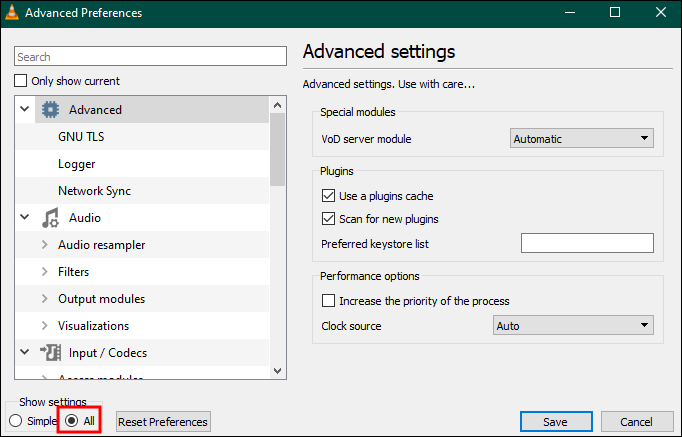
- Click on “Preferences,” then select “Advanced Preferences.”
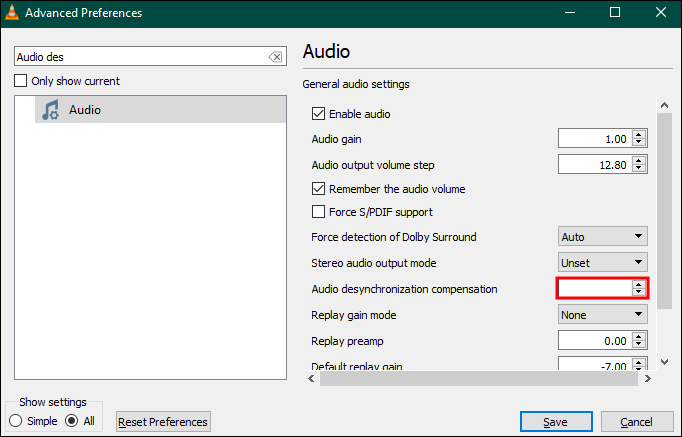
- Select the “Audio” tab, then click on “All’ under “Show Settings.”
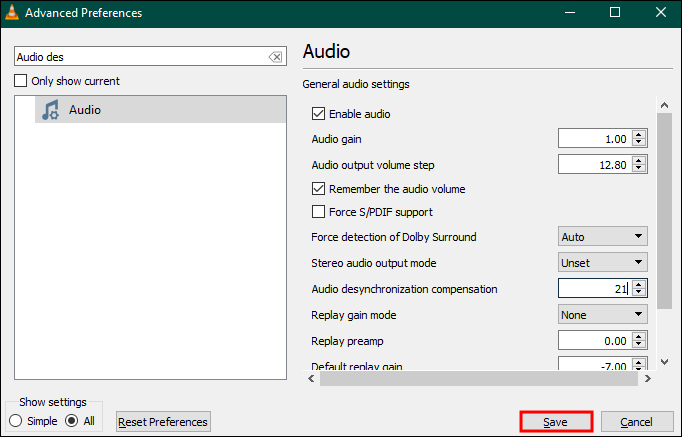
- Locate the “Audio desynchronization compensation” setting and enter a value. To slow down the audio, input a negative value and a positive value to hasten the audio.
- Click on “Save” to complete synchronization.

Understanding VLC Video Conversion
You can easily change your file formats via VLC, but the app has some drawbacks, including:
- You can’t dictate the quality and resolution of your video file.
- The conversion rate is slow, especially for MKV formats.
- You can’t edit your video before conversion.
- It offers you less control over output compared to paid video conversion tools.
- The quality of MKV-converted files is lower compared to paid programs.
Quick Fixes for VLC Won’t Convert MKV to MP4
VLC may fail to convert your videos in some instances. Below are some common culprits and some quick fixes on how to solve the issue.
Audio Incompatibility
The MP4 container format doesn’t support Digital Theater Sounds (DTS), while the MKV supports this audio format. Consequently, you may find that your video has no sound after conversion. There are several ways you can fix this issue. Try the options below to fix your audio problem:
Enable Audio Stream Using Windows
The MKV format utilizes both video and audio streams. If you haven’t checked the audio stream option under Codec settings, it may not work. You need to make sure the audio option is enabled to avoid this issue. Here’s how you can do it when using VLC on Windows:
- Open the Convert/Save window in VLC.
- Find the “Add” button and select it to add the video whose format you want to change onto the VLC player.
- Scroll down your current window and select the “Convert/Save” button.
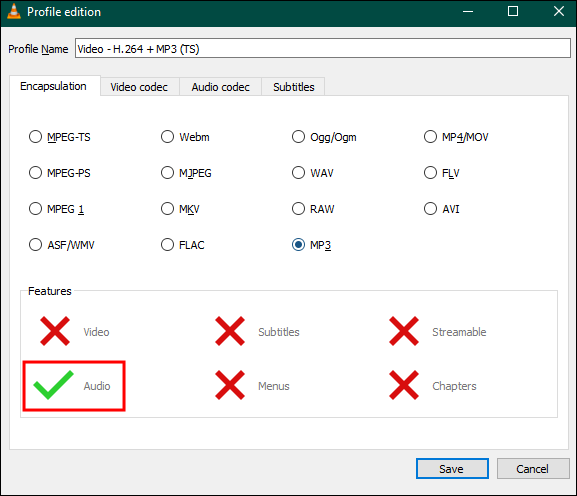
- Select the “Wrench” icon to edit the chosen profile.
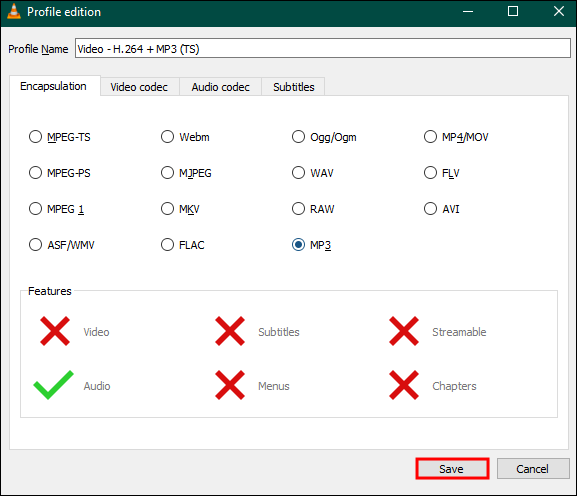
- Enable the “Audio” stream option by checking the box next to it.
- Click on “Save” and begin the conversion.
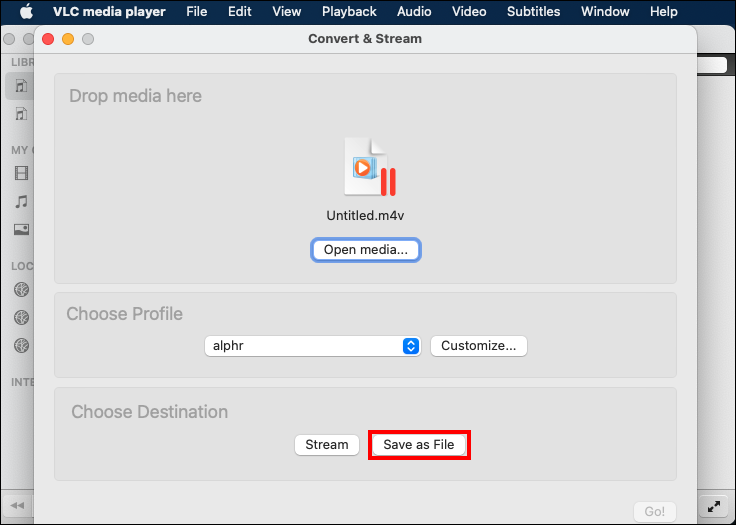
Enable Audio Stream Using Mac
While the steps in enabling the audio stream are similar for the two, the naming might differ in the MACs VLC version.
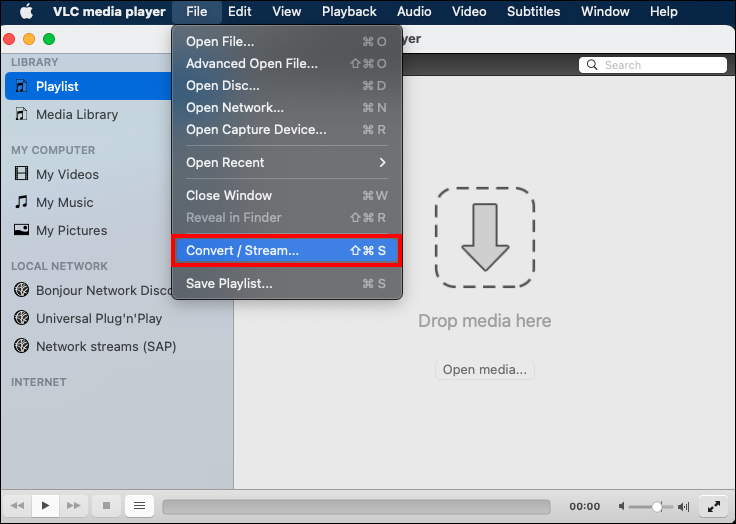
- Launch your VLC Player and click on the “File” menu.
- Select “Convert/Stream” and add the video you want to convert.
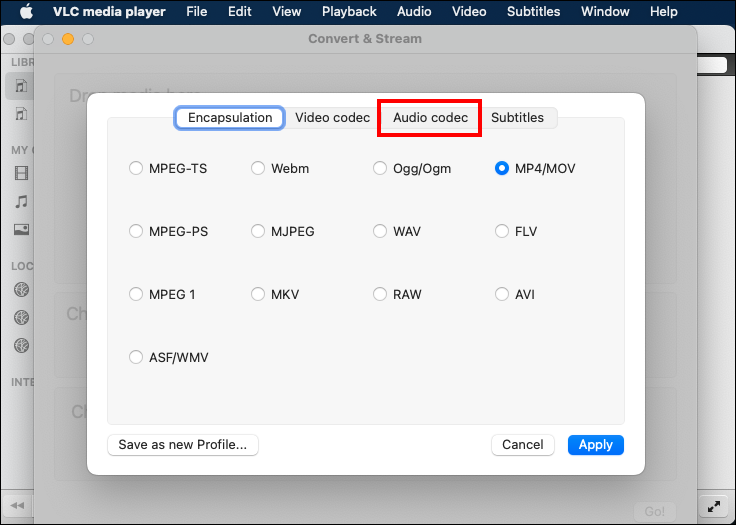
- Click the “Customize button” and select the “Audio Codec” option.
- Check both “Audio” and “Keep original audio track.”
- Select “Save as File,” then choose a destination file to start conversion.


Unstable VLC Software
There are reports from the VideoLan Forum that recent VLC updates have been unstable. So, if you’ve recently updated your VLC software and are unable to convert your MKV video to MP4, it is recommended that you use an older version to help convert your file. Try installing an older version and check whether the issue will be resolved.
Check Your Codec Settings
The VLC media player requires that you adjust Codec settings for some formats, including MKV. Double-check your Codec settings because choosing an incompatible stream will likely interfere with your MKV to MP4 video conversion. If the MP4 still doesn’t support video conversion, you’ll have to use third-party applications.
Slow Conversion Rate
You might observe that your conversion progress bar has halted or it’s too slow. This error can result from large video file sizes or an overtaxed CPU. Disabling all other applications when running your VLC media player is the best solution to help accelerate the speed.
Using Third-Party Application
Try using a different file converter, such as TinyWow Video Converter. This is a professional grade free tool has more features that can quickly resolve audio stream and Codec settings issues.
FAQs
Does your MKV format container lose quality when you use VLC to convert it to MP4?
Yes. It’s likely that your video quality and resolution will go down after using VLC because it re-codes the video.
Why should you choose VLC for your MKV conversion?
This open-source video converter is convenient because it can support a wider range of formats.
Master VLC MKV to MP4 Conversion
MKV’s main limitation is compatibility. The VLC media player provides a convenient way of converting your files to MP4 format. VLC also boasts a user-friendly interface and has a range of features for the most common uses. However, a third-party application may give you more options if you need more advanced features.
How often do you convert files using VLC? Why do you prefer it over paid applications? Let us know in the comments section below.
Disclaimer: Some pages on this site may include an affiliate link. This does not effect our editorial in any way.