The Android platform is known to be highly customizable. If you own an android, changing how your screen looks is a great way to personalize your device.
In this article, we’ll show you a few ways on how to change the resolution on Android so you can set it up just the way you want it.
Checking Device Settings
The first thing you should check if you want to change the resolution of your Android device is the settings menu. Some manufacturers allow different resolutions on their devices, and have them readily available through the menus. Resolution would usually be found under Display settings, but might be under Accessibility settings as well. If you’ve checked both and didn’t find them, changing your resolution will be a more involved process.

Root vs. Non-Root Method
If the manufacturer hasn’t included a way to adjust the resolution by default, you can still change your Android’s dpi settings in one of two ways. You can use either root or non-root methods. Rooting means that you’ll be accessing the device’s system code – it’s like the Android version of jailbreaking. There are advantages and disadvantages to both these methods.
If you root a phone, changing the resolution will be slightly easier, because all it takes is downloading an app from the Play Store to do the work for you. The downside is that, because you’re opening access to the system code, you’re leaving your device vulnerable to unwanted editing. If changes to the system are done incorrectly it may brick your device. That, and rooting, will void most manufacturer’s warranties.
The non-root method avoids these problems, sure. But the process of changing the resolution becomes a bit more complicated. We’ll outline you the steps here so you can decide for yourself which method to choose.
Changing Your Resolution Using the No Root Method
To change the resolution of your device using the no root method, you’ll be using a tool called the Android Debug Bridge or ADB for short. ADB communicates with your device and gives you the ability to run different actions using typed in commands. That being said, you’ll need a computer and a way to connect it to your Android machine.
First, download ADB from the Android Developer’s Studio webpage. Either by getting SDK Manager which has ADB included, and installs it for you, or getting the standalone SDK Platform Package.
Download SDK then extract the compressed file to your preferred location.
Next, you’ll have to enable USB debugging on your device. Doing this is easy, just follow these steps:
- Open Settings.
- Look for About Phone, or about device. If you can’t find it, look for System and find it there.

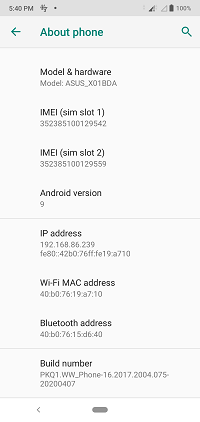
- Open About Phone and scroll down until you see Build Number.
- Tap on Build Number multiple times. You’ll get a warning that you’re about to enable Developer Options. Click OK.
- Go back to either Settings or System and look for Developer Options then open it.
- Scroll down until you see the USB Debugging option and click enable.
- Use a USB cable to connect your Android to your computer.

Now you’ll be using ADB to change the resolution. Do as follows:
- Open command prompt. This can be done by typing cmd on your taskbar search or by pressing Windows + R and typing cmd.
- Open the directory where you extracted ADB. You can do this in the prompt by typing DIR to get the list of folders then typing CD followed by the name of the folder you wish to open.
- Once you’ve opened the directory type in adb devices. You should see the name of your device on the screen. If not, check if the USB debugging has been properly enabled.
- Type in the adb shell to issue the command to communicate with your device.
- Before you change anything, you should remember the original resolution of your android just in case you want it back. Type in dumpsys display | grep mBaseDisplayInfo.
- Find the values for width, height, and density. This is your device’s original resolution and DPI density.
- From here you can change the device’s resolution by using the command wm size, or wm density. Resolution is measured by width x height so the original resolution as per the image above would be 1080 x 2280. If you were to give a resolution command this would be wm size 1080×2280.
- DPI ranges from 120-600. For example, to change the DPI to 300 type wm density 300.
- Most changes should happen as you input them. If not try restarting your device.


Changing Your Resolution by Rooting
Due to Android’s nature as an open source mobile OS, there are thousands of manufacturers for a multitude of different devices. You’re going to have to check the proper way to root your particular device as it may not be the same process as most others.
Looking for a rooting method that’s specific to your device ensures that you don’t accidentally brick it. Be careful about this, as rooting itself will void your warranty, and your manufacturer may not accept it for repair.
If you already have a rooted device, changing the resolution is as simple as downloading an app. Currently, the most popular one you can use is Easy DPI Changer Root from the Google Play Store. It’s free to use and has great reviews. There are other apps available, but not as highly rated as this one.
Adjusting to User’s Tastes
One of Android’s advantages is that it’s made to adapt to many kinds of machines. This means that the system itself was designed to adjust to the taste of its user. Being able to change the device’s resolution, though not standard, can be done by any Android user with minimal effort.
Do you know any other methods to change the resolution in Android? Share your thoughts in the comments section below.
Disclaimer: Some pages on this site may include an affiliate link. This does not effect our editorial in any way.


