Has it ever happened to you that an image looks one way on your display and completely different when you print it? Factors such as gamma, brightness, contrast, etc., have a huge impact on the way your screen displays colors. If you’re an artist or a designer, you know how important colors on your screen are. Today, various color calibration tools are available that can help you adjust your display and get the best image possible.
If you’re wondering how to change the gamma on Windows 10 and customize other color calibration settings, look no further. In this article, we’ll show you what you can do to get the most accurate colors on your Windows 10.
How to Change Gamma in Windows 10
Gamma is the relationship of red, green, and blue on the screen. It controls the amount of light that’s emitted from the display.
How to Adjust Screen Gamma
If you want to adjust your screen’s gamma, follow the steps below to access the settings:
- Open the Start menu.

- Tap the gear icon to access settings.

- Tap “System.”
- Tap “Display.”
- Under the “Multiple displays” menu, tap “Advanced display settings.”
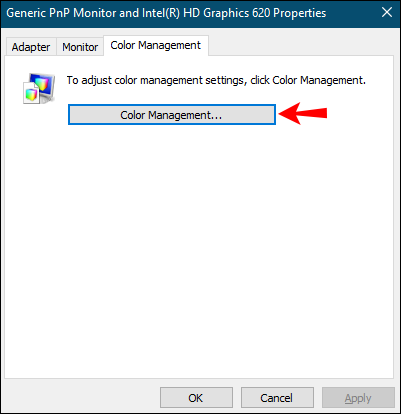
- Tap “Display adapter properties for Display 1.”
- Tap the “Color Management” menu.
- Tap “Color Management.”
- Tap the “Advanced” menu.
- Tap “Calibrate display.”


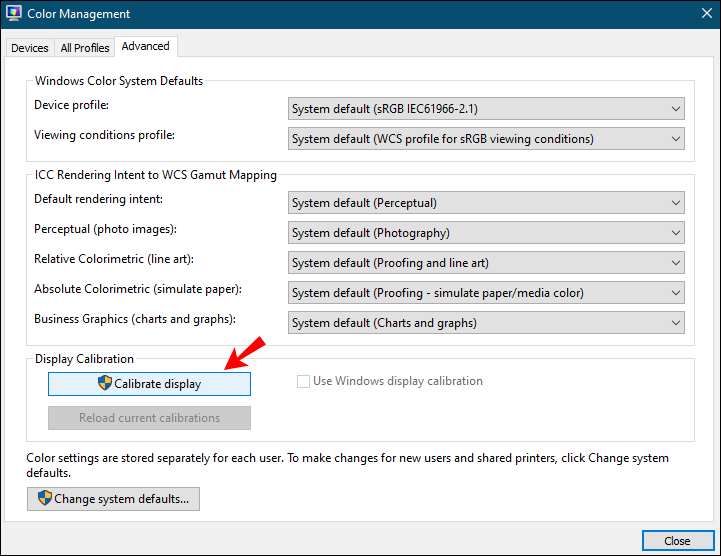
The Display Color Calibration wizard will pop up on your screen. If you’ve never done it before, you can tap “How do I calibrate my display?” to get more information. When you’re done, tap “Next” to access the calibration.
The first modification in the color calibration menu will be gamma adjustment.
Gamma Too Low

Windows offers recommendations for what your display should look like with different levels of gamma. When the gamma is too low, the shadows look much brighter. Low gamma makes an image look washed out or flat. The image lacks depth, and details get ruined by the brightness.
You can adjust your gamma to the normal level by switching the slider. When aiming for good gamma, try matching the picture that Windows recommended on the previous page.
Good Gamma

Good gamma allows you to view your images just the way they are. In Windows 10 settings, you move the slider to adjust the gamma levels. If you’re unsure whether you’ve set the right gamma on your display, pay attention to the picture next to the slider. When gamma is properly set up, there should be no smaller circles within the large circles. If you’re not sure whether you’ve got it right, tap “Reset” to go back to the previously set gamma, or go back to look at the recommended picture. Once you adjust the gamma, tap “Next” to move on to additional settings.
Gamma Too High

When the gamma is too high, the image looks much darker. The details in the dark areas of the image are completely lost. The black and white on the image aren’t affected by the high gamma, but the colors are completely changed. The image might even look richer due to the enhanced contrast.
Use the slider in Windows 10 settings to adjust the gamma to its normal level.
Gamma is too high on almost all TVs today. The aim is to get the effect of enhanced contrast and richer tones.
Check Gamma Online
If you want to be sure you’ve got the gamma right in your Windows 10, you can use different online tests. One of them is W4zt Screen Color Test. Here, you can perform a Gamma test to establish if your display’s settings are right. According to the test, most photographer’s web pages are set for 1.8 gamma, while most TVs are set for 2.2. gamma.

Besides checking gamma, this online test enables you to check the colors of your display with a simple task.
After adjusting the gamma, you can use the test to check brightness and contrast by distinguishing between various shades of white and black. If your gamma is set right, this shouldn’t be a problem.
Additional FAQs
How do I adjust the brightness and color?
Besides adjusting gamma in Display Color Calibration settings, you can also adjust the brightness and color of your display. If you want to perform the calibration of brightness and color, it’s recommended to do it in an environment with natural light. This way, you will achieve the best results and calibrate the display correctly. If you’re in a dark room with artificial light, you might not be able to adjust your display adequately.
Brightness
Immediately after adjusting gamma, you can use the Display Color Calibration settings to adjust the brightness level. It’s important to note that you won’t have the option to adjust the brightness if you’re using a laptop. If that’s the case, you can tap “Skip brightness and contrast adjustment.”
The brightness level determines how dark your image is. In the settings, Windows will show you a picture with three different levels of brightness: too dark, good brightness, and too bright. In the background of the picture, you’ll see an X. Use the controls on your display to adjust the brightness levels until you’re able to distinguish the shirt from the suit and until the X in the background is barely visible.
Color
Adjusting the color balance means adjusting how different shades of gray are shown on your display. You can move the red, green, and blue sliders to set the right color balance and prevent the overuse of a particular color. Windows provides examples of how it looks when too many colors are used.
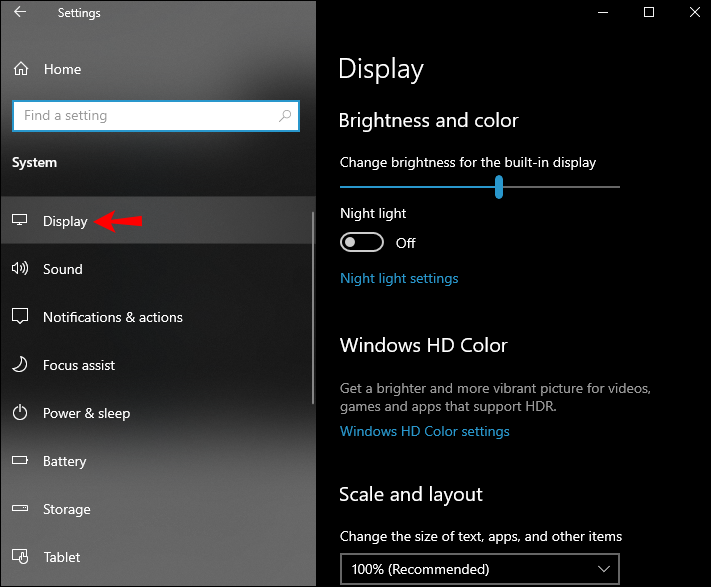
If you don’t want to calibrate brightness and color, you can adjust them in the display menu:
1. Open the Start menu.
2. Tap the gear icon to open settings.
3. Tap “System.”
4. Tap “Display.”
5. You’ll see a slider under “Brightness & Color.” Move the slider according to your preference.
How can I adjsust the contract?
Like brightness, you can’t adjust contrast levels if you’re using a laptop.
The contrast level determines the clarity of highlights. If the contrast level is too high, the light parts of an image will be lighter, and the dark parts will be darker. This is usually seen on TVs. Although it seems like high contrast levels make an image deeper and richer in color, they actually destroy the details.
In the Display Color Calibration settings, Windows offers three versions of an image: not enough contrast, good contrast, and too much contrast. By using contrast control, you should adjust the contrast as high as possible while paying attention to the shirt in the picture. You shouldn’t lose the ability to see the wrinkles and buttons on the shirt.
How do I save the new calibration settings?
If you’ve adjusted all the display settings and want to save the new calibration, you should first compare it to the previous calibration to establish the differences. Once you complete all the settings, you’ll see the buttons “Previous calibration” and “Current calibration.” Sometimes it may seem like the changes you’ve made aren’t significant, so this is a way to notice the differences and establish if anything else needs to be adjusted.
Once you’re sure everything is set, tap “Finish.” If you prefer the previous calibration, tap “Cancel.” However, keep in mind that any settings made with the display controls can’t get restored.
Other Display Settings
The display settings allow you to customize the resolution, brightness and color, layout, etc. Let’s go over some of the options.
As previously mentioned, the first option in the display settings is “Brightness & Contrast.” Here, you can use the slider to set the preferred levels.
The second option is “Night Light.” If you often use your computer at night, you might’ve noticed that your eyes get tired from the blue light emission from your display. By enabling the night light, your display will emit warmer colors that will help you sleep. You can adjust the strength of the night light, and even schedule when you would like it to turn on.
Then, you have the “Windows HD Color Settings.” Here, you can customize and calibrate HDR settings to get a more vibrant picture in apps and programs that support HDR.
The “Scale and layout” options allow you to adjust the display according to your preferences. Under this menu, the first option is to change the size of texts and apps. The recommended option is 125%, but you can choose whatever suits you best. In the “Advanced scaling settings,” you can enter a number from 100-500 to further customize scaling. If some of the apps are blurry after scaling, switch the toggle button next to “Let Windows try to fix apps so they’re not blurry.”
The next option under the “Scale and layout” menu is resolution. Every display has a recommended resolution based on its size, but there are various options you can choose from if you’d like to change this.
Another option you have is orientation. Usually, this will automatically change depending on whether you’re using a computer or a tablet. If you want to change the orientation, you can choose between landscape and portrait and their flipped versions.
Change Gamma Without Drama
Now you’ve learned how to change gamma on Windows 10. Having the wrong display settings can affect the way you view colors. If you’re using your computer for professional purposes and the colors on your display are important to you, you can calibrate your display to make sure everything’s adjusted for viewing images as they are. Besides that, use the display settings to customize your experience further.
Have you ever calibrated your display on Windows 10? What part was the hardest? Tell us in the comment section below.
Disclaimer: Some pages on this site may include an affiliate link. This does not effect our editorial in any way.


