Google Chrome is an incredibly responsive browser. Thanks to the new core algorithm and other optimizations, it can bring up search results in a matter of seconds. However, the same can’t be said about the download speed.
The difference in uplink and downlink speed connections can be quite apparent and frustrating at times. Follow along in this article to help prevent slow download speeds in Chrome.
Update Google Chrome to the Latest Version
It may seem obvious, but running an outdated version of Chrome may lead to lagging. Usually, Google automatically updates the browser in the background, i.e., when you close and reopen it. If you haven’t done that in a while, chances are you didn’t get the latest firmware. Here’s how you can check:
- Open Chrome.
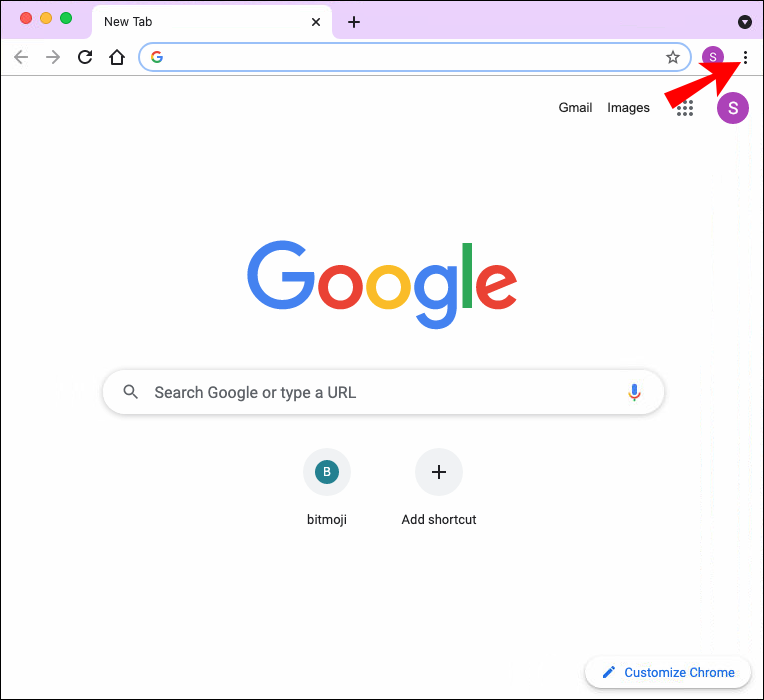
- Click on the three vertical dots in the top-right corner of the screen.

- If the icon is colored green, orange, or red, Google released an update some days ago.
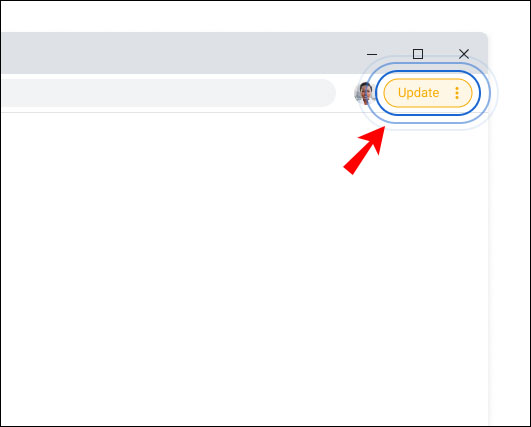
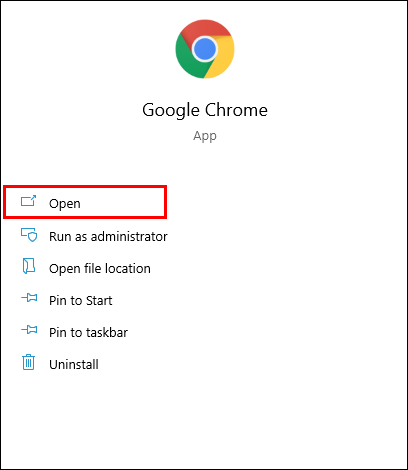
Once you’ve established you’re due for an upgrade, here’s how to do it manually:
- Launch Chrome on your PC or Mac.
- Next, click on the three vertical dots in the top-right.
- From the drop-down panel, select, Update Google Chrome.
- Finally, press Relaunch.

You can also update the mobile version of the browser app. Here’s how to do it with an Android device:
- Launch the Google Play Store app.
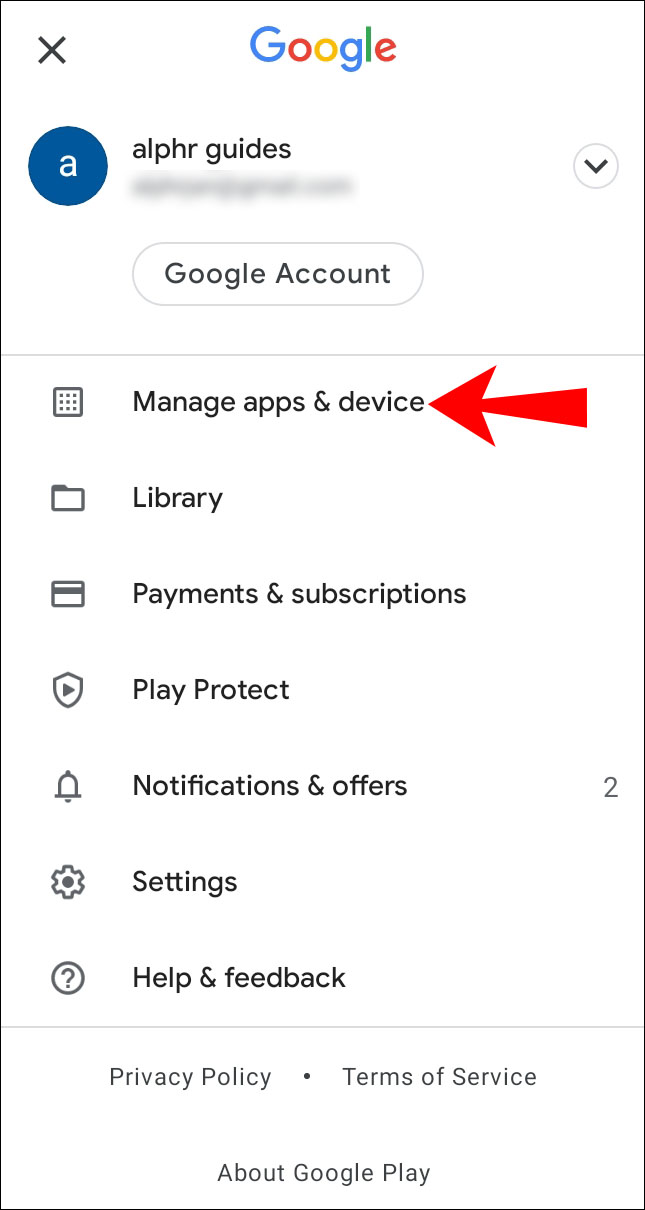
- In the top-right corner of the display, tap on your profile pic.
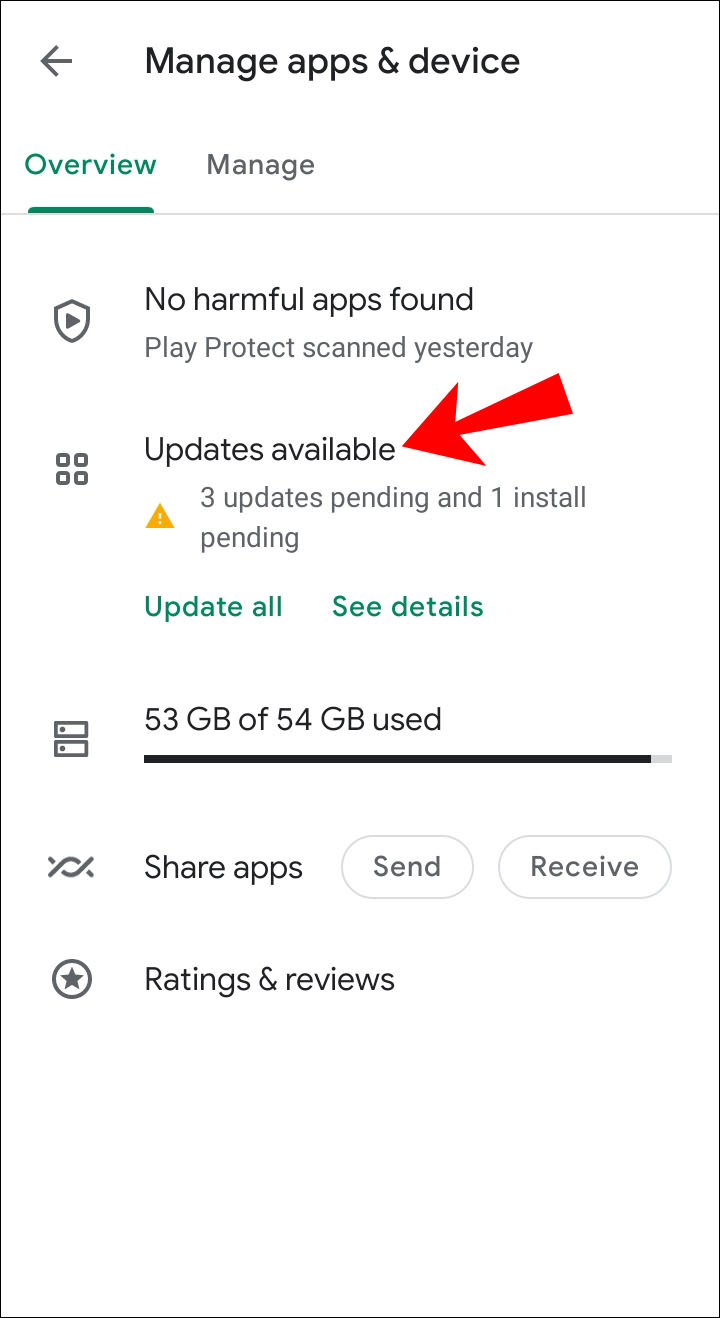
- Select Manage apps & device from the options window.
- Find Chrome in the Updates available section and update the app.


And here’s how to do it with an iOS device:
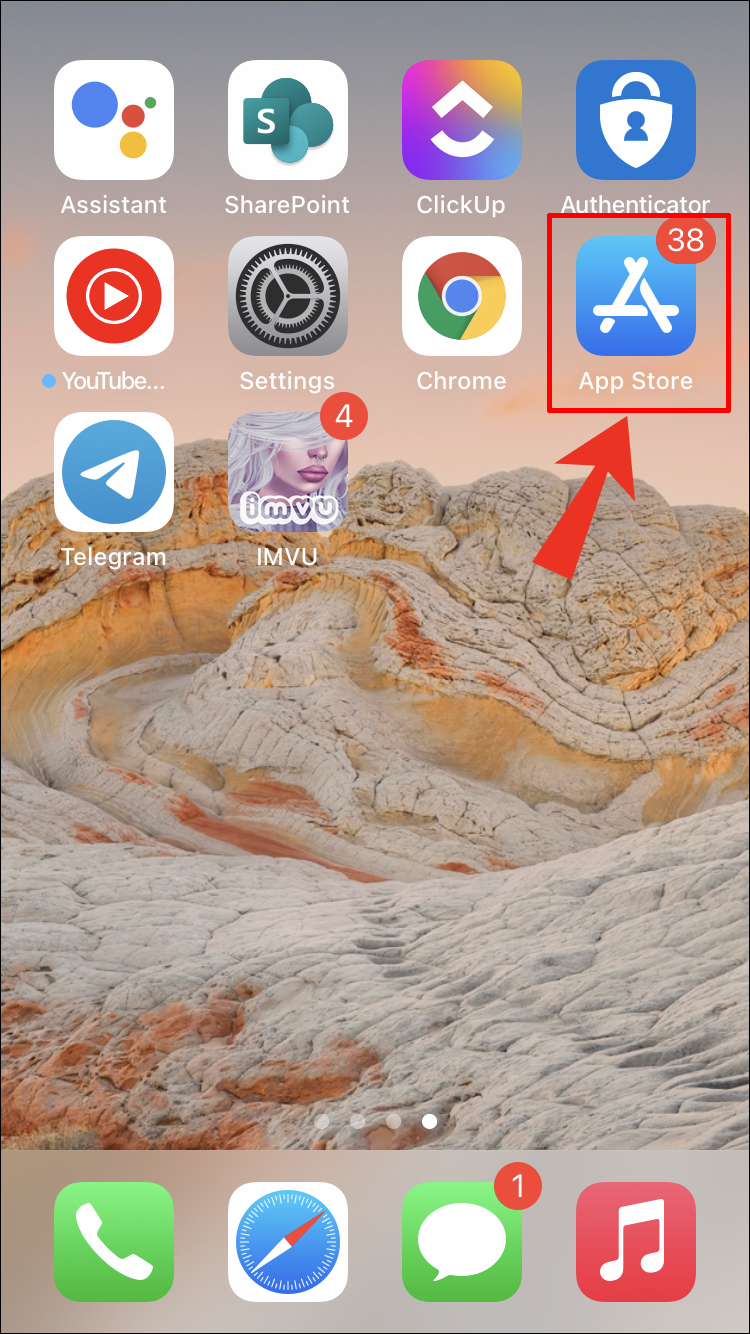
- Open the App Store app and tap on your profile icon.
- From the pop-up panel, find Available Updates and locate the Chrome app.
- Tap the Update button next to the app to get the latest version.
- Enter your Apple ID if prompted.

Clear Browsing Data
Sometimes, an accumulation of browsing data can hinder the download process. Storing too many cookies is known to cause glitches, so it might be a good idea to perform a deep clean. Here’s how to do it with a computer:
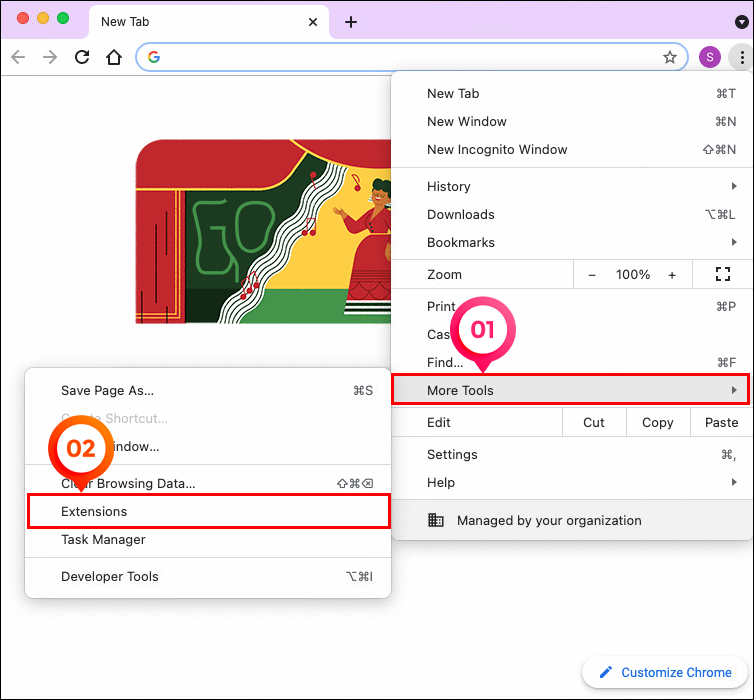
- Launch the Chrome browser and click on the three-dot menu in the top-right corner of the window.
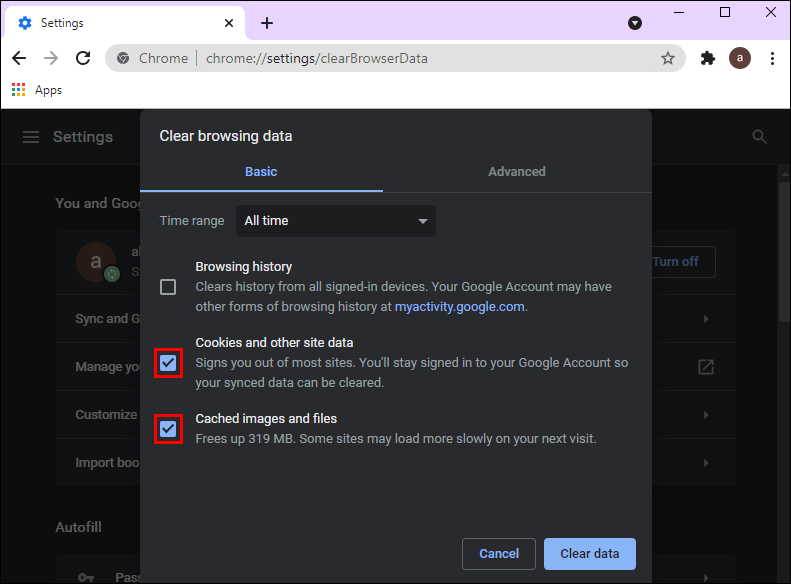
- From the drop-down list, select More tools > Clear browsing data.
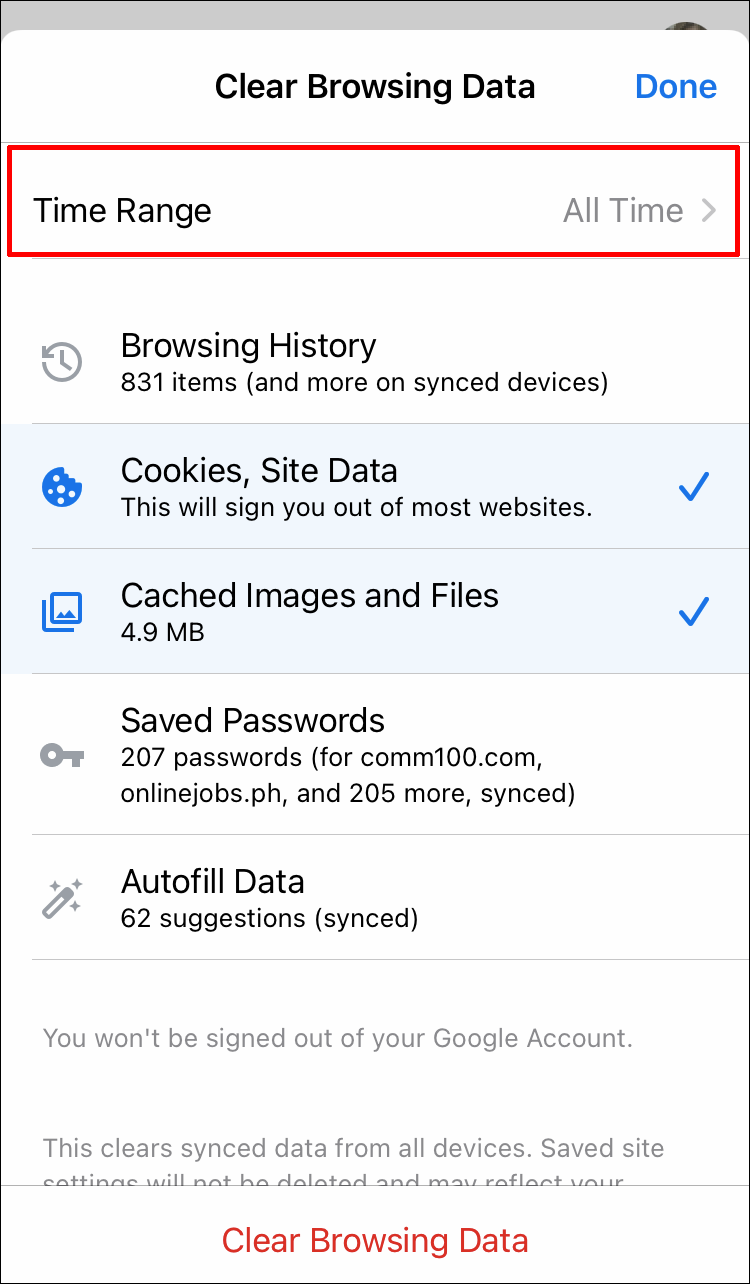
- A new window will open. Set a time range for the removal. For example, you can choose to clear the data accumulated within the last hour or delete everything.
- Next, check the boxes next to the type of data you want to remove.
- Finally, click Clear data.


If you delete any saved passwords, the information will be removed from all synced devices.
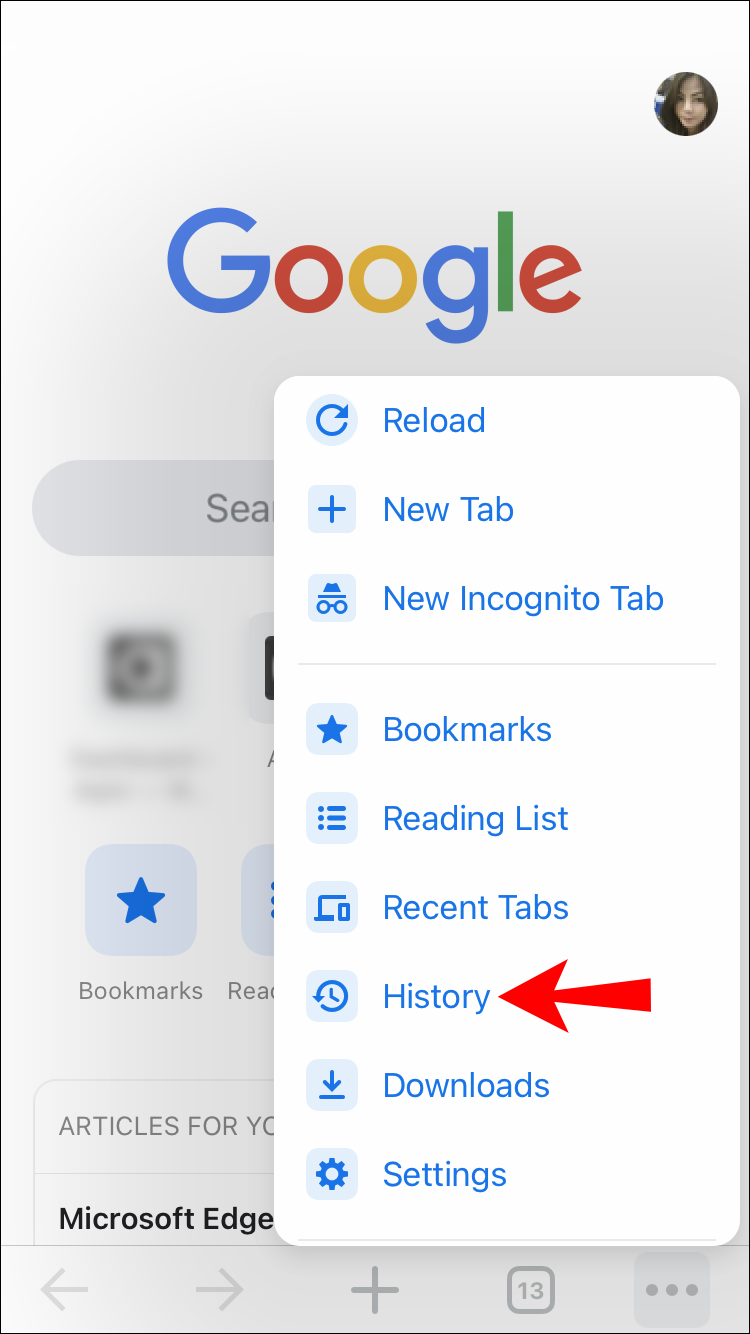
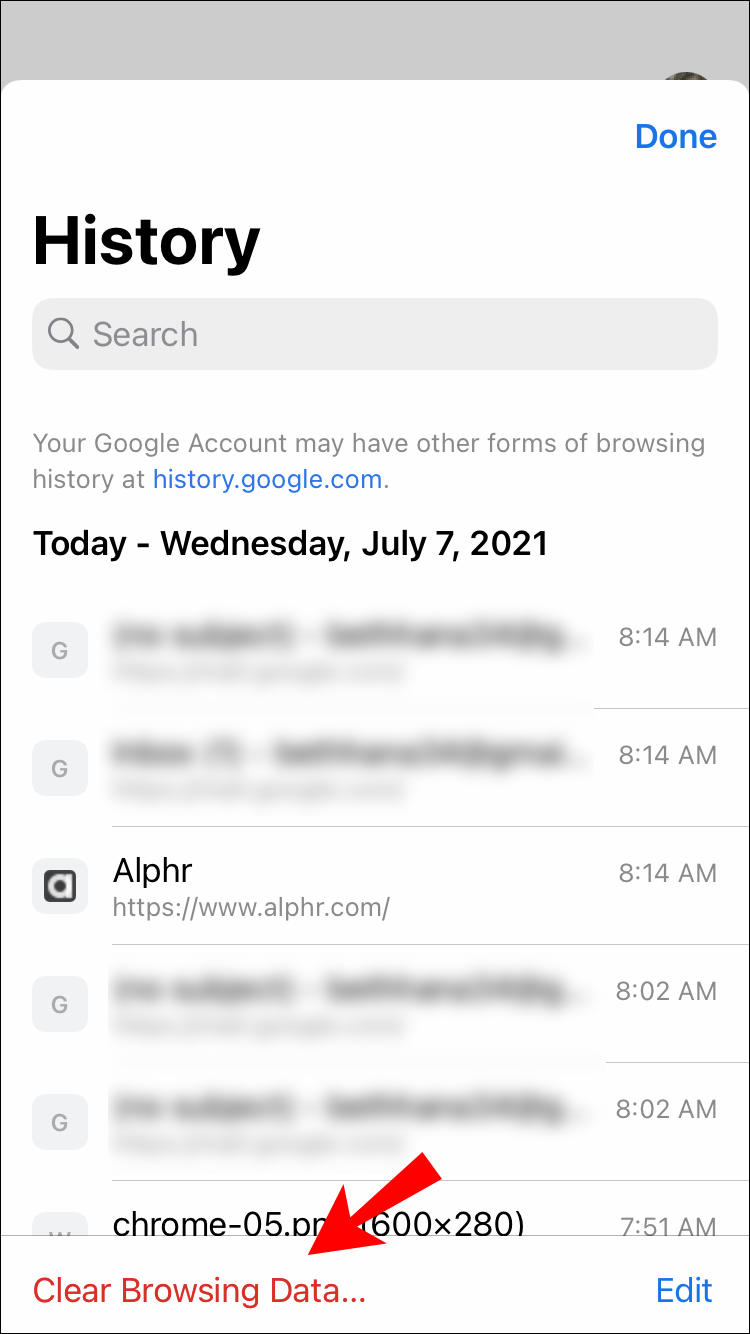
You can also clear the browsing data on your mobile app to optimize the performance. Just follow these steps:
- Launch the Chrome mobile app.
- In the top-right corner, tap on the three vertical dots. For iOS devices, it’s the three horizontal dots.
- Go to Settings if you have an Android device and History if you’re an iPhone user.
- From the list of options, select Privacy & Security, then click Clear Browsing Data.
- Select a Time Range and the type of data you want to delete.
- Once you’re done, tap Clear or Done, depending on the device.


Remove Unused Chrome Extensions
While Chrome extensions are incredibly useful, there is such a thing as having too many. If there’s a plugin you haven’t used in a while, it might be a good idea to remove it. Here’s how:
- Launch Chrome on your PC or Mac.
- Next, click on the More menu in the top-right corner.
- From the drop-down list, select More Tools, then go to Extensions.
- Scroll through the list of extensions and click the Remove option next to the ones you want to delete.
- Once you’re done, click Remove again to confirm.


Of course, you don’t have to get rid of your extensions permanently. Instead, you can temporarily disable them while you’re downloading files to increase the speed. Here’s how:
- Launch Chrome and open the More menu.
- Go to More Tools, then Extensions.
- Uncheck the tiny box next to the plugin you want to disable.
Close Unused Tabs
Again, it might seem too simplistic, but closing unused tabs can sometimes boost the download speed. That way, Chrome will focus all the bandwidth on the download process instead of distributing it to background resources. If you need any important pages for future use, you can either bookmark them or find them among the browsing data.
It’s also not recommended to use the browser while the files are downloading. You’re free to take measurements that’ll help Chrome perform better or even do offline work; just make sure you’re not burdening the internet bandwidth.
Make Sure Page Prefetch is On
Chrome has a feature that enables it to cache pages linked to the one you’re currently using to download files. If you want to speed things up a little, make sure the feature is on before you start the process. Here’s how to do it:
- Go to Chrome and click on the three vertical dots in the top-right corner.
- Go to Settings, and then scroll down and select Advanced from the list of options.
- Next, under Privacy and Security, slide the Use Prediction Service to Load Pages More Quickly option to the left. That’ll enable prerendering.
Windows 10 users can enable Prefatch with Registry. Here’s how:
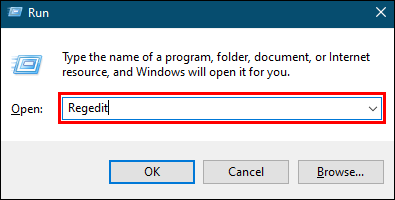
- Hold the Windows Key + R keyboard shortcut to access the Run dialog box.
- Type “Regedit” into the box and click Enter.
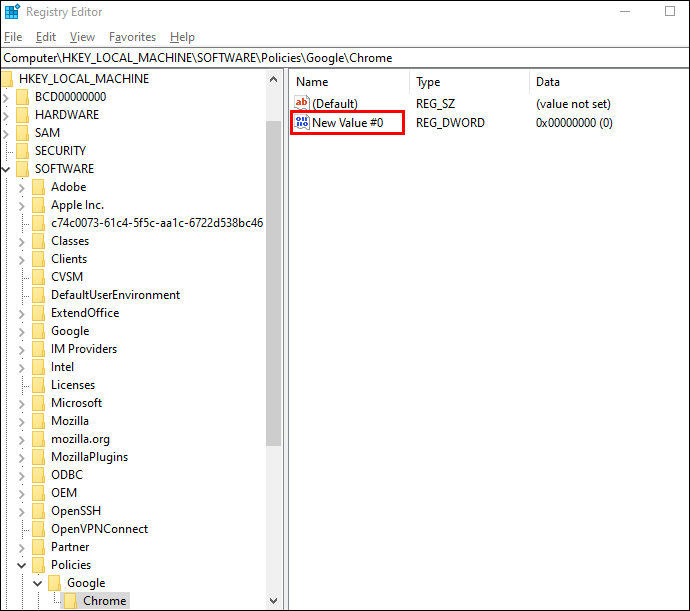
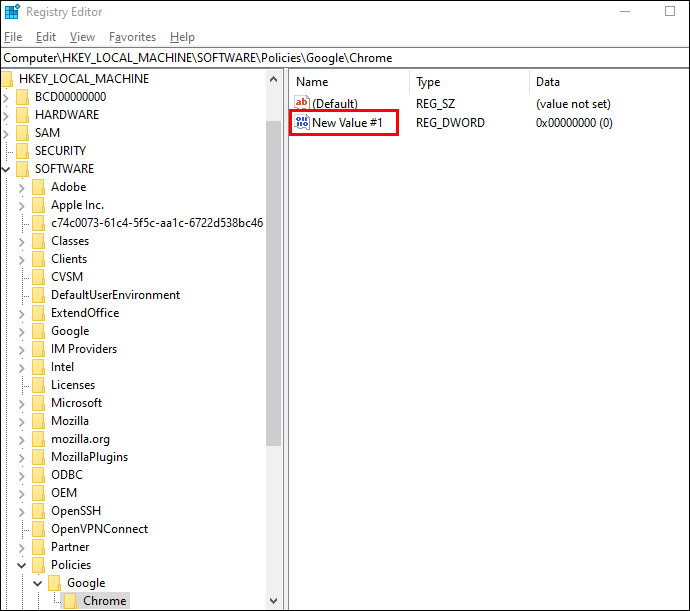
- Next, click on the “
HKEY_LOCAL_MACHINE \ Software \ Policies \ Google \ Chrome” section. Then, right-click on Chrome and choose New > DWORD 32-bit Value from the drop-down panel. - Set the value to zero if you want prefetch always to be enabled.
- If you want the feature to only work on networks that aren’t cellular, set it to one.

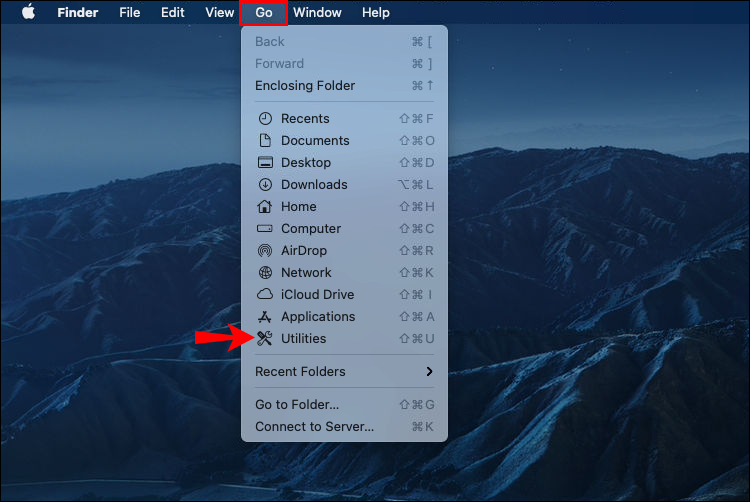
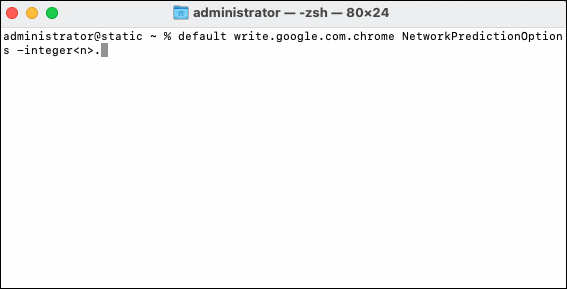
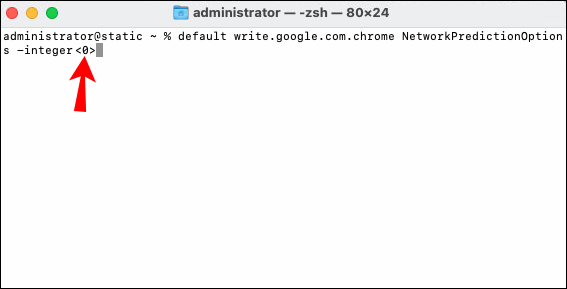
Finally, Mac users can turn the feature on with a Terminal command:
- Open Finder and click Go > Utilities.
- Launch the Terminal app.
- Enter the following command: “
defaults write com.google.chrome NetworkPredictionOptions -integer <n>.” - If you want to enable prerendering for all networks, type zero instead of “n.”
- If you only want to enable it for non-cellular networks, type one.
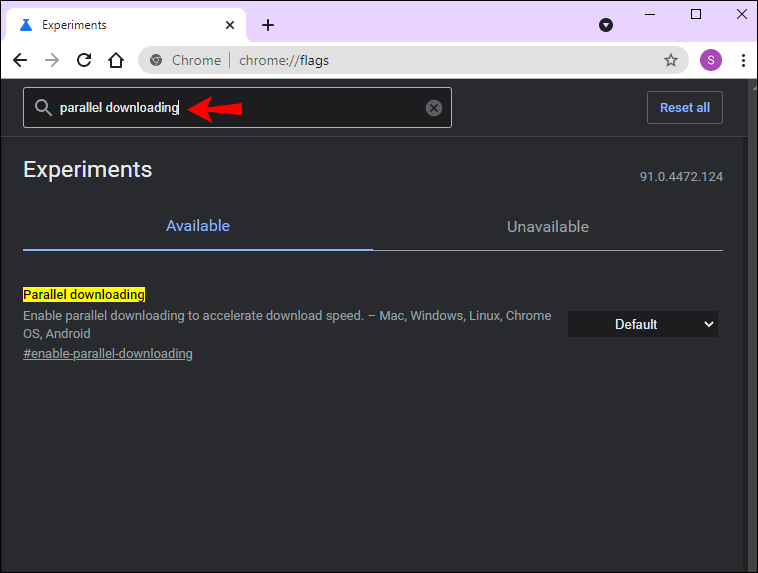
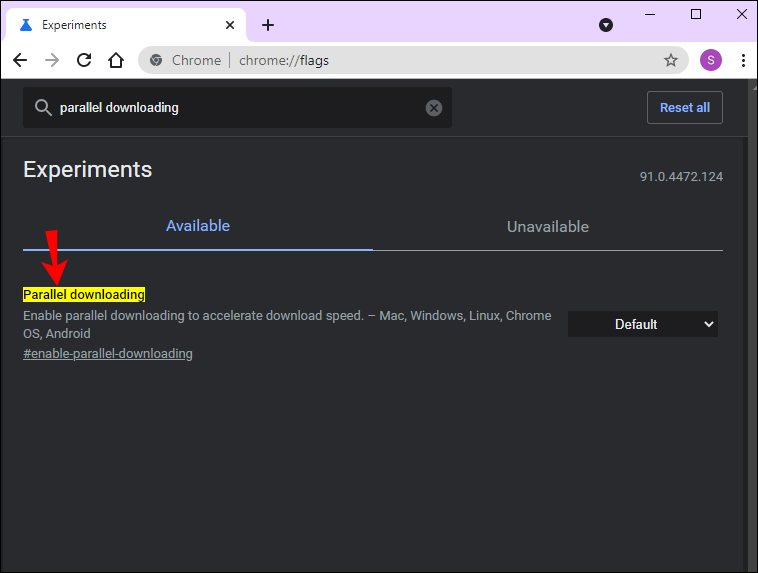
Allow Parallel Downloading in Chrome
If you want to improve your download speed significantly, allowing parallel downloading in Chrome is an extremely effective way to do so. While it’s still considered an experimental feature, many users have found it very helpful. Here’s how to activate parallel downloading:
- Launch the Chrome browser on your computer.
- Paste “
chrome://flags” into the address bar at the top of the window and press Enter. - A new window will open—type “parallel downloading” into the built-in search box.
- Next, expand the drop-down menu in the Parallel downloading section.
- Finally, choose Enabled from the list of settings.


Scan Your Device for Malware and Viruses
Harmful software is one of the most common causes of any kind of glitch. That’s why it’s advisable to check your device for malware regularly. It will not only improve the download speed on Chrome but potentially optimize the overall app performance. Here’s how to do it:
- Launch Chrome on your computer.
- Click the three vertical dots to access the More menu.
- Next, open Settings > Reset and clean up and select Clean up computer.
- Then, choose Find so that Chrome can use your device for any viruses or other harmful software.
- Finally, click Remove.


Additional FAQs
Can I add a Google Chrome download speed limit?
Of course, it does. Like other popular browsers, Chrome has a built-in feature that allows you to control the download speed to avoid any issues with the internet bandwidth. Here’s how to do it:
1. Launch the browser and click on the three vertical dots to access the drop-down menu.

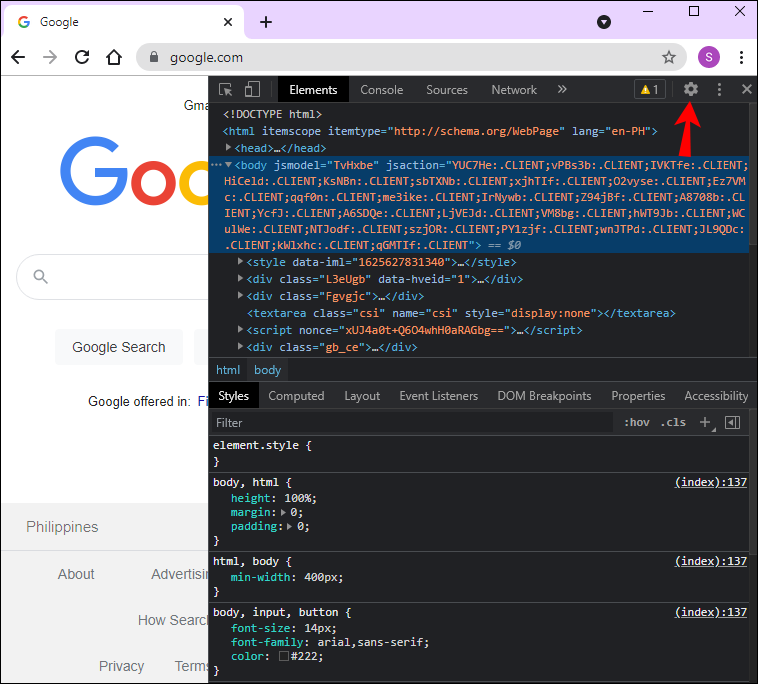
2. Select More tools and then choose Developer tools from the pop-up panel. A quicker way to do it is to use the Ctrl + Shift + I keyboard shortcut.

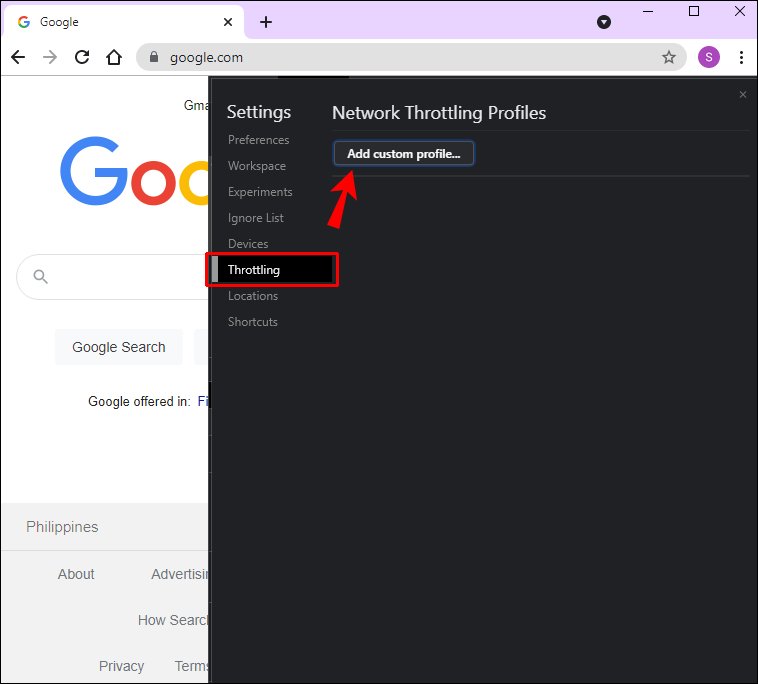
3. A new panel will appear. Click on the three vertical dots in the upper-right and choose Settings from the drop-down list.
4. Next, click on Throttling in the new Settings window and then Add custom profile.
5. Enter the speed limit for downloading files to a preferred kb/s value.

6. Finally, add a title to the new profile and click Add to complete the process.

Download Files in the Blink of an Eye
Google Chrome is an overall fantastic browser that can sometimes experience lagging while downloading files. It’s most common when you try to download multiple files in one go. Luckily, there are several ways to make the browser run faster.
First, start with the basics, such as checking if you have the latest version of the app and closing all extra tabs. Then you can move on to some more advanced features, like enabling parallel downloads and prerendering. Finally, a super helpful Chrome extension will allow you to manage downloaded files with increased speed and efficiency.
Is Chrome your preferred web browser? Have you ever encountered issues when downloading? Let us know in the comments section below.
Disclaimer: Some pages on this site may include an affiliate link. This does not effect our editorial in any way.