Want to become a Word master? Want to know how to clear recent documents in Microsoft Word? Need to tame Word’s strange formatting options? Or quickly search for particular words or phrases in a document? This tutorial will show you all those things and more.
I spend a good portion of every day within Microsoft Word. I have a love hate relationship with it. I love that it is continually developed and new features added but I hate that it has become more complicated and seems to be moving away from being a word processor into something it isn’t meant to be. With more features come more bugs and issues and that’s never a good thing.
Despite that, Word is a great word processor and is well worth trying to master. Here are a few neat tricks you can use to tame it.
Clear Recent Documents in Microsoft Word
Recent documents is a quality of life feature that allows you to quickly call any document you have used recently. If you want to clear this out, you can. How you do this depends on how you have Word set up.
If you have Word to open directly in a new document, do this:
- Open Word and select File.

- Select Open from the left menu.
- Right click a document from the center pane and select Clear unpinned Documents.
- Confirm removal.


If you have Word opening to the splash screen:
- Select Recent in the left menu.
- Right click a document and select Clear unpinned Documents.
- Confirm removal.


Now your list of recent documents should be empty.

You can disable recent documents if you want.
- Select File from within a document and then Options.
- Now, select Advanced from the menu on the left.
- Under Display, set Show this number of Recent Documents to zero.


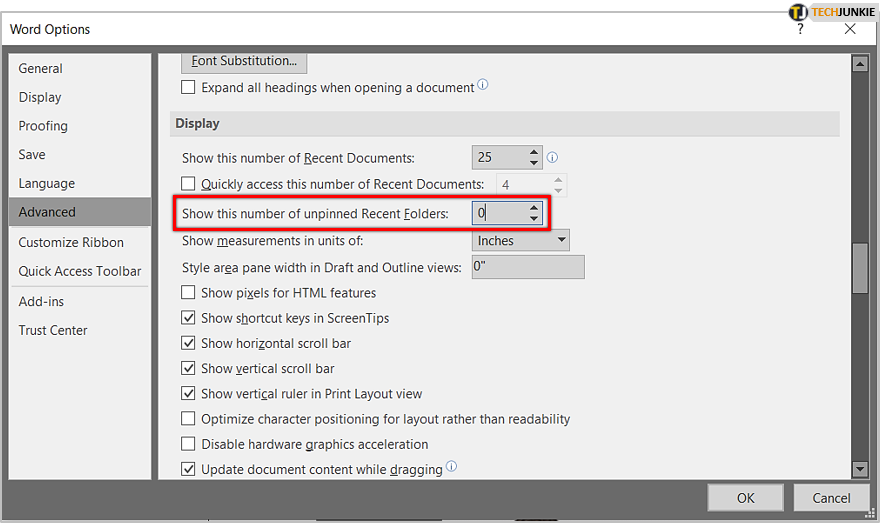
This will stop the recent documents list being populated at all.
Strip Word Formatting
Word has a huge formatting overhead that doesn’t always work in other applications. Often it is better to strip the Word formatting altogether and redo it in the destination. This is especially true if the work is being published on the web.
- Select all the content within Word you want to strip formatting from.
- Next, press Ctrl + Space or select the eraser icon in the Font part of the Home ribbon.

In some documents, Ctrl + Space doesn’t work so the eraser icon is your fallback. Alternatively, copy the content from Word and paste it into Notepad or Notepad++ as it will have exactly the same effect.
Quickly Add Hyperlinks Into Word
Publishing to the web will usually include hyperlinking. It is straightforward to add them using the right click menu but if you’re anything like me, you will hit Translate instead of Add Link as often as not. Better to use Ctrl + K instead. Highlight the text to be linked and hit the shortcut. Much easier!
Find and Replace Words or Phrases in Word
For editing, going through a long document looking for a specific word or phrase to correct will take an age. Use Ctrl + F instead. The main window will let you find your word or phrase and will take you directly to it.

Select the down arrow next to the box and select Replace. Add your target word and replacement word and let the program do the rest.
Paste Without any Formatting
Even if you set the default paste behavior to use destination formatting, it rarely does. Somehow the source formatting seems to be present even if you manually select use destination formatting. It’s easier to use Ctrl + Shift + V instead. This forces Word to ditch the formatting and paste it in plain text for you to format as required.
You can also click on Format Painter near the top, left-hand corner of the screen and select your paste formatting needs..

Two Click Highlighting
Fed up with having to drag the mouse across text to highlight? Get other letters or punctuation caught up with highlighting? I do which is why I try to remember to use two click highlighting. Click the mouse at the beginning of the area you want to highlight, hold Shift and click at the end of where you want to highlight. Good huh?
Use Smart Lookup as a Dictionary
Smart Lookup is a neat feature that lets you check words or phrases online from within Word. Highlight a word or phrase, right click and select Search ‘Word or Phrase‘. Replace the quoted text with your highlighted word or phrase, ‘Smart Lookup‘ was used in this example.

You may need to enable it the first time but after that you can find meanings, alternative words, link subjects and all sorts from within a sidebar of Word.
Those are just a few tips for mastering Microsoft Word. Got any you would like to share with our readers? Tell us about them below if you do!
Disclaimer: Some pages on this site may include an affiliate link. This does not effect our editorial in any way.