When it comes to built-in antivirus, Microsoft’s Defender has received mixed reviews. Many users would rather turn to third-party solutions for protection. If you’re one of these people and would like to know how to delete Windows 10 Defender from your computer, you’ve come to the right place.
Unfortunately, Windows doesn’t provide the option to directly uninstall the program. On the plus side, it’s possible to deactivate it using a workaround. In this article, we’ll show you the easiest ways to disable Windows 10 Defender, both permanently and temporarily.
How to Completely Remove Windows 10 Defender?
Last year, Microsoft issued an upgraded version of their built-in, anti-malware protection – the Windows 10 Defender. They resolved some of the safety issues and improved its features.
However, compared to some third-party antivirus programs such as Bitdefender or McAfee, it does come up short. The lack of consistent updates and a subpar interface make it more vulnerable to malware files.
Another thing users find off-putting is the absence of tools such as private networks, identity theft protection, and password manager. That’s mainly why people choose to delete the antivirus from their PC.
Sadly, it’s not possible to completely remove Windows 10 Defender since it’s integrated into the operating system. If you try to uninstall it like any other program, it will just pop up again. The alternative is to permanently or temporarily disable it.
How to Permanently Disable Windows Defender?
If you own Windows 10 Pro or Enterprise, you can use Group Policy to permanently disable Microsoft Defender. There are two things you need to do:
- Go to Start.

- Look for “Windows Security.”

- Go to “Virus and threat protection.”
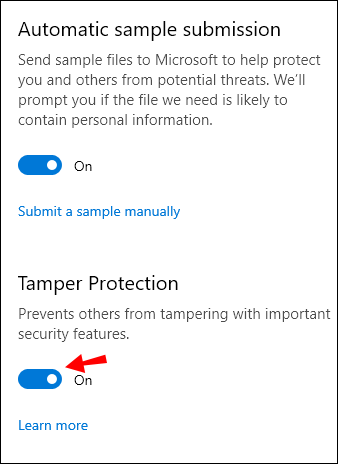
- Find the “Manage settings” option and click on it.
- Click on the slider to turn off “Tamper Protection.”
After you’ve finished, you can proceed to round two:
- Go to Start.
- Type “gpedit.msc” into Search.
- Click on the first result to access “Local Group Policy.”
- Open the following in this order: Configuration > Administrative Templates > Windows Components > Microsoft Defender Antivirus.
- Double-tap on the “Turn off Microsoft Defender Antivirus.”
- Click on the circle next to the word “Enable.”
- Select the “Apply” button, and then click on “OK.”
- Go back to Start to restart the computer.


After restarting your computer, Windows 10 Defender will be permanently disabled. The icon can sometimes linger on your Taskbar, but that doesn’t mean the process wasn’t successful. It actually refers to the Windows Security app, not the antivirus itself.
If you use Windows 10 Home, then you won’t have the Group Policy feature on your PC. However, you can permanently disable Windows 10 Defender through Windows Registry. Here’s how:
- Open Start.
- Write regedit.exe then, push “Enter.”
- Browse the key below:
HKEY_LOCAL_MACHINE\SOFTWARE\Policies\Microsoft\Windows Defender - If the option to “Disable Anti-Spyware” appears, double-click on it. If not, continue.
- Right-click the Windows Defender.
- Go to New > DWORD (32-bit) Value and rename it as “Disable Anti-Spyware.”
- Program the value to 1.


None of this is irreversible, and you can always choose to restore Windows 10 Defender by deleting the key you created.
How to Disable Antivirus on Windows 10 Computer Easily?
Probably the quickest and easiest way to disable the antivirus on Windows 10 is through a third-party solution. When you install a different anti-malware program, the built-in protection becomes redundant and is turned off automatically. Here’s how you can download antivirus protection to your computer:
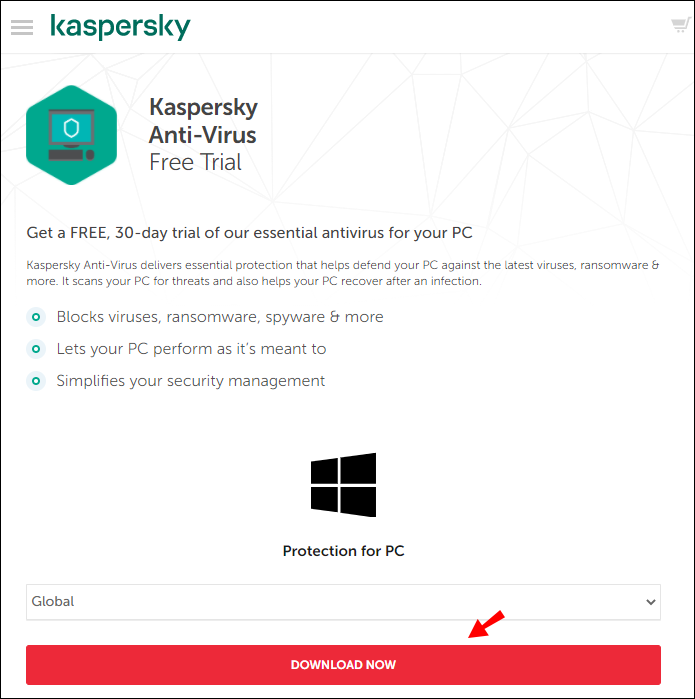
- Find your chosen antivirus website. Kaspersky, Bitdefender, and Norton are the most common alternatives.
- Tap the “Download” button.
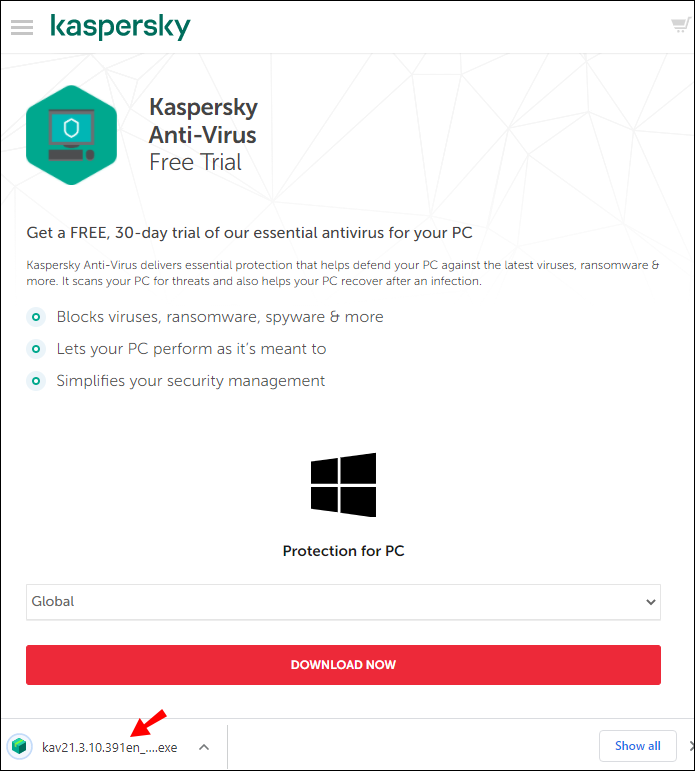
- A file will appear somewhere on the screen. Double-tap to proceed.
- Click “Agree” to begin the installation.
- Lastly, tap “Install.”


Once you’re done installing your new antivirus program, the Windows 10 Defender will be automatically disabled.
How to Delete Windows 10 Defender History?
Every time the antivirus scans your computer for potential threats, it ends up saving that data on its Protection History page. That means it provides a detailed overview of every action taken to resolve security issues.
Generally, Windows Defender is programmed to automatically clear the scan log after a certain amount of time. It’s usually set to remove items from the folder in 30 days, but you can choose a different value.
You can also do it manually. Here’s how to delete Windows 10 Defender history from your local drive:
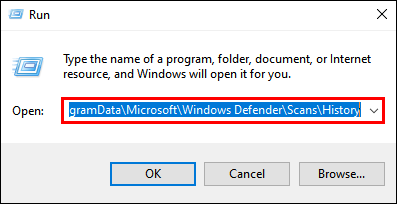
- Hold “Windows key + R” on your keyboard.
- Copy the link below and paste it in the Run dialog:
C:\ProgramData\Microsoft\Windows Defender\Scans\History - Click “Enter” and then “Continue.”
- A “Service” folder will appear. Right-click on it and choose to “Delete.”
- Leave File Explorer after you delete the folder.
- Go to Windows Security > Virus and Threat Protection > Manage Settings.
- Tap the button to turn it off, and then once again to turn on “Cloud-delivered Protection.”


The Protection History page is now cleared from your local drive. There’s another way to do it, using Windows Event Viewer:
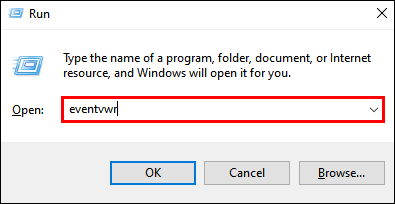
- Initiate Run by holding “Windows Key + R.”
- Write “eventvwr” in the dialog to open Windows Event Viewer.
- Select “Applications and Services Logs” written on the left-hand side, just under “Event Viewer (Local).”
- Tap on “Windows.”
- Scroll to find Windows 10 Defender on the middle pane. Right-click to open it.
- Two options will appear. Right-click on “Operational” first, and then “Open.”
- Find Windows Defender on the list of logs.
- Click on “Menu” and find the option to “Clear Log.”
- You can now choose to “Clear” or “Save and Clear.”


How to Delete Quarantined Files in Windows Defender?
When a potential threat is detected, the antivirus program usually deletes the corrupted file irreversibly. However, sometimes the scan results are unclear, so it puts the file “in quarantine” Instead. Therefore, it can still be found on your drive, in case it turns out to be harmless.
Quarantined files are a solution to the problem of anti-malware protection accidentally removing important items from your computer. You can fix whatever’s wrong and then restore the data safely.
After you’ve deemed the files unnecessary, you can program Windows to permanently eliminate them. Here’s how to delete quarantined files in Windows Defender using Group Policy:
- Open Run by pressing “Windows Key + R.”
- Write “gpedit.msc” to locate the Local Group Policy Editor.
- Click on these in the following order: Computer Configuration > Administrative Template > Windows Components > Windows Defender Antivirus > Quarantine.
- In the big box on the right-hand side, you’ll find the option to “Configure Removal of Items from Quarantine Folder.” Double-click on that.
- Choose “Enable.”
- Choose the amount of time the files will be quarantined before being deleted (e.g. 14 days).
- Press “Apply,” then “OK.”


You have now programmed Windows 10 Defender to automatically delete quarantined files after a certain number of days. If you don’t have Group Policy, you can also use Register on older versions of Windows 10:
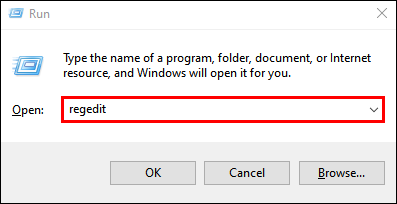
- Hold “Windows Key + R” to open Run.
- Write “regedit” to start Registry.
- Browse the link below:
HKEY_LOCAL_MACHINE\SOFTWARE\Policies\Microsoft\Windows Defender - The Windows Defender folder will appear. Right-click on it.
- Choose “New” and press “Key.”
- Rename the key into “Quarantine.”
- Right-click on the renamed folder and press “New.”
- A list of values will appear. Choose the DWORD (32-bit) Value.
- Double-click that key. Under “Base” choose “Decimal.”
- Under “Value Data,” determine the amount of time files are kept in quarantine before removal.
- Press “OK” to finish.


As you can tell, it’s a little tricky to delete quarantined files using Registry. Make sure to follow all the steps accordingly so as not to cause damage to your PC. It might not be a bad idea to do a backup before trying this.
Additional FAQs
1. How Do You Turn Off Windows Defender Temporarily?
In case you’re still on the fence about Windows 10 Defender, you can choose to temporarily disable it. That way you can try out other forms of protection, and decide what works for you.
There are also cases where the antivirus is getting in the way of certain upgrades or software installation. If Windows 10 Defender is merely preventing you from downloading an app, it doesn’t make sense to permanently disable it. Especially if you don’t have a third-party antivirus program.
The alternative is to shut it down until you complete the installation. You can learn how to temporarily turn off Windows Defender by using Windows Security:
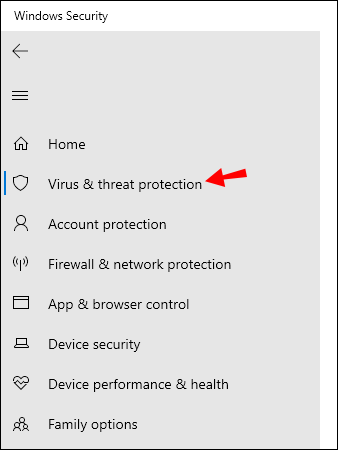
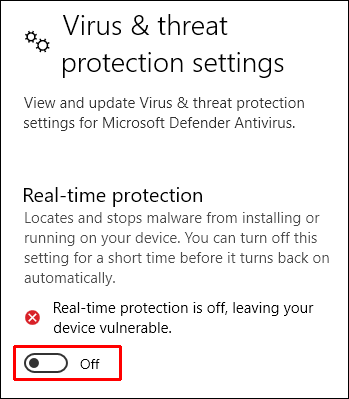
1. Go to Start.
2. Find Windows Security and open the app.

3. Go to ‘Virus and Threat Protection.”
4. Find the option to “Manage Settings.”
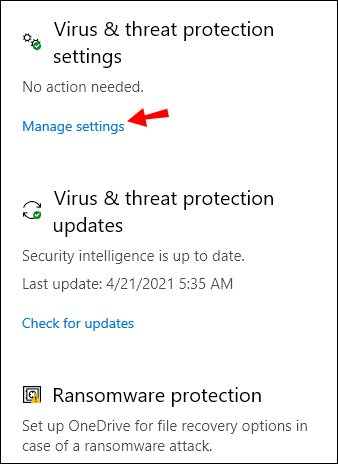
5. Turn off “Real-time Protection.”
Once you’re done, you can make any changes to your PC. You don’t have to turn it back on manually. Since Windows 10 Defender is temporarily disabled, it will automatically turn on the next time you start your computer.
2. How Do I Turn On Windows Defender in Windows 10?
If you would like to use the built-in protection, you can turn on Defender in a few steps. This is meant for users who have the Group Policy feature on their PC.
1. Open Start.
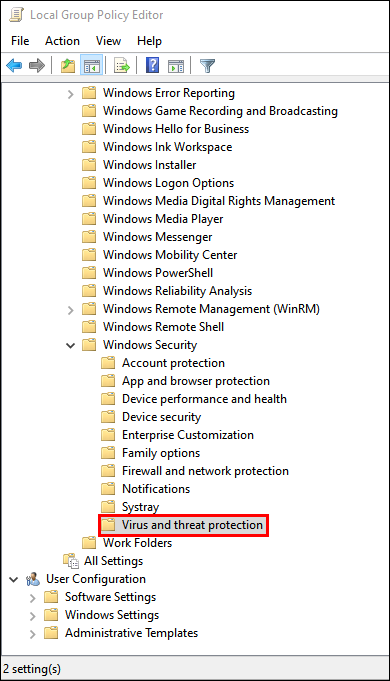
2. Write “group policy” in the Search bar. Find “Edit Group Policy” in the results to open The Local Group Policy Editor.
3. Go to Computer Configuration > Administrative Templates > Windows Components > Windows Defender Antivirus.

4. Find “Turn off Windows Defender Antivirus” on the list.

5. Choose the option to “Disable,” or “Not Configured.”

6. Click “Apply,” then “OK.”
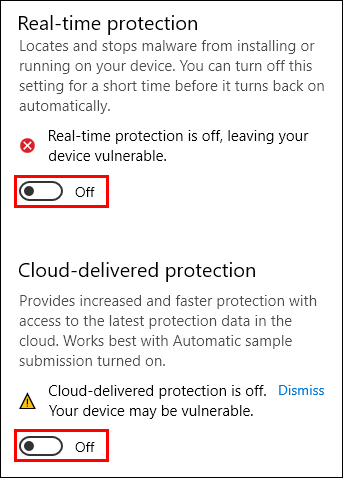
You can also strengthen the anti-malware by enabling Real-time and Cloud-delivered protection. Here’s how you do it:
1. Open Start.
2. Type in “Windows Security” in Search.
3. Go to “Virus and Protection.”
4. Choose the option to “Manage Settings.”
5. Find the sliders for “Real-time protection” and “Cloud-delivered protection.” Click to turn them on.
There are cases when these options are hidden. You can still activate the features via Group Policy:
1. Go to Start.
2. Write “group policy” in the Search bar. Go to “Edit Group Policy” to open the Local Group Policy Editor.
3. Click the following Computer Configurations > Administrative Templates > Windows Components > Windows Security > Virus and Threat Protection.
4. Choose the option to “Hide the Virus and Threat Protection Area.”

5. Click “Disabled.”

6. Select “Apply”, then “OK.”
3. Is it OK to Delete Windows Defender?
Since it’s a built-in program, you might be thinking that disabling Windows 10 Defender will cause harm to your PC. This is not the case. As we’ve already established, you can’t actually delete it completely. You can merely turn it off, which is completely harmless.
That being said, there are a few things that can go wrong when trying to permanently disable Windows 10 Defender. Especially when you’re using Registry. However, you just need to be careful about following the required steps and back up important files.
It’s also not a good idea to disable Windows 10 Defender without downloading a different, third-party antivirus program. As lackluster as you may view it, Windows 10 Defender still acts as a decent anti-malware protection.
Keep Your Guard Up
When it comes to your PC, it’s always a good idea to keep your guard up. While Windows 10 Defender is a solid built-in antivirus, it has its shortcomings. There are other accessible, cost-free solutions with better features.
While you can’t completely remove it from your computer, you can manage to deactivate it temporarily or permanently. If you’re careful about the process, you won’t cause any damage to your system.
Do you have experience with Windows 10 Defender? How do you rank it as anti-malware protection? Comment below and tell us what antivirus software you prefer.
Disclaimer: Some pages on this site may include an affiliate link. This does not effect our editorial in any way.


