While the last half-decade has seen a rise in popularity for dedicated instant messaging apps—think iMessage, Facebook Messenger, or WhatsApp—the most reliable method of communication between your friends’ devices is probably still SMS, especially for us Android users communicating with our iPhone-using friends. So when our phones run into problems while trying to send or receive text messages, it’s a major problem. Sure, we can use IM apps as a backup, but when it comes to the easiest form of communication, you really can’t beat text messaging.
If you’re running into problems trying to send text messages from your Galaxy S7 or S7 edge to your friends, family, or co-workers, you’ve come to the right place. This is a frustrating problem to experience day-to-day, so we’ve built a guide for troubleshooting and fixing your phone. This is our guide to fixing SMS issues on your Galaxy S7.
Quick Fixes for Your SMS Woes
These are some quick little tips to try on your device. Often, issues with sending or receiving SMS can be identified or solved just by some of the following guides:
- Check your network connection. In the top right corner of your screen is your status bar. You should see 1-5 bars, along with a 4G or 3G logo, depending on the data speed in your area. If you don’t have a signal from your wireless carrier, you may be in a dead zone. If you’re in an area that normally has coverage, your phone may be experiencing network connectivity problems, or your carrier might be suffering from an outage. These outages happen infrequently, but often enough that it’s worth looking into. Typically, searching Google for “[your carrier] outage” will return coverage and outage maps, which you can use to check your current location. If your carrier is currently experiencing an outage, you’ll have to wait for operations to be re-enabled. Typically this takes one-to-three hours.
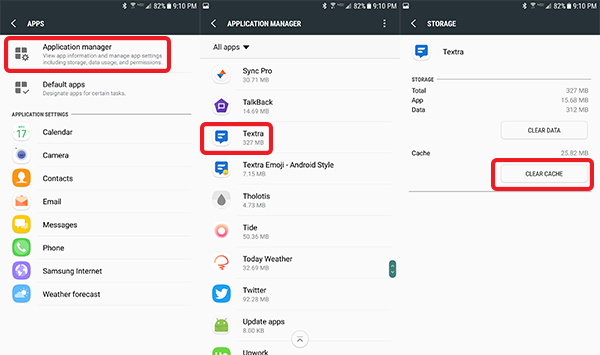
- Clear the cache for your messaging app. Head into Settings, scroll down to the “Apps” menu, and select “Application manager.” Once your apps list loads, find the name of your messaging app. If you still use the standard Samsung Messages app, it’s under “Messages”; if you use a third-party texting app (like Textra or Google Messenger), you’ll want to find the name of that application and select it. Once you’re viewing that application’s settings, find the “Storage” listing and select it, then press “Clear Cache” to reset the app back to normal.
- Reboot your phone. Often a quick reboot can jolt a phone back into operation, especially if your system software or an app was recently updated. Just hold down the Power key and select “Reboot” from the menu.

Checking Other Functions of Your Phone
Before we move forward trying to solve your SMS problems, we should make sure those issues are related just to SMS. If you haven’t already, disable your WiFi (if you’re connected to WiFi) and try to make a phone call or do a quick Google search on your device. If everything on your phone is working except for your SMS messages, then we can move forward in this guide. If you’re experiencing other problems—like you can’t place a phone call, or you can’t use your mobile data—you may have a different, network-related problem on your hands. Luckily, we have a guide for that too, so head over to our guide on fixing mobile network issues on your Galaxy S7.
That said, if the problem lies solely with sending text messages and nothing else, we can continue trying to troubleshoot your phone’s messaging issues.
Make Sure Your Texting App is Set as Default
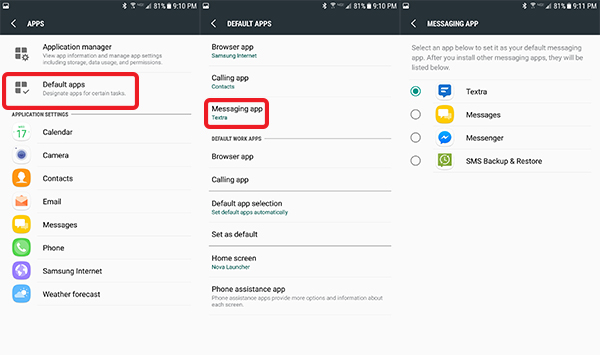
Ever since Android 4.4 Kit Kat, Android has required a singular app to hold permissions to send SMS messages. This means only one messaging app at a time can be allowed to send text messages for you, which is great for security, but might prevent an application from sending messages if your typical default texting application has had its SMS default permissions revoked. While most texting applications will provide you with a prompt to switch your default messaging app to their own, the prompt may have accidentally been hidden by accident. To reset a default app, head into your Settings and find the “Apps” menu referenced earlier in the guide. This time, instead of selecting the “Application Manager” menu, select “Default Apps.” Third down from the top, you should see your default settings for your messaging app. Selecting this will bring you to a separate page, where you can select from any messaging-capable app on your device. Make sure your usual messaging application has been selected, then clear your recent apps menu and restart the application. You should find yourself able to send messages.
Try a Different Texting App
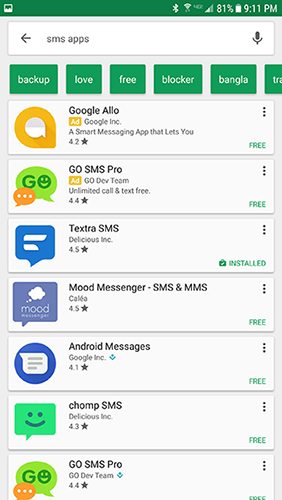
So this might sound a bit strange, but it’s worth trying a different messaging application downloading from the Play Store, especially if you’re using a third-party texting app. If the texting app you regularly use was recently updated, it may be experiencing problems sending messages from your phone. Though apps like Textra or Google Messages provide different and customizable user experiences while texting, they can also occasionally experience bugs or hiccups when being updated. Instead, you can try another texting app from the Play Store, or—even better—try sending a text from the default Samsung Messages application pre-loaded on your S7 or S7 edge.
Typically, if the problem does spawn from a third-party messaging app, the application should be updated within a few days, and you’ll be able to switch back to your normal texting app following the bug fix.
Reset Your Network Settings
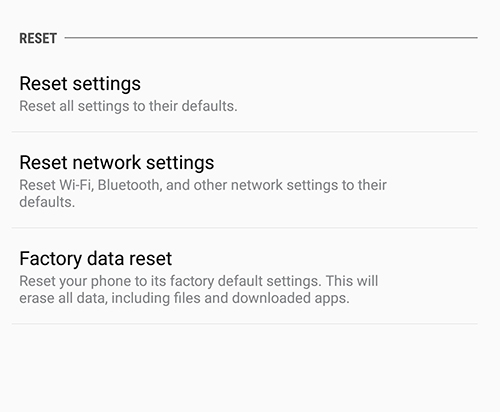
If you’ve tried all of the above steps and your phone still isn’t able to send or receive messages, you can try resetting several of your settings back to their default modes. First, start by opening your settings menu and finding the “Backup and Reset” option near the bottom of your settings list. If you’re viewing your settings in simplified mode, you’ll find this option by selecting “General management,” followed by “Reset.” You’ll find three reset options in this menu: “Reset Settings,” “Reset Network Settings,” and “Factory Data Reset.” You probably already guessed, but we’ll be using the second option: “Reset Network Settings.” This will reset your WiFi, Bluetooth, and mobile data connections back to their carrier-enabled defaults. If your network settings have been changed, either by user error or a rogue application, this option will reset your phone’s network capabilities to stock. Do note that your WiFi and Bluetooth settings and devices will be lost, so you will have to reenter your passwords and repair your devices back to your phone once the reset is done.
After your network settings have been reset (it should only take a few moments), try to send a text message to a friend, both from the Samsung Messages app and from a third-party app if you have one installed on your phone. If your SMS issues haven’t been fixed, we have two more settings to try.
Clear Your Cache Partition
Next up on our list of resets: clearing your S7’s cache partition. If you’ve never wiped your phone’s cache partition, do proceed with caution and follow this guide closely. It’s easy to do this step, but selecting the wrong menu can wipe or brick your phone. Wiping the cache partition of your S7 won’t wipe any user data or applications from your device. Instead, your cache partition holds any temporary data saved by the applications and software on your phone, allowing your phone to load app data faster. Unfortunately, this information can sometimes lead to problems or issues with your phone if something goes wrong with your cache. Clearing the cache partition should fix any minor issues with your device’s usability or connection.
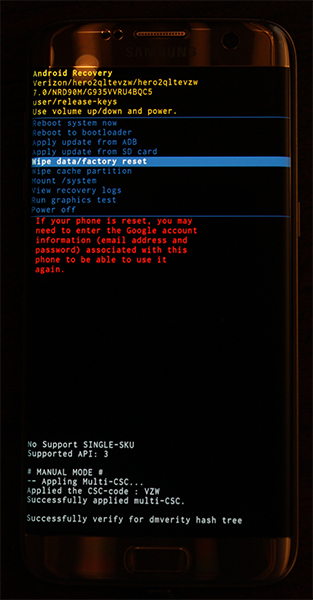
Start by powering your phone completely off. Once the device is off, press and hold the Home key, the Power key, and the Volume Up key. Once the words “Recovery Booting” appear at the top of your screen, you can let go of these buttons. A blue screen reading “Installing System Update” for up to thirty seconds; the display will then alert you that the system update has failed. This is normal, so don’t stress. Let the phone sit for another few seconds, and the display will switch to a black background with yellow, blue, and white text on it. At the top of your screen, the words “Android Recovery” will appear; you’ve successfully booted into recovery mode in Android. Using the volume keys to move your selector up and down, move down to “Wipe Cache Partition” on the menu. In the picture above, it’s below the highlighted blue line—don’t select that option unless you want to wipe your entire phone. Once you’ve highlighted “Wipe Cache Partition,” press the Power key to select the option, then use the Volume keys to highlight “Yes” and the Power key once more to confirm. Your phone will begin wiping the cache partition, which will take a few moments. Hold tight while the process continues. Once it’s complete, select “Reboot device now” if it isn’t already selected and press your Power key to confirm.
Once your device has rebooted, try once more to send a text message. If you still can’t send or receive messages, and you’re sure that the problem doesn’t lie with your carrier’s mobile network or a misbehaving application on your phone, you can move onto our final suggestion.
Factory Reset Your Phone
Finally, we come to the final step when doing any troubleshooting on your phone: a full factory data reset. As we mentioned above, you should ensure you followed this guide closely and performed each of the steps before this, as factory resetting your phone will wipe any data and applications you keep on your device.

Before completely resetting your device, however, you’ll want to back your phone up to the cloud, using a backup service of your choice. Some recommendations: Samsung Cloud and Google Drive work best with your device, but if you’re interested in using something like Verizon Cloud, that will work too. You can also use apps like SMS Backup and Restore and Google Photos to backup your SMS messages, call log, and photos to the cloud. You can also transfer important files or information to an SD card installed in your device; factory resets don’t clear your SD cards unless you check a specific setting.
Once you’ve backed your files up, open your settings menu and select “Backup and Reset,” found under the “Personal” category in the standard settings menu and under “General management” on the simplified layout. This time, select the third reset option, “Factory data reset.” This will open a menu that shows every account you’ve signed into on your phone, along with a warning that everything on your device will be wiped. As mentioned above, your SD card will not be reset unless you choose to select the “Format SD card” option at the bottom of your menu; whether you want to do so is up to you, but it isn’t necessary for this process. Before selecting “Reset phone” at the bottom of this menu, make sure your phone is either plugged-in or fully charged. A factory reset can use a large amount of power and can take upwards of half an hour, so you don’t want your phone dying during the process.
Once you’ve confirmed your device is either charging or charged, select “Reset phone” at the bottom of your scree, and enter your PIN or password for security verification. After this, your phone will begin to reset. Let the device sit and complete the process; don’t mess with your S7 during this time. Once the reset is complete—which, again, can take thirty minutes or more—you’ll be booted to the Android setup display. Complete the setup on your device as normal. Once you’ve returned to your home screen, you can return to the Messages app and try to send an SMS message.
Contact Your Wireless Provider/Retailer
If you’ve done everything above and you still can’t manage to send or receive text messages, it’s time to reach out to your carrier or your local retailer to try to set up a support appointment. You can also use your carrier’s support phone line, but it’s faster and quicker if you meet with a technician in person. They may need to replace your SIM card, or send your phone in for repair if it’s still covered under warranty. The good news: you can tell them you’ve tried every troubleshooting trick in the book.
Disclaimer: Some pages on this site may include an affiliate link. This does not effect our editorial in any way.


