Many programs are designed to use your computer’s CPU when they start. However, some programs run better if you force them to use your computer’s GPU instead. If you have a program that’s lagging or not performing as well as you’d like, try forcing it to use your GPU.
This article will show you how to go about it.
Forcing a Program to Use the GPU
A graphics processing unit, or GPU, is a computer chip primarily used to render images. GPUs are used in all sorts of devices, from phones to PCs to game consoles. They’re very efficient at what they do; their parallel structure means they can handle algorithms that general-purpose CPUs just can’t touch.
In other words, if you’re looking for speed and power, a GPU is what you need. Whether watching a movie or playing the latest video game, your GPU is there to ensure the visuals are smooth and realistic.
Most PCs come with two different types of graphics cards. The first and most common type is the onboard graphics card. This is usually an Intel chip and is the default option for most computers.
The second type of graphics card is the dedicated graphics card. These are made by companies like Nvidia and AMD and are often used in gaming PCs. Dedicated graphics cards tend to be better than on-board ones because they’re more powerful and offer better performance.
When your system detects that the onboard graphics card can’t handle an application’s requirements, it will switch to the dedicated GPU. This mostly happens automatically when playing games, but you can also force an app to use the dedicated GPU. Let’s see how to go about it on Windows.
How to Force a Program to Use a Dedicated GPU via Windows 10 Settings
If you have a program that is lagging or not performing as well as you’d like, try forcing it to use your GPU. Here’s how to do it on Windows 10:
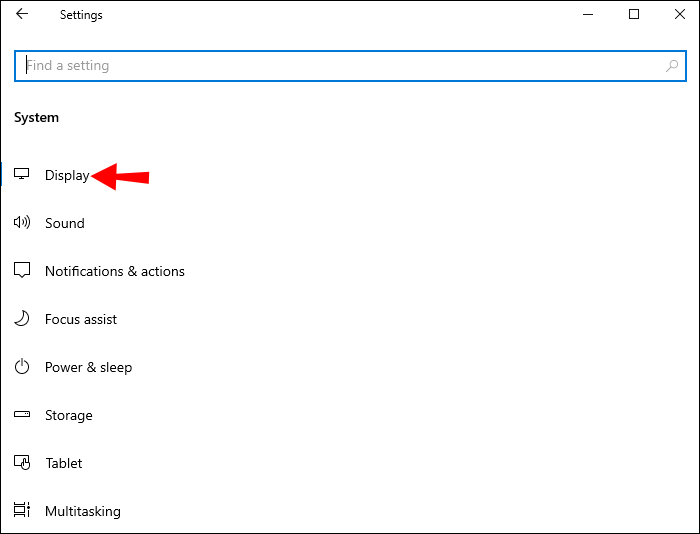
- Open the Settings app by hitting the Windows key + I shortcut.

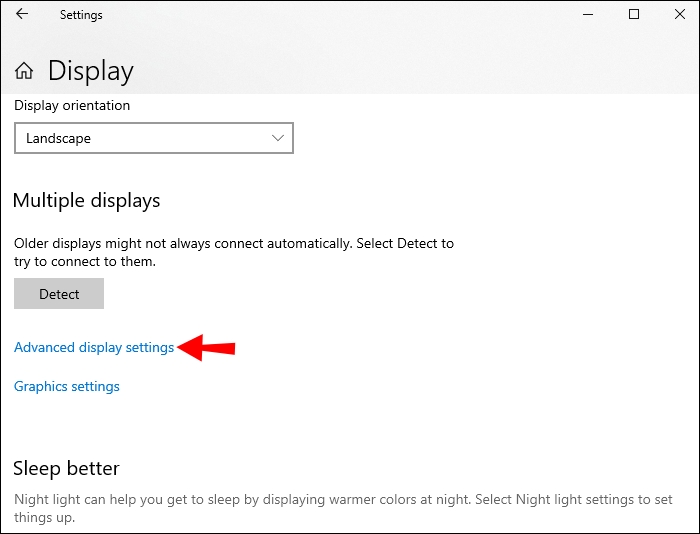
- Navigate to System > Display.
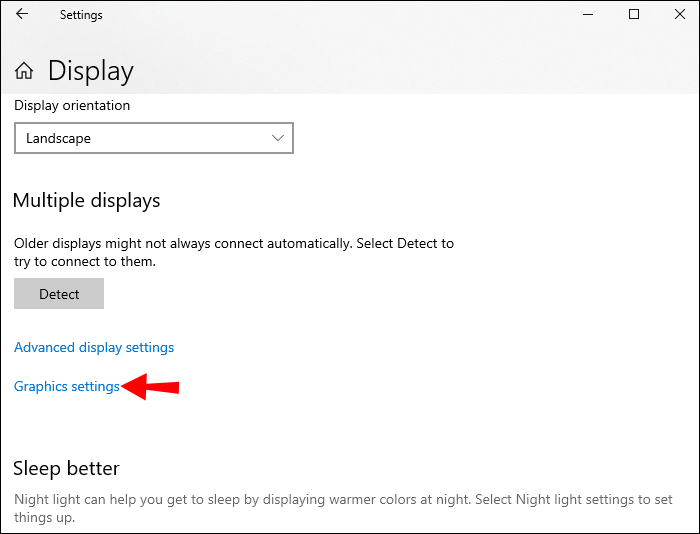
- Scroll down again and click the “Graphics settings” link.
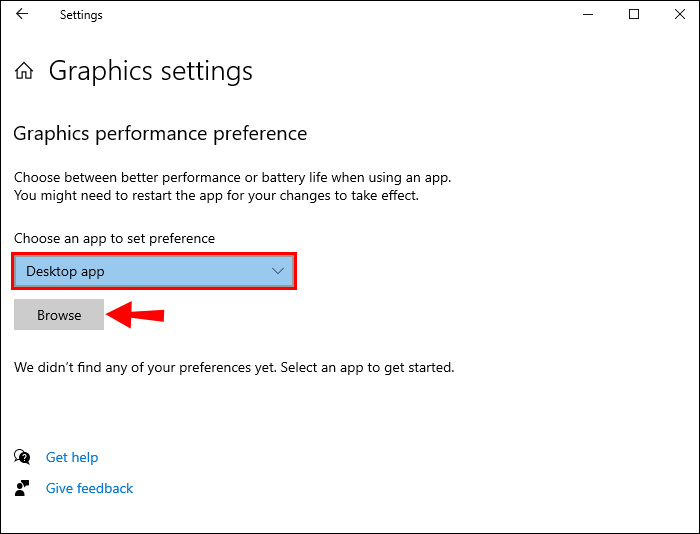
- Under “Choose an app to set preference,” click the dropdown menu and select the app you want to configure. If the app you want to configure is not listed, click the “Browse” button and navigate to the app’s executable file (.exe).
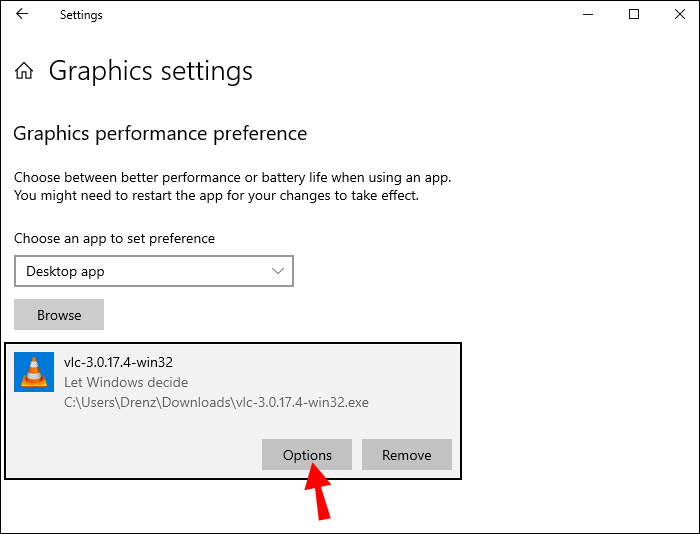
- Once you’ve selected the app, click the “Options” button.
- Choose “High performance” from the next menu and hit “Save.”

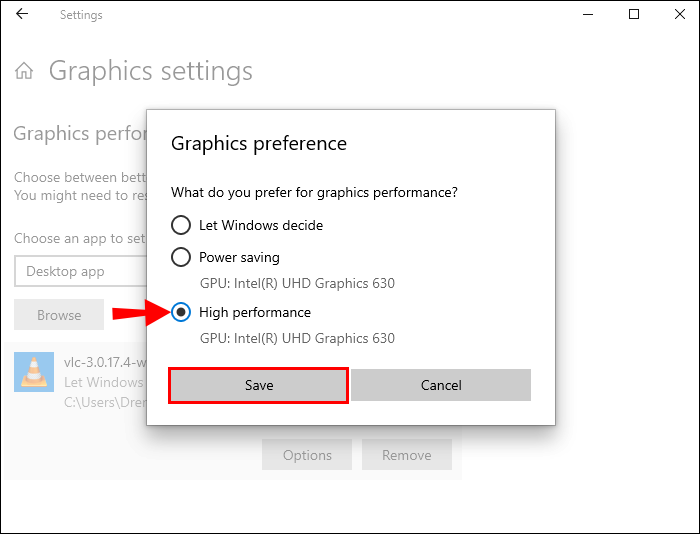
Now, whenever you launch the program, it will automatically use your dedicated GPU. However, it’s important to note that this method only works with apps that support GPUs—not all apps do. In addition, some apps may override this setting if they have their own graphics settings (e.g., games).
How to Force a Program to Use the NVIDIA Graphics Card
For gamers and other power users, a dedicated NVIDIA graphics card is a necessity. However, sometimes you may find that your games or other apps are not using your NVIDIA GPU as they should. Here’s how to force an app to use the NVIDIA GPU on Windows:
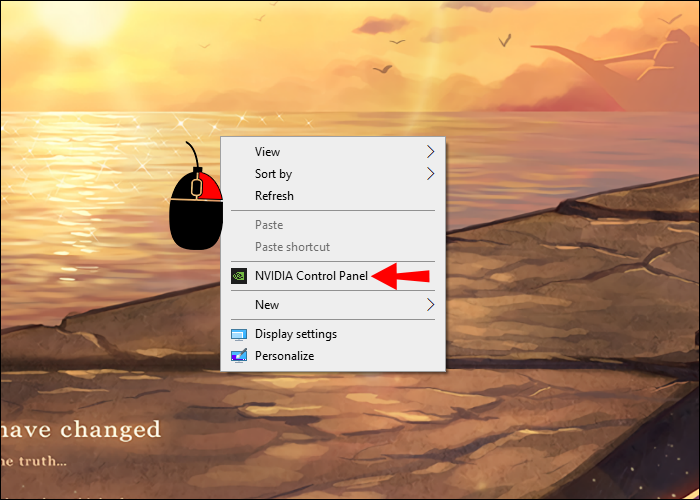
- Right-click on your desktop and click on “NVIDIA Control Panel.”
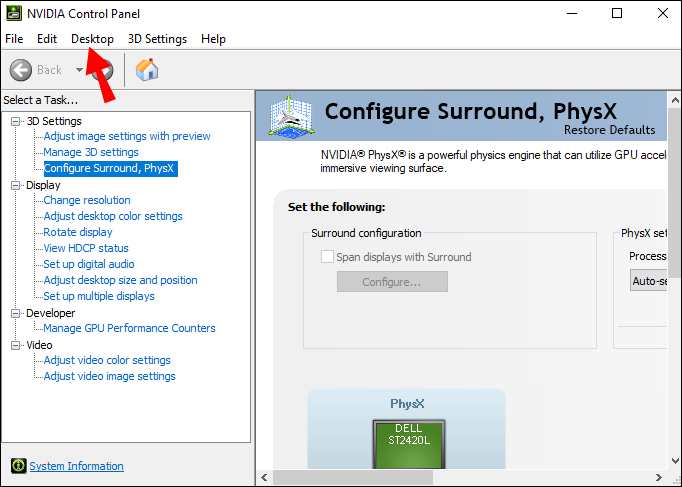
- Navigate to the Desktop menu.
- Check the box next to “Add ‘Run with graphics processor’ to Context Menu.”
- Go back to your desktop and right-click on the app of interest.
- Select “Run with graphics processor” from the context menu.
- Click on “High-performance NVIDIA processor.”

And that’s it! By following these simple steps, you can force your computer to use the NVIDIA graphics card for any app or game, even when running on battery power.
This can help you eke out every last bit of performance from your system, but keep in mind that it will also lead to shorter battery life. So, make sure to switch back to using the integrated GPU when you’re done gaming or working on other graphics-intensive tasks
How to Force a Program to Use the AMD Graphics Card
If your machine is equipped with an AMD graphics card, you might be wondering how to force apps to use it. Unfortunately, it’s not as easy as it is with NVIDIA cards. With AMD, you must manually add apps to the Catalyst Control Center. While this isn’t as convenient, it does give you more control over the apps using your dedicated graphics card.
Here’s how it works:
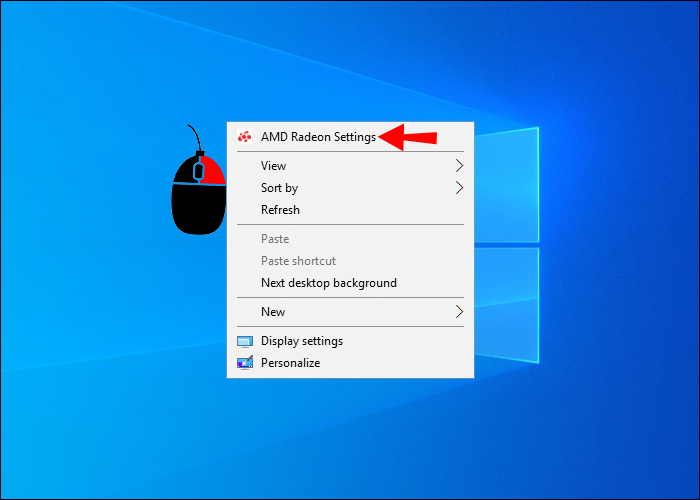
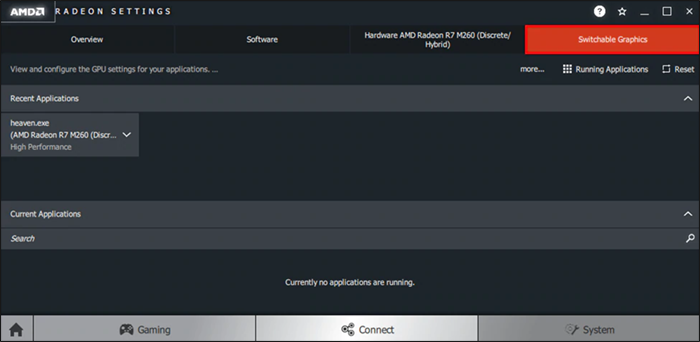
- Right-click on your desktop and select “Catalyst Control Center” from the context menu. This should open the AMD Catalyst Control Center app.
- When the AMP control app opens, you should see a list of panels on the left. Click on “System.”
- Select “Switchable Graphics.”
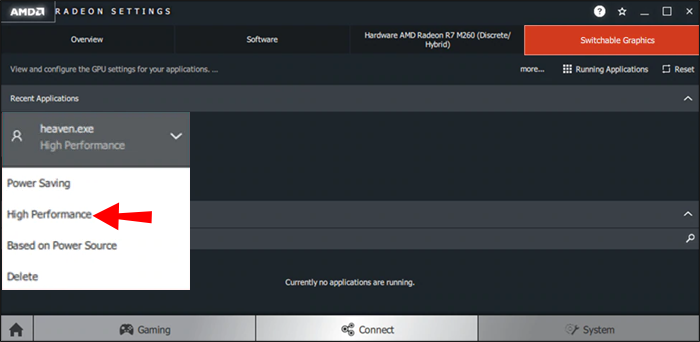
- Once the program has been added to the list, click on the down arrow next to it and select “High Performance” from the dropdown menu.
- Close the window and launch the program. Your AMD graphics card should now be in use!

How to Check Which Graphics Card You Have in Windows
Here’s how to check the graphics card preinstalled on your Windows computer:
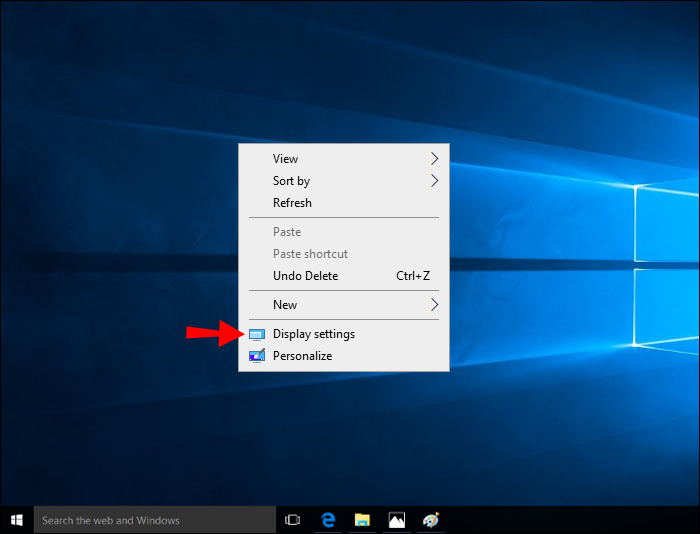
- Right-click on the desktop and select “Display Settings.”
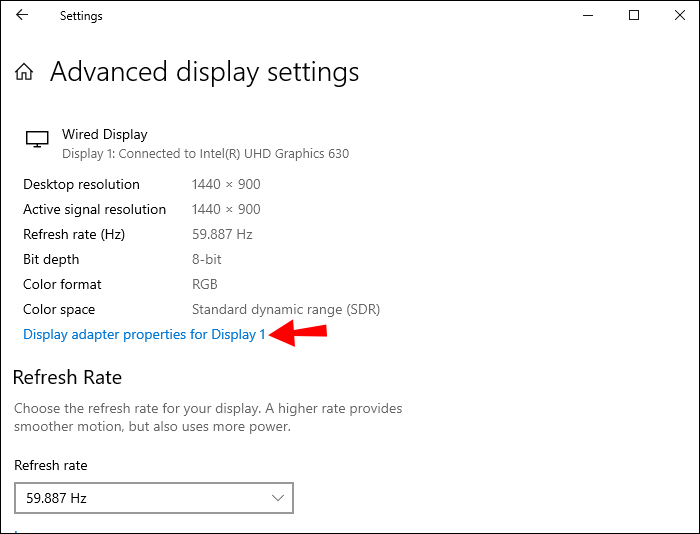
- Scroll down and select the “Advanced Display Settings” section.
- Click on “Display Adapter Properties.”
- A new window will open with information about your graphics card. The “Adapter Type” field will tell you whether you have an integrated or dedicated graphics card. The “Adapter Description” and “Driver Version” fields will give you more specific information about your graphics card model and driver version.

How to Check Whether a Program Is Using a Specific GPU
Many Windows users have a dedicated GPU in their system but don’t know how to check which programs are using it. This can be important for gamers who want to ensure that their games always use the dedicated GPU for the best performance.
Luckily, it’s easy to check which programs are using the dedicated GPU.
Here’s how:
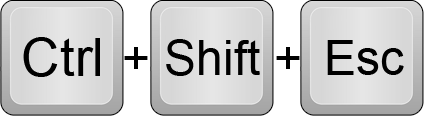
- Open the Task Manager. You can do this by pressing “Ctrl+Shift+Esc” or right-clicking the taskbar and selecting “Task Manager.”
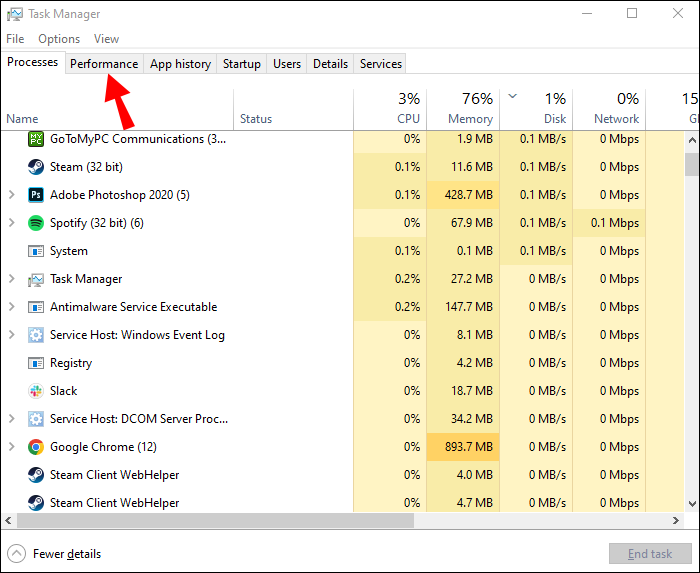
- Click the “Performance” tab. This will show you an overview of your computer’s performance, including CPU and memory usage.
- Select the “GPU” dropdown menu. This will show you which GPU is being used for each program on your computer.
- If a program is using your integrated GPU, you’ll see “Intel HD Graphics” or “AMD Radeon HD Graphics” listed under the “GPU” column. If it’s using your dedicated GPU, you’ll see the name of that GPU listed instead. For example, if you have an NVIDIA GTX 1080, you’ll see “NVIDIA GeForce GTX 1080” listed here.
- If you don’t see the “GPU” column, click “View > Select Columns” and then check the box next to “GPU.”

FAQ
When should you use a dedicated GPU?
A common misconception is that integrated GPUs are always slower than their dedicated counterparts. But that’s not necessarily true. It depends on the generation of both the CPU and GPU, as well as the tasks you want to perform.
If you want to do any kind of video editing or 3D rendering, you will definitely want to invest in a dedicated GPU. You’ll also need a dedicated GPU if you work with graphics-intensive programs regularly or do serious gaming. These activities require a lot of horsepower that an integrated GPU just can’t provide.
For general gaming and occasional image/video editing, an integrated GPU should suffice.
Get the Most Out of Your Graphics Card
If you do graphics-intensive work on your computer, it’s important to use a dedicated GPU. But sometimes, your computer will try to use the integrated GPU instead.
By following the steps above, you can force programs to use your dedicated GPU and get the most out of your graphics card. You may find that your favorite program runs much smoother after making this change.
Have you tried to force a program to use a specific graphics card on your computer using any of the methods discussed in this article? How did it go?
Let us know in the comments section below.
Disclaimer: Some pages on this site may include an affiliate link. This does not effect our editorial in any way.


