Even if you don’t own an Android phone, you probably use three or four of Google’s services daily, so the company knows much about you. Your harvested information can include your work commute and shopping habits, even if you used the service offline.
This privacy database doesn’t mean Google is trying to stalk you personally, as the information is stored anonymously, but it is attached to you. The process allows advertisers to understand demographics better and determine your interests to target ads.
If you’ve been looking at something you shouldn’t, doing things for work, or don’t want sites to extract your private information, there are ways to delete the Google history stored on your devices.
Use a Web Browser to Delete Google Search History in MyActivity
Note that deleting search history removes it from your Google account and not just for specific devices. Therefore, deleting any history deletes it from all devices.
Follow the steps below to delete Google history using your iPhone, Android phone, tablet, MacBook, Chromebook, desktop PC, or laptop.
- Go to your My Activity page using a browser.
- DO NOT CLICK THE DELETE DROPDOWN at this point. This action has time filters (only before adding other filters like time or product) but immediately deletes all Google History (not just Google Search). If you previously added filters, you’ll receive a prompt first.

- Click on the vertical ellipsis (three vertical dots) to the right of Search Your Activity.
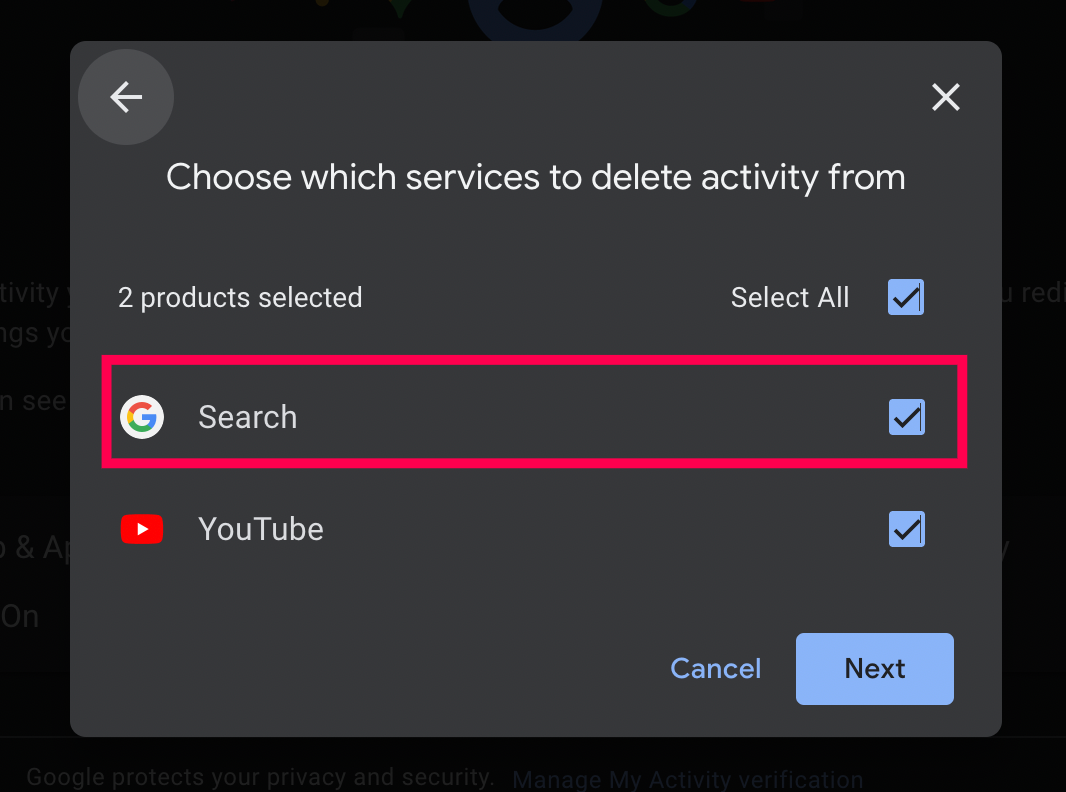
- Choose the history timeframe you’d like to delete. For this article, we’re selecting All Time.
- Check the box next to Search and uncheck the other boxes if you don’t want other data deleted. Then, click Next.
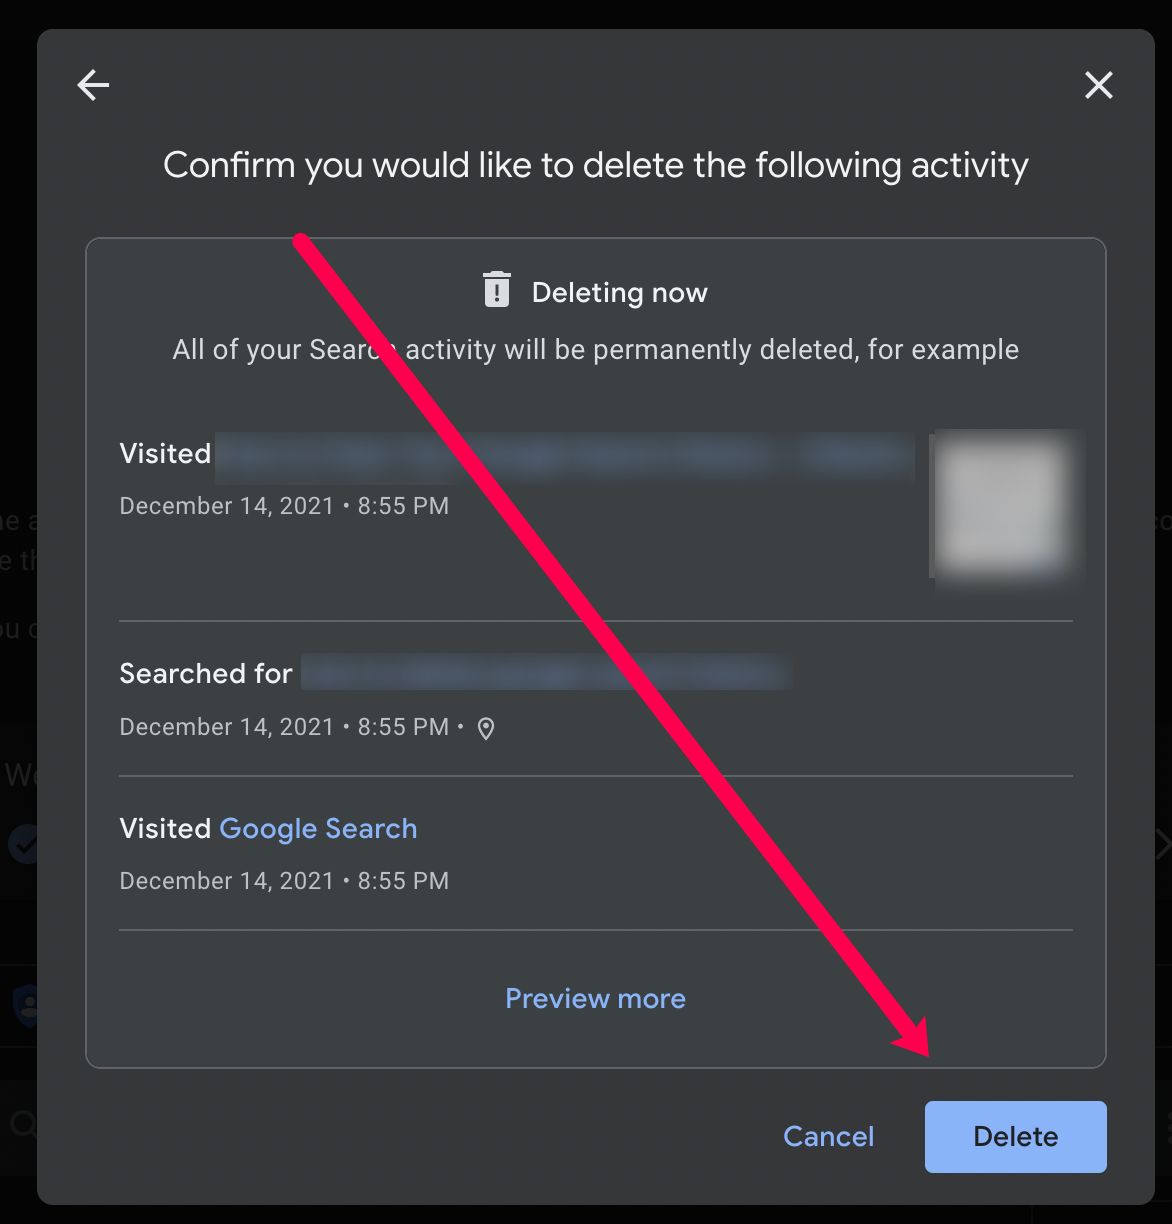
- Finally, review the web pages and select Delete.


If desired, the above steps allow you to quickly delete your Google search history using specific dates and keywords. Upon completing the above-listed steps, all Google search history gets deleted from the devices associated with that account.
Clear ALL Google Search History Entirely using Chrome on a PC (Windows, Mac, Linux, or Chromebook)
If you want a quick and easy way to bulk-delete all Google search history, plus optionally remove all browsing history, saved passwords, cache, and cookies on Chrome, the steps below cover it all.
- Launch Chrome and log in to the correct account if not already done.
- Click the vertical ellipsis (three vertical dots) in the top right-hand corner of your browser to open the Chrome menu.
- Now, select Settings from the options.
- Next, click Clear browsing data in the Privacy and security section.
- Choose between the Basic or Advanced tab. Basic is a way to quickly clear Google history, while Advanced gives you more control over the individual elements, such as passwords.
- Click on Clear data to remove the selected items.


The above steps delete any Google history (including search history) you selected in the steps above.
Clear Google History on an Android
On your Android device, open Google Chrome and follow these steps:
- Tap the vertical ellipsis (three vertical dots) in the upper right-hand corner.
- Now, select History.
- Next, select Clear browsing data… in the new window.
- Confirm when finished.


Note: You can also tap the X next to each web page to delete your searches.
All your Google history, including search history, disappears after performing the above steps. Therefore, ensure you have saved any sites, data, and other personal information elsewhere.
Clear Google History on an iPhone
For iPhone users, open Google history and follow these steps to clear your history:
- Launch the iOS Chrome app.
- Tap the History button on the homepage if visible, or tap the horizontal ellipsis (three horizontal dots) in the lower right corner and choose History on the new page.
- Tap Clear Browsing Data…
- Choose the time range, then uncheck any data you want to preserve, such as Cookies, Site Data, Cached Images, etc., then select Clear Browsing data.
- Confirm the action by tapping Clear Browsing Data once more.
Once you’ve completed the above steps, all Chrome browsing history and any other history you selected is now deleted on your iPhone, including Google search history.
Set Up Auto-Delete for Google History Data
Google does offer an option to dump your data automatically. If you prefer to keep some data, avoiding this function is best. However, if you feel like automatically deleting all your Google search data, follow these steps to set up the auto-delete feature:
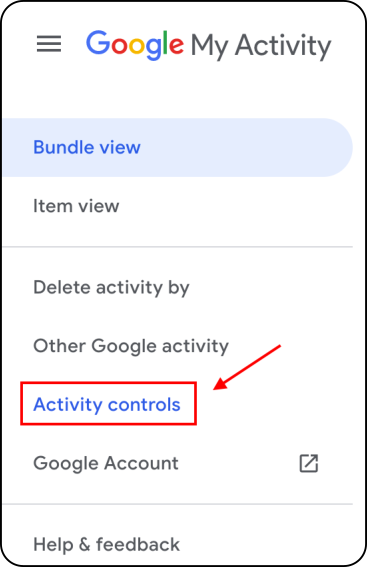
- Visit your Google My Activity page and log into the correct account.
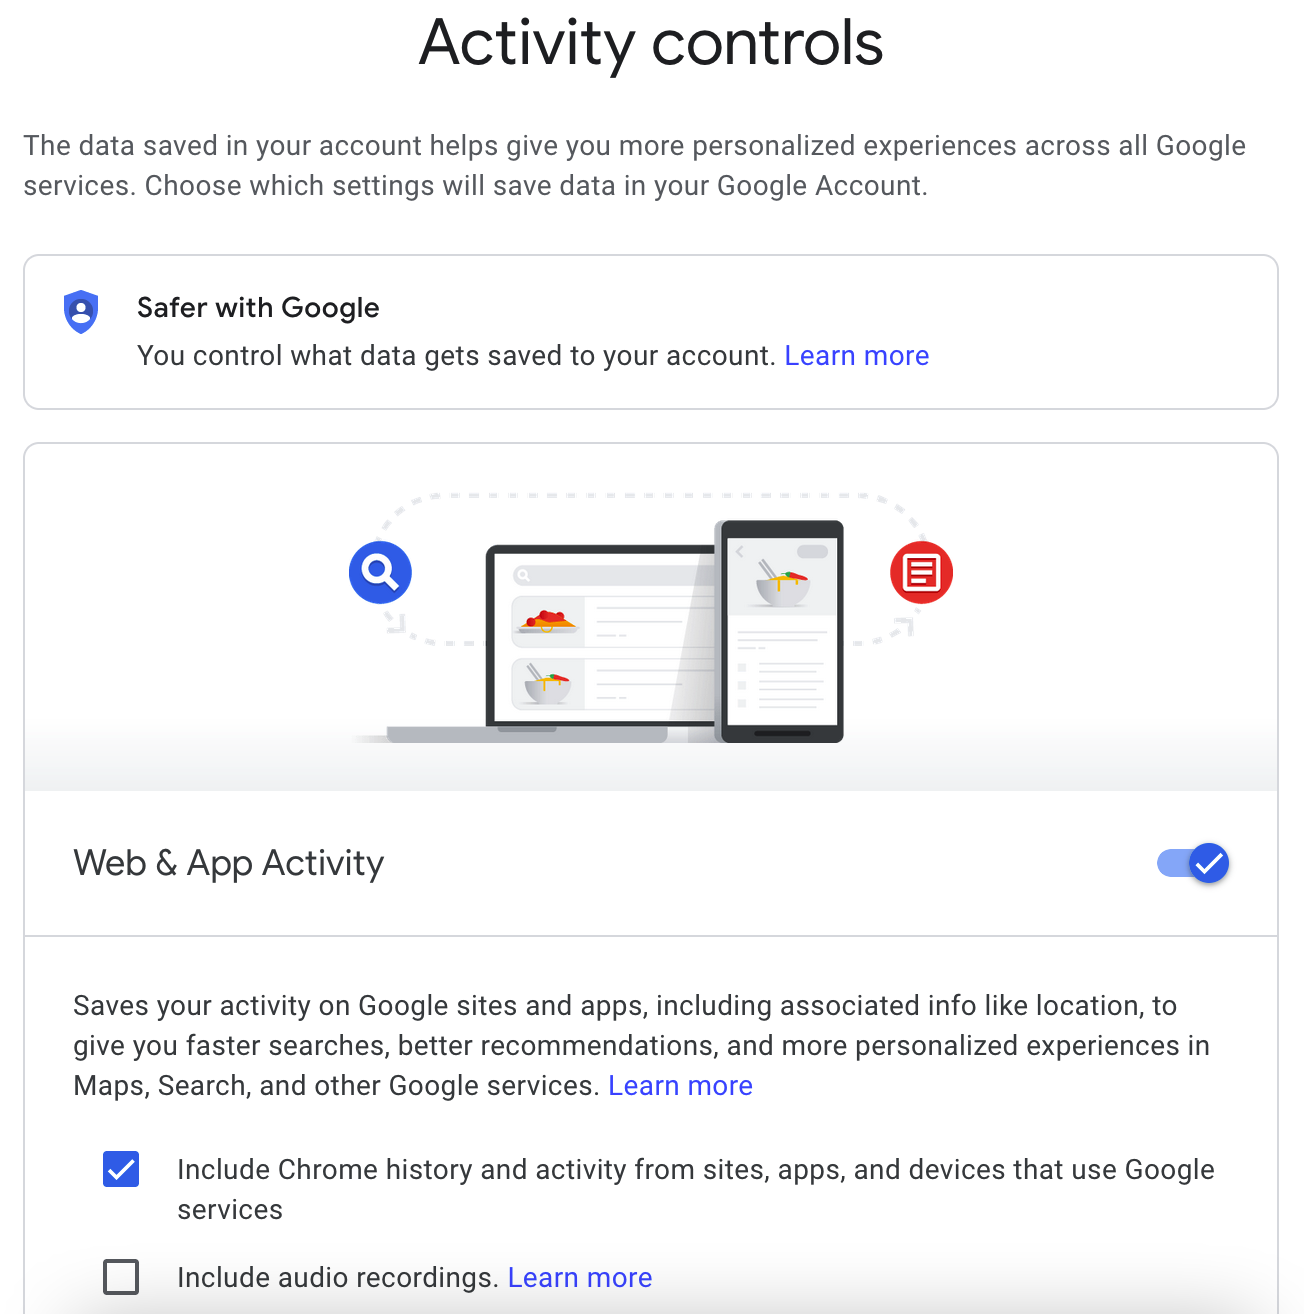
- In the left navigational menu, click on Activity controls.
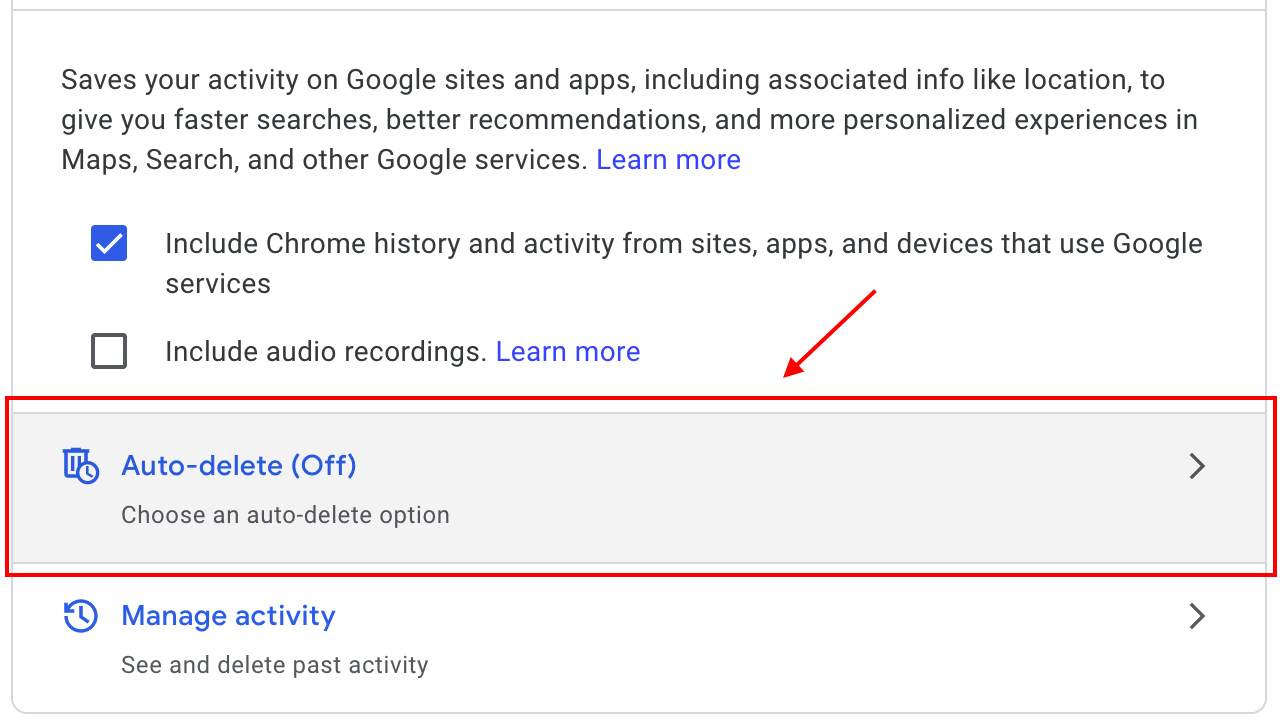
- Scroll down and click on Auto-delete (Off).
- Click on the Auto-delete activity older than dropdown menu and choose 3 months, 18 months, or 36 months, then click “Next.“
- Confirm your auto-delete activity option by clicking on Confirm. Remember that the preview of your activity history is just that.


After completing the settings above, Google will routinely autodelete your search history based on your set duration.
Device Links
ss="wp-block-heading">Google History Deletion FAQs
I want to save my passwords but delete everything else. How can I do this?
If you’re deleting all of your Google data, it is possible to de-select the option under Clear Browsing Data for clearing passwords. But, if you want more security, you can use a browser extension such as Last Pass to store your passwords in a secure location.
Like Google or Chrome, Last Pass can auto-fill your passwords by storing these passwords for you.
Can I permanently close my Google account?
Yes. If you’re no longer interested in using it, you can permanently delete your Google account.
If you visit the Google Account webpage, you can click on the option to download all your data and delete your entire Google account and everything that goes with it.
Remember that performing this action will completely wipe out all your Google-related information. This process includes losing all Google Docs, emails, contacts, etc. If you’re using an Android device, you must create or use another Google account to access many features and back up your device.
Disclaimer: Some pages on this site may include an affiliate link. This does not effect our editorial in any way.