If you enjoy using Airtable’s views feature to customize how and what information you see, you may want to know how to delete a view.
You’re in the right place.
In this article, we’ll show you how to delete a view and how to create personal and locked views when accessing Airtable from your desktop.
How to Delete a View on Airtable
To delete a view:
- Sign in and access the applicable base.
- Click on the Views option found towards the top left-hand corner of the screen.

- From the view switcher select the view you wish to delete.
- Click on the three-dotted Menu found next to the Views option.
- Click on Delete view found at the bottom of the menu options.


The view will automatically move to the Trash.
Following this, an UNDO message will appear briefly towards the bottom left-hand corner of your screen. If you’ve accidentally deleted the wrong view and were not quick enough to hit UNDO, don’t worry. The view can easily be restored using the Trash function. Luckily, any views, fields, tables, and records deleted within the past seven days can be restored from the Trash.
To restore a deleted view:
- From the base, click on the Trash icon found towards the right-hand side of the screen.
- Click on Restore next to the view you wish to reinstate. The word Restored will replace Restore as confirmation.
- Towards the top left-hand corner of the screen select Views.
- Click on the restored view to see it again.


How Do You Create a Personal View?
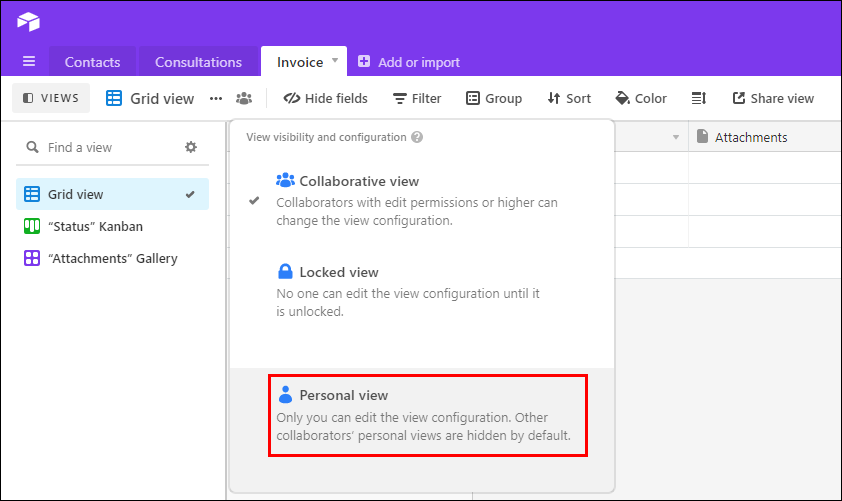
With creator, commenter, or editor permissions on a Pro or Enterprise plan, you can create a personal view that only you can customize and change. By default, personal views are not available to other collaborators, therefore, no one can accidentally make changes to them.
They’re useful to help focus on what’s relevant to what you need to know. For example, you could create a personal view with filters showing only the tasks you are responsible for.
To create a personal view:
- Click on the Views option found towards the top left-hand corner.
- From the view switcher, select the view you wish to make personal. You could also create a new view to make personal. Steps on how to create a new view are shown in the Additional FAQs section of this article.
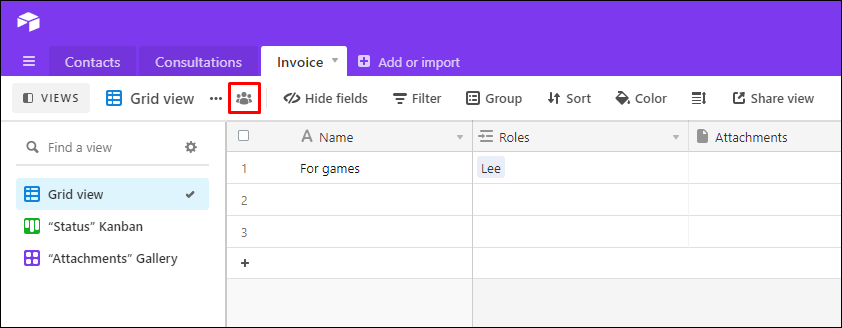
- Next to the view’s name, click on the View mode button.
- From the view mode menu, choose the view mode you want for the current view.

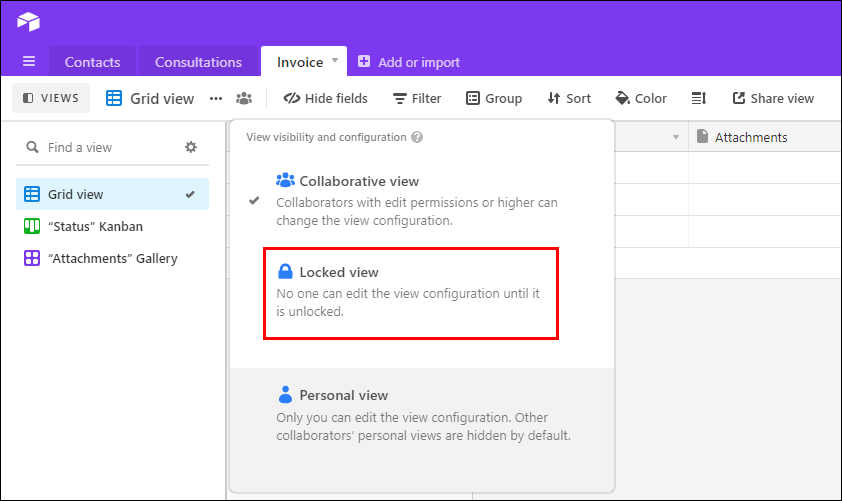
How Do You Lock a View in Airtable?
The Locked view feature is also available on the Pro and Enterprise plans. It’s useful for preventing any unexpected changes to a view’s set up which could potentially disrupt workflow. Other collaborators will still have the ability to view or make changes to the information with the records.
The steps are very similar to creating a personal view. With creator/owner rights to create a Locked view, do the following:
- Click on the Views option found towards the top left-hand corner.
- From the view switcher, select the view you wish to lock.
- Next to the view’s name, click on the View mode button.
- From the view mode menu, choose the view mode you want for the current view.
Additional FAQs
How Can I Delete a Record?
Here we’ll show you how to delete a single record, multiple records, and partial record deletion, for when you only need to delete selected information from a record.
To delete a single record:
• Sign in and access the applicable base.
• Right-click anywhere on the record you wish to delete, then from the drop-down menu select Delete record.
To delete multiple records:
• Select the records you wish to delete by hovering over the number to the left of each record.
• Once your records are checked; right-click on a record included in your selection, then click Delete all selected records.
Partial record deletion:
• Select the cell[s] you wish to delete by clicking and dragging to select multiple cells or holding the shift key while clicking/using the arrow keys.
• Then hit the delete key on your keyboard to clear the selected cells.
How Do You Edit in Airtable?
You can edit a base and individual records, as long as you have owner/creator or editor permissions. Here we’ll go through how to edit a base description, field details, and records.
To edit the base description:
• Sign in and access the applicable base.
• Click on the dropdown arrow next to the base name.
• From the menu select Base description > Edit.
• Once you’re happy with your changes hit Save.
Editing field details are only possible with Owner/creator permissions:
• From the applicable base, go to the field you wish to edit the details for.
• Click the downward arrow at the right-hand corner of the field name cell.
• Select Rename field, Edit field description, or Edit field permissions from the menu to edit what you wish.
To edit a record:
• From the applicable base, go to the record you wish to edit.
• Click on either the circled number or the expand icon to open the record.
• There make the changes you need, a log of the changes made will automatically display in the Activity feed on the right-hand side.
What Is a View in Airtable?
With traditional spreadsheets, if you freeze or hide columns, for example, all viewers will see the data the same way. In Airtable you can create a view which is set a specified way to view the information e.g., you can create a calendar view that outlines all meetings and events monthly.
As views are only a different way to look at the same data, if the data is edited in a record, the changes will be seen in everybody’s view once refreshed.
How Do I Create a View in Airtable?
To create a new view:
• Sign in and access the applicable base.
• Click on the Views option found towards the top left-hand corner.
• Towards the bottom of the menu select Grid under the Create a view section.
Your new view will appear in the Views sidebar. Select it to name it, sort or manually order the records, filter out records, and show/hide fields.
What Is Grid View in Airtable?
A grid or table view is the default view type of an Airtable database via the web browser.
The records and fields are presented as rows and columns making it look like a spreadsheet.
These are the other types of views you can use:
• Calendar view. Displays your records as events within a calendar; great for keeping on top of important dates.
• Kanban view. Displays records of your workflow in a board of stacked cards, which can be moved around and reordered.
• Gallery view. Displays your records as large cards to highlight your documents, images, and attachments, etc.
How Do I Find My Airtable Base ID?
Here we’ll show you how to retrieve your Base and Workspace ID.
Getting your Base ID:
This is performed via the Metadata Application Programming Interface. This API uses token-based authentication, therefore, to gain access you’ll need to register for access to get your client token.
Once you have the token, paste your Airtable account’s API key into your integration, send the API key in the Authorization header of all your requests to the server with the following syntax:
Authorization: Bearer $USER_API_KEY
To get the Base ID’s that the API key can access, enter the following syntax:
GEThttps://api.airtable.com/v0/meta/bases
Including only the first 1,000 bases, they’ll be displayed in the order displayed on your home screen.
Note: As a security measure Client-side requests are not permitted. Please perform all requests to these end-points server-side.
Getting your Workspace ID:
One way is to open the workspace settings for the workspace from either the account page or home screen.
From your account page:
• Sign into Airtable.
• Click on your picture at the top right-hand corner of the screen.
• Select Account from the dropdown menu.
• On the left-hand side of the screen click on the workspace to view its settings.
From your home screen:
• Select the downward arrow next to the workspace name.
• Select Workspace settings.
For an even quicker way, copy the URL in your browser’s address bar, once you’ve accessed the Workspace settings. The part of the URL starting with wspis is your workspace ID.
Airtable Helps to Keep Your Views Tidy
The delete view feature is especially useful when the number of views start to get out of hand – cluttering the view switch area. For good house-keeping, listing only the views you need helps improve productivity, creativity, and efficiency!
Now that we’ve shown you how straightforward it is to delete a view, what do you think about there not being a confirmation to delete before going to trash? Do you think seven days is enough time to restore from the trash?
If you’re a massive fan of Airtable we’d love to hear from you, please leave a comment in the section below.
Disclaimer: Some pages on this site may include an affiliate link. This does not effect our editorial in any way.