Generally speaking, Windows is a fairly easy operating system to learn. Newer versions of Windows, especially Windows 10, have made it easier than ever to set up and use Windows, making it a great operating system for anyone, including younger users and your computer-illiterate grandparents. Of course, just because Microsoft has gone out of their way to make their operating system easier to use for basic users doesn’t mean power users have to suffer in return.
Windows includes powerful system-wide search functionality that lets users quickly find files and other data via a Start Menu or Start Screen search. By default, Windows Search will index certain common locations on your drive, such as the User folder, Outlook Messages, and Internet Explorer browsing history. If Windows Search stops working for you and no longer returns search results for files that you know exist, there are a few steps you can take to troubleshoot the issue. Here’s how to fix Windows Search issues in all versions of Windows from 7 to 10.
First, head to the Control Panel and find the section labeled Indexing Options. If you’re not facing a total malfunction of Windows Search capabilities, you can quickly jump to Indexing Options directly by searching for it from the Start Menu (Windows 7 and Windows 10) or the Start Screen (Windows 8 and 8.1).
Verify Indexed Locations
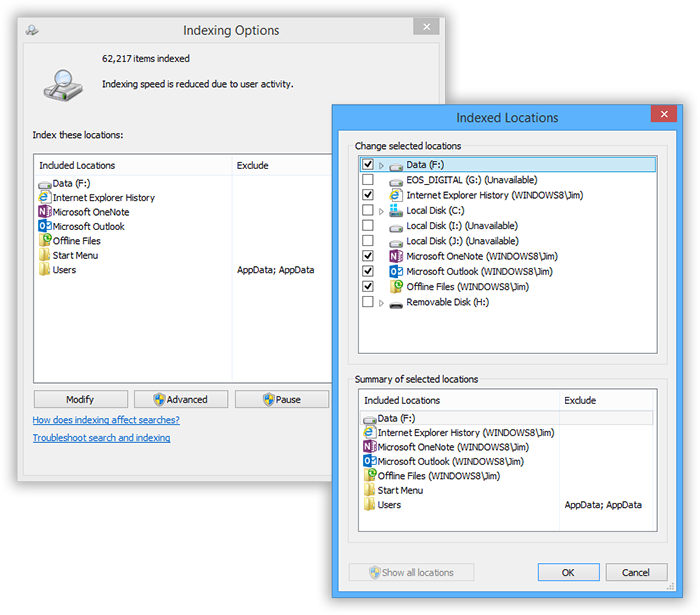
In the Indexing Options window, the first step to take when Windows Search isn’t finding your files is to make sure that Windows is indexing the location where your files reside. You’ll see a list of locations and applications that are currently being indexed; note that if a drive or folder is listed here, then all subfolders and files included in that drive are indexed as well.

If the locations of your files are not listed here — such as your Users folder for places like the Documents and Desktop folders, or a second hard drive — you can manually add them. Click the Modify button and you’ll see a list of all locations on your PC. Find the desired drive or folder that contains files you’d like indexed and check the box next to it. Click OK when done and you’ll return to the Indexing Options window to see your new location listed.
Rebuild the Windows Search Index
Regardless of whether the location of your files was already in the indexed locations list, you’ll want to rebuild your Windows Search index as your next troubleshooting step. This index can become corrupted or otherwise encounter issues, and rebuilding it from scratch is often a good way to solve Windows Search problems.
One note before we begin: rebuilding the Windows Search index can take a very long time depending on the speed of your PC, your storage drives, and the number of files that need to be indexed. You can still use your PC during the rebuild, but you won’t have full access to Windows Search until the rebuild is complete. On slower systems, the rebuilding process may decrease system performance while it runs (you can see how much of an impact the process has on your PC by finding the Microsoft Windows Search Indexer process in Task Manager). It’s therefore best to plan a Windows Search index to take place overnight. Just follow the steps below as the last thing you do before leaving your PC at night, and let it run uninterrupted.
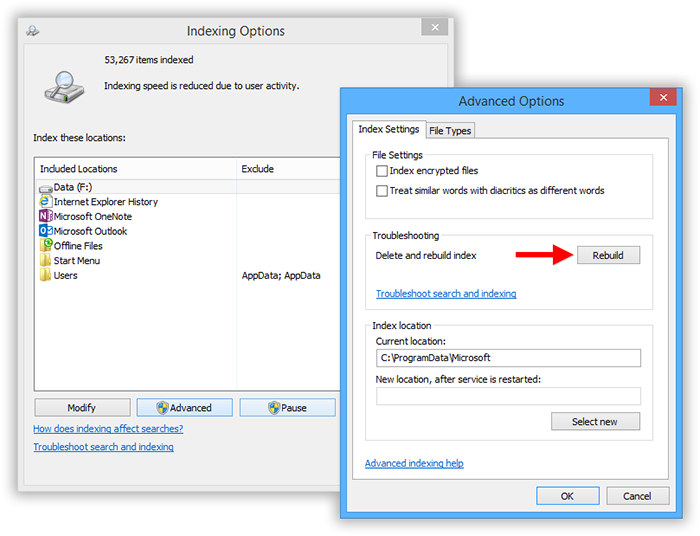
To rebuild the Windows Search index, head back to Control Panel > Indexing Options. Click the Advanced button and make sure you’re on the Index Settings tab of the Advanced Options window.
Under the Troubleshooting section of the Advanced Options window, find and click the Rebuild button. Windows will warn you, just as we did above, that the index rebuilding process may take a long time, and that you may not have full search functionality until it’s complete. Click OK to accept the warning and start the re-indexing process.
Once the Windows Search index has been rebuilt, try searching for your files again. Absent more serious issues like hardware failure or viruses, your files, folders, and data should all now appear in your Windows search queries.
Disclaimer: Some pages on this site may include an affiliate link. This does not effect our editorial in any way.


