You can use Microsoft Word’s watermark feature to mark your document (confidential, draft, ’do not copy’, etc.) or add a transparent logo (such as that of your business or trademark).
Microsoft Word allows you to insert watermarks in a few simple steps. You can choose watermarks from the premade templates or create custom ones.
This article explains how to insert watermarks, how to make them yourself from scratch, and how to make pictures act like watermarks in a document.
Inserting Watermark in Word (Office 365 and Word 2019)
While this example is for Office 365 and Word 2019, adding a Watermark is similar in some earlier versions of Word. To add a watermark, you should:
- Open Word.
- Click on the ‘Design’ tab.

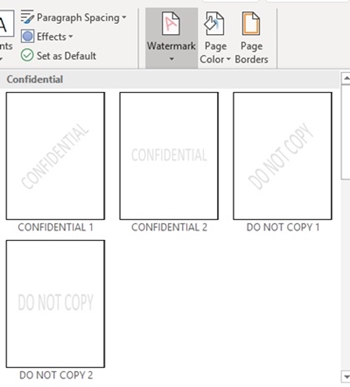
- Click on ‘Watermark’ at the far-right. Depending on the version of the word, you will see a few templates that you can choose from.
- Click on one.
- The watermark should appear on the page.


Inserting Custom Watermark in Word
If you want a custom watermark, you can make it yourself. To do this, you should:
- Repeat steps 1-3 from above.
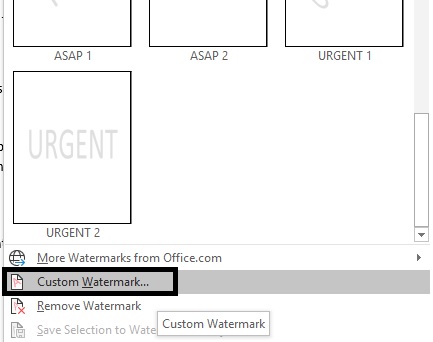
- Below the menu with the premade watermarks, you will see a ‘Custom Watermark’ option.
- Click on ‘Custom Watermark’.
- Select ‘Text Watermark’.
- In the ‘Text’ line, you can add a string of text that you want to appear on your document. You can also format the font, color, and size. Also, you can pick whether to display the watermark vertically or horizontally.
- Click on ‘Apply’.
- Click ‘OK’ and the window should close.
- You should see your custom watermark on the document.

Inserting a Picture Watermark
You can display an image watermark on your document. With this option, you can easily add a nonintrusive company logo or a subtle background. To add a picture watermark, you should:
- Go to the ‘Custom Watermark’ window by repeating steps 1-3 from the previous section.
- Click on ‘Picture Watermark’.
- Click on ‘Select Picture’.
– To add a picture from your drive, select the ‘Browse’ option next to the ‘From a file’ icon. Then navigate to the location of the image.
– To add a picture from the internet, you can use the Bing search engine. Use the search bar and press ‘Enter’ to choose.
– To add a picture from OneDrive, select ‘Browse’. Sign in to your One Drive account as applicable and locate your image. - Wait for the picture to upload.
- In the ‘Scale’ dropdown menu, you can choose the size of your image. If you choose ‘Auto’, the image will scale to its original size. If you want a smaller image to completely cover the page, you may have to scale up to 500%. Keep in mind that the picture quality may become grainy.
- Ticking the ‘Washout’ option will make your watermark almost fully transparent. If you want your watermark to be more visible, you should leave it unchecked.
- Click ‘Apply’. The watermark should appear.
- Click ‘OK’.


Removing a Watermark
If you’d rather not use a watermark after all, you can easily remove it. Follow these steps to clear the watermark:
- Open the ‘Design’ tab.
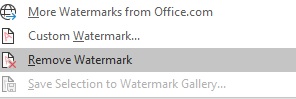
- Click on the ‘Watermark’ menu.
- Click on the ‘Remove watermark’ option. It’s below ‘Custom watermark’.
- The watermarks should disappear from every page.
Inserting Watermark in Word for Mac OS
If you have Microsoft Word for Mac, inserting a watermark is almost the same. Here’s what you should do:
- Open Word.
- Click on the ‘Design’ tab.
- Find ‘Watermark’.
- The ‘Insert Watermark’ dialog will open, similar to the ‘Watermark’ window in Word for Windows.
– Click on ‘Text’ to add a custom watermark. Besides font, size, and color, you can also set the transparency scale of the watermark. (This option is not available in Word 365.)
– Choose from one of the templates to add a premade watermark.
– Select ‘Picture’ to insert an image as a watermark. You can use an image on your drive, search engine or iCloud. - Once you’ve chosen your option, the watermark should appear.
- If the watermark doesn’t appear, click on the ‘View’ tab on top.
- Select ‘Print Layout’.
- You will see how the watermark looks like in the printout.
 – Click on ‘Text’ to add a custom watermark. Besides font, size, and color, you can also set the transparency scale of the watermark. (This option is not available in Word 365.)
To remove a watermark, simply choose the ‘No watermark’ option in the same dialog.
Disclaimer: Some pages on this site may include an affiliate link. This does not effect our editorial in any way.


