Windows 11 is a powerful operating system, but navigating its Start menu can be challenging. Users who have upgraded their Windows 10 system may find the new version cluttered with all the changes they’ve made to the Start menu. The good news is that there are several ways to organize the Start menu and adjust its appearance to maximize its functionality. Additionally, you can switch to several user-friendly menus to improve your Windows 11 experience.
Keep reading to learn more.
How to Modify the Windows 11 Menu Alignment
The easiest way to give your Windows 11 Start menu a custom look is to tweak the taskbar settings. Changing the taskbar alignment also affects the Start menu positioning, and you can modify the appearance by switching between two alignment options. The default taskbar alignment is center, so moving it to the left part of the desktop provides the screen with a sleek and elegant feel. To adjust the alignment:
- Hover the cursor over the taskbar and right-click.
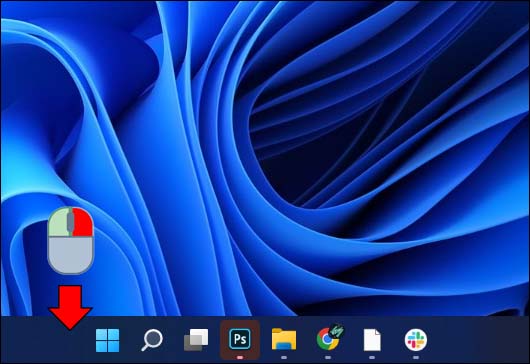
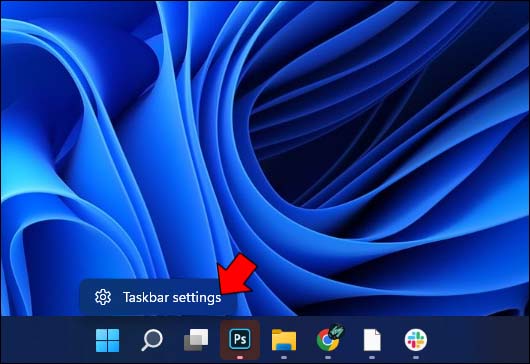
- Click on the “Taskbar settings” option.

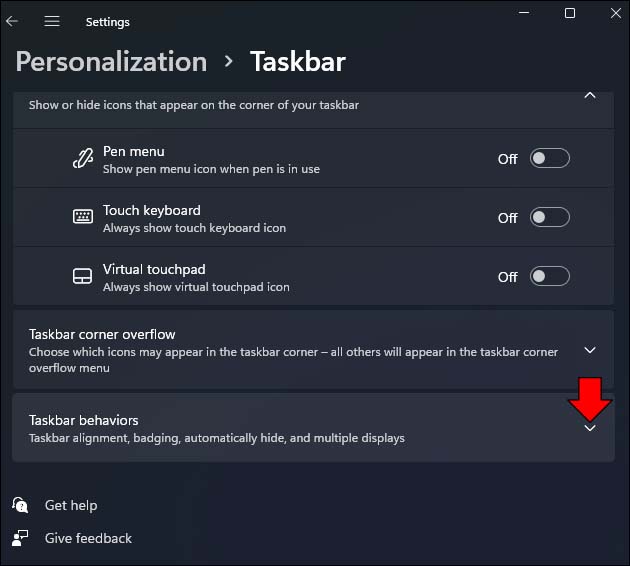
- Scroll to the bottom of the interface and tap the “Taskbar behaviors” section to expand it.
- Under the “Taskbar Alignment” heading, choose either “Left” or “Center” to change the alignment.

Changing the default alignment is a useful hack, especially if you prefer to keep the taskbar hidden. It also gives you easier access to the Start menu since you only have to tap the Windows key to pull it up.
How to Organize Pinned Programs
The Start menu is packed with pinned programs. Many apps are third-party software like Instagram, while others are Microsoft add-ons such as Solitaire or Windows system apps. It’s unlikely that you’ll use all of the software, so it’s best to remove apps that take up space on the Start menu.
To unpin a program from the Start menu:
- Navigate to the app you wish to remove and perform a right-click.
- Choose the “Unpin from Start” option.
- If it’s an app you don’t intend to use, press the “Uninstall” button.

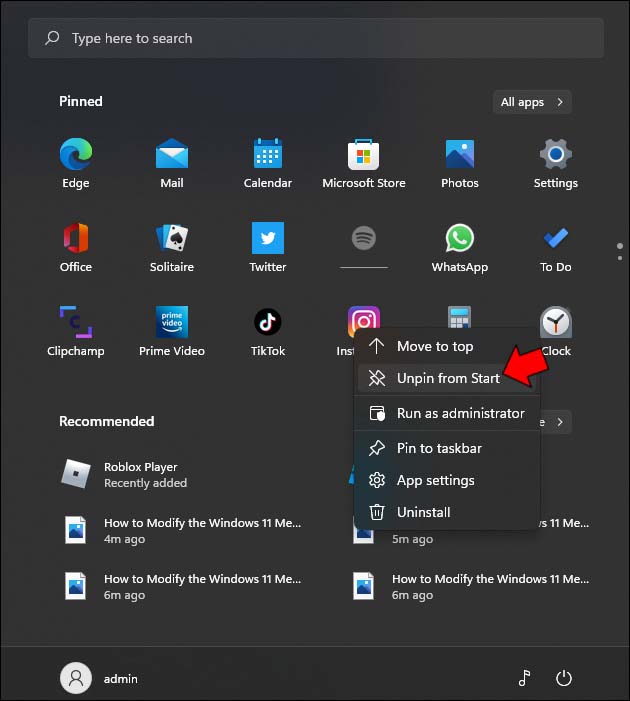
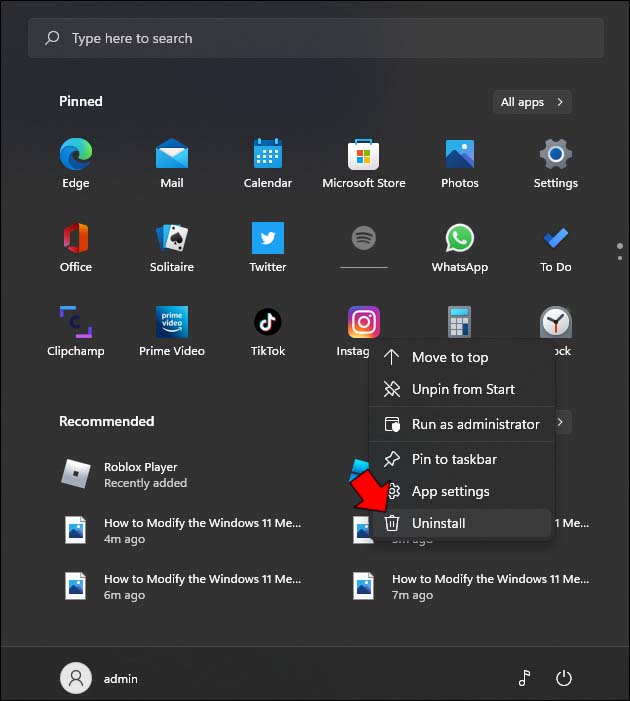
Identify all unnecessary pinned apps and unpin or uninstall them to declutter your Windows 11 Start menu.
How to Pin Folders to the Menu
While it’s impossible to pin folders to the Windows 11 Start menu, users can place default system folders beside the Power button for easier access. To do so:
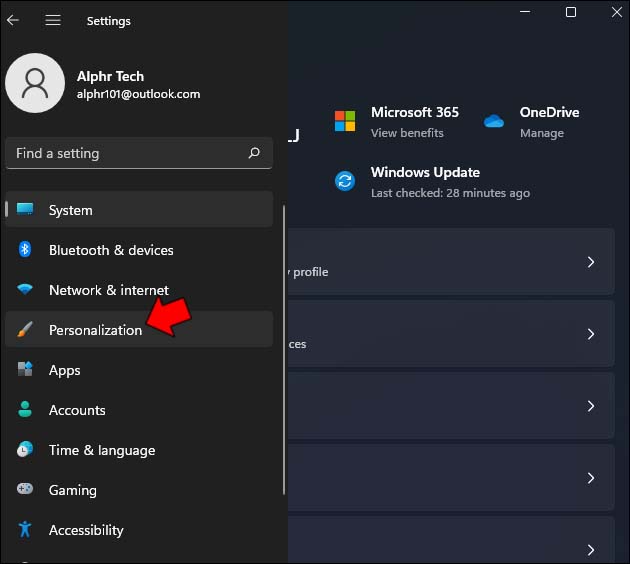
- Hold down “Windows + I” to launch the “Settings” app. Alternatively, find it through the Start menu.
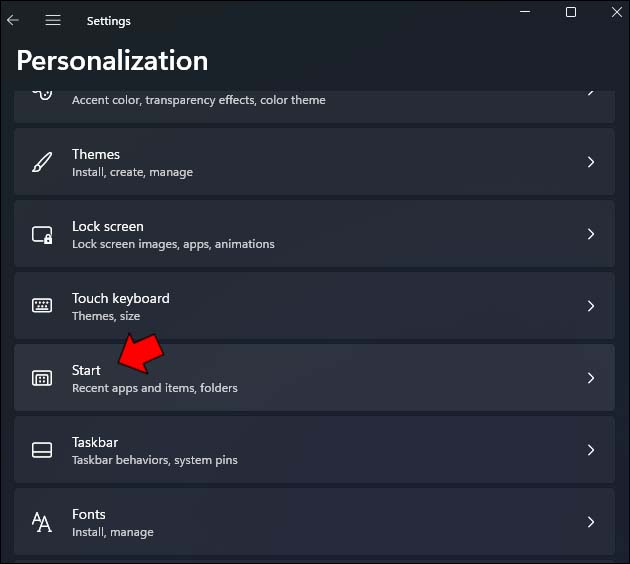
- Click on “Personalization” and select “Start.”
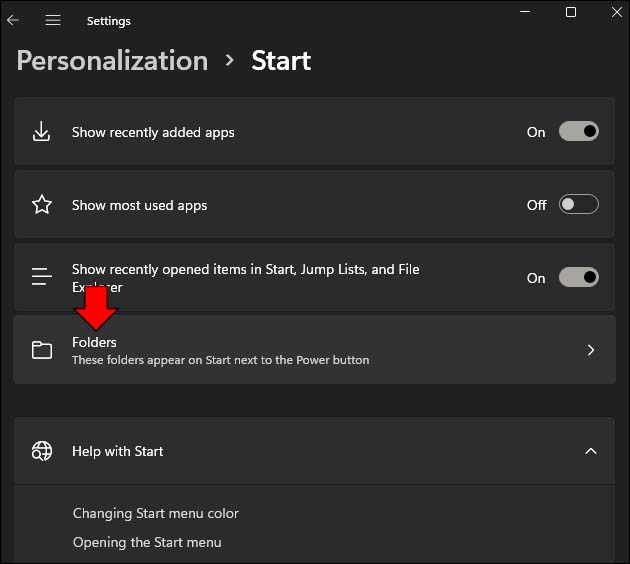
- Pick the “Folders” option and select which folders will appear in your Start menu.
Although Windows 11 doesn’t allow users to pin files, you can scan recently accessed files by going to the Start menu and tapping the “Recommended” section. If you press “More,” the menu will generate a list of files you’ve accessed over the previous months.
How to Remove Recommended Files
The “Recommended” tab is helpful if you frequently work with the same files, but it can also give the menu an unkempt look. Wiping this section will keep the Start menu organized. To clear the tab:
- Click on “Windows + I” and go to “Personalization.”
- Choose the “Start” option.
- Navigate to “Show recently opened items in Start, Jump Lists, and File Explorer” and press the “Off” button.
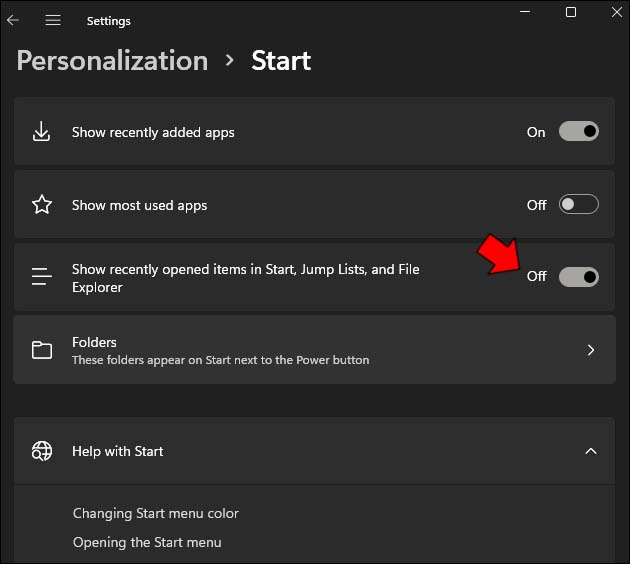
Keep in mind that Microsoft still hasn’t rolled out a method to remove the “Recommended” section entirely. It will remain in the Start menu, but it won’t contain any files.
How to View Recently Installed and Frequently Used Apps
If you’ve installed several apps you want to access quickly, consider tweaking the menu settings so that the programs show up as the top results. To do so:
- Hold “Windows + I” to launch the “Settings” app and select “Personalization.”
- Press “Start” and click on “Show recently added apps” to enable the option.

You can also place the most frequently used programs at the top of the menu to make it more user-friendly.
- Press ” Windows + I” to open your device’s “Settings.”
- Open “Personalization” and choose the “Start” option.
- Click on “Show most used apps” to enable the feature.
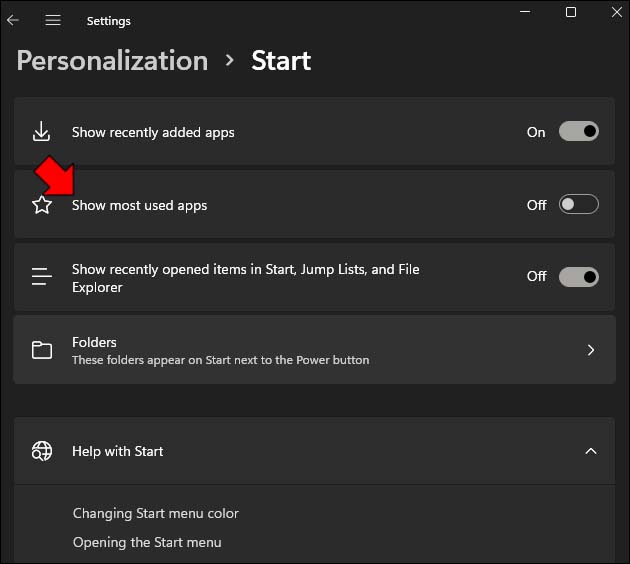
The next time you bring up the menu, the first choices will be your frequently used and recently installed programs.
How to Change the Menu’s Color
Users who want to customize their digital aesthetic might be interested in changing the color of their Windows 11 Start menu. Keep in mind that picking a different color also modifies the color scheme of the entire Windows 11 interface.
To select a different color for your Windows 11 menu:
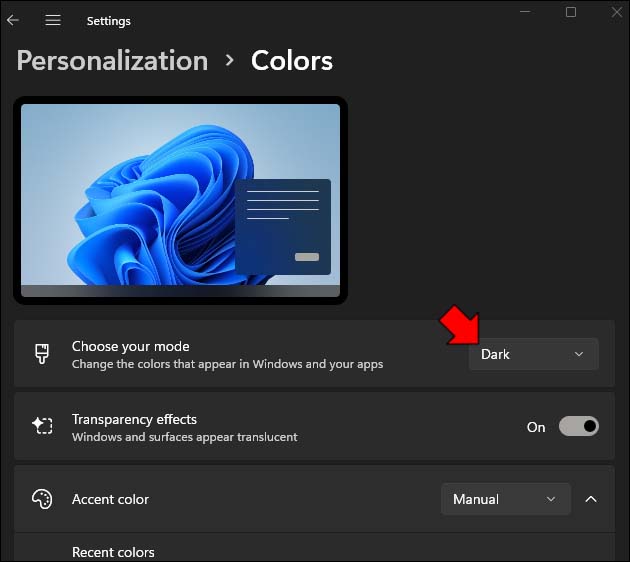
- Tap “Windows + I” to launch the PC’s “Settings” and click on “Personalization.”
- Select the “Colors” option.
- Make sure the “Choose your mode” field is set to “Dark.” Otherwise, you won’t be able to change the Start menu’s background color.
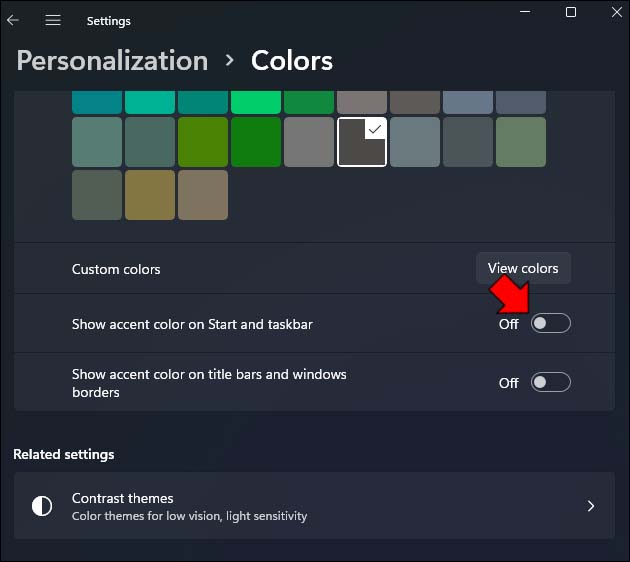
- Choose the “Accent Color” that matches your personal preference and toggle on the “Show accent color on Start and taskbar” feature.

Selecting a bright color will make the Start menu and taskbar more vivid and easier to spot. You can even match the desktop background with the Start menu for a polished look.
How to Replace the Windows 11 Start menu
While the Windows 11 Start menu boasts an innovative appearance, it lacks the simplicity of its predecessors. When you’ve spent some time customizing the menu, you may become dissatisfied with your user experience. In that case, you might want to switch to a menu that’s a better fit. Fortunately, there are several great options on the market.
The first alternative is Start 11. Although Stardock is still adding the finishing touches to the menu, anyone can download it and test it out during the 30-day free trial. The menu lets you modify its alignment, but the most alluring perk is probably the different style options. If you’re used to the classic Windows menu, go for the Windows 7 style. Those who want more control over the menu’s setup can adjust its layout, choosing between the grid and compact options.
Another alternative that comes with a 30-day free trial is StartAllBack. The menu also mimics the classic two-column Windows menu, so you won’t need a lot of time to get used to navigating it. For easier access, you can reposition and rename specific shortcuts.
Tech-savvy users should consider replacing their Start menu with the Start menu X. This free-to-download menu is easy to customize. You can modify shortcuts, font sizes, interface layout, and more.
The Start menu Reviver is based on the Windows 8 interface, featuring tiles that house programs and files. Additionally, the tiles are responsive on touchscreen devices, and the 11 built-in styles ensure that the menu aligns with your preferences and looks fresh.
Finally, Launchy wasn’t developed as a direct Start menu replacement, but it’s compatible with Windows 11 devices. The app is free to download and acts as a keyboard launcher. Once you tap “Alt + Space,” Launchy will prompt you to type in the program you wish to open. When you press “Enter,” Launchy will bring up the program instantly. Although it’s different from traditional menus, Launchy is geared toward minimizing search times. Due to its minimalistic design, it’s an excellent option for those who want to boost their productivity.
Declutter Your Windows 11 Start Menu
Although previous Windows versions offer more customizing options, several methods will enable you to declutter the Windows 11 Start menu. When you modify the alignment, pinned items, “Recommended” section, or color scheme, you might find an organization system that meets your needs. If the menu isn’t a right fit for you, you can pick a user-friendly menu from several third-party options.
Have you tweaked your Windows 11 menu? Did you change the alignment or color scheme? Which of the options above have you downloaded if you’ve gone for an alternative? Let us know in the comments section below.
Disclaimer: Some pages on this site may include an affiliate link. This does not effect our editorial in any way.


