VirtualBox, from Oracle, is an incredibly powerful tool that lets you create virtual machines on a Windows, Mac, Linux or Solaris PC (as long as the machine uses an Intel or AMD chip).
Virtual machines are self-contained simulations of another computer running a different operating system without any additional hardware. Virtual machines can be used on the PC level or on the server level. Virtual servers run the same sort of applications that can run on a dedicated machine.
For example, you might have a mission-critical application that won’t run on Windows 10. You can still upgrade your computer to Windows 10 and then use VirtualBox to have Windows 7 running on a virtual machine on the same PC.
Web hosting services offer Virtual Private Servers (VPS’s) enabling the benefits of a dedicated server at a fraction of the cost because each customer has a “virtual server” rather than a dedicated “bare metal” server. There can be dozens of virtual servers running on each physical server.
On the PC level, you would likely install and configure virtual machines using OVA files that conform to the Open Virtualization Format. They usually come in two flavors, OVA or OVF and can be used in a number of virtualization apps including VirtualBox. If you want to use OVA files with VirtualBox, this tutorial is for you.
VirtualBox is an outstanding application but, if you’re a Windows user looking for alternatives to VirtualBox, you may like this article on The 5 best alternatives to VirtualBox in 2021.
When you create a virtual machine (VM), the entire setup is contained within a single file. Rather than spreading files everywhere like traditional OS installations, the software encapsulates it into a self-contained file to keep everything tidy and in one place, ensuring that the VM has everything it needs to function. If that file conforms to the Open Virtualization Format, it will be usable in many VM applications, including VirtualBox and VMWare.
VirtualBox uses the .VDI format while VMware uses VMDK and VMX files among others. Both will play nicely with OVA files.
Using OVA Files with VirtualBox
To use OVA files with VirtualBox, you need to import them and let VirtualBox configure the file as it needs to. The process is quite straightforward.
- Download and install VirtualBox if you don’t have it already.
- Open VirtualBox and select File > Import Appliance…

- Now, select your OVA file in the import box and verify the settings in the center window.
- Make any changes if you need to in that center window.
- Click Import at the bottom.
- Allow VirtualBox to import the file and then configure it for use.

It may take a little while to import OVA files. I recently imported a new Mac OS image and it took over an hour. A previous Linux image took a mere ten minutes so you may or may not need to be patient waiting for VirtualBox to install the operating system on your virtual machine. The procedure is fairly reliable, though, so it is safe to go have a coffee or something while it’s working. Just let the setup process run until it’s finished.
When you select the OVA file to import, the main details of the VM appear in the center of the import box. You can change some details but not others. If you don’t change them here, you can modify some of them later in the main Settings menu within VirtualBox.
It is worth checking these settings as the machine that created the OVA file may have had fewer resources than the machine you’re importing to. It makes sense to allow the imported VM to have access to the maximum amount of resources so it can run faster.
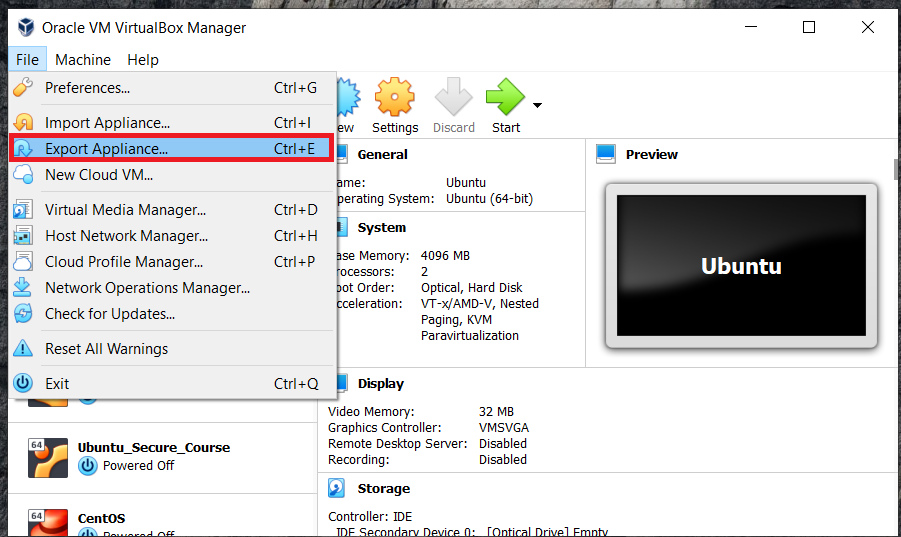
Export from VirtualBox to OVA
By default, VirtualBox uses .VDI files for its VM images. As well as importing from an OVA file, it can export to an OVA file. It converts a .VDI to OVF which is interchangeable with OVA so you can freely use the image in a different computer or VM program.
- Go to File > Export Appliance…
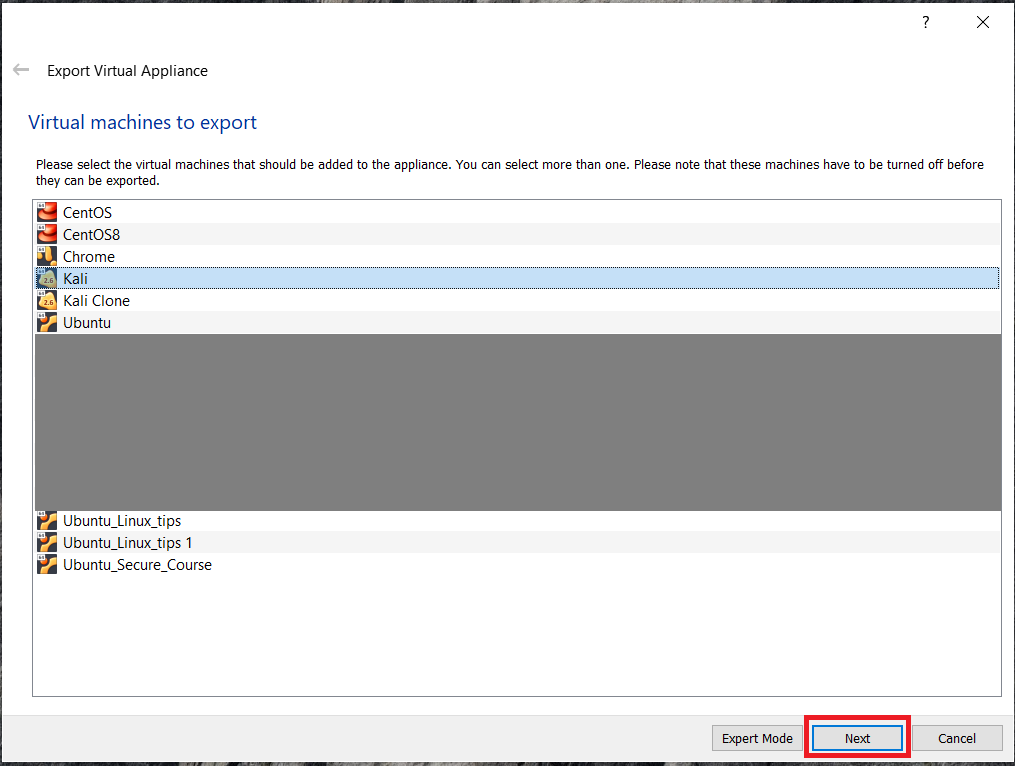
- Now, select the virtual machine that you want to export and then click Next.
- Then, confirm or edit the details on the next screen and then click Next again.
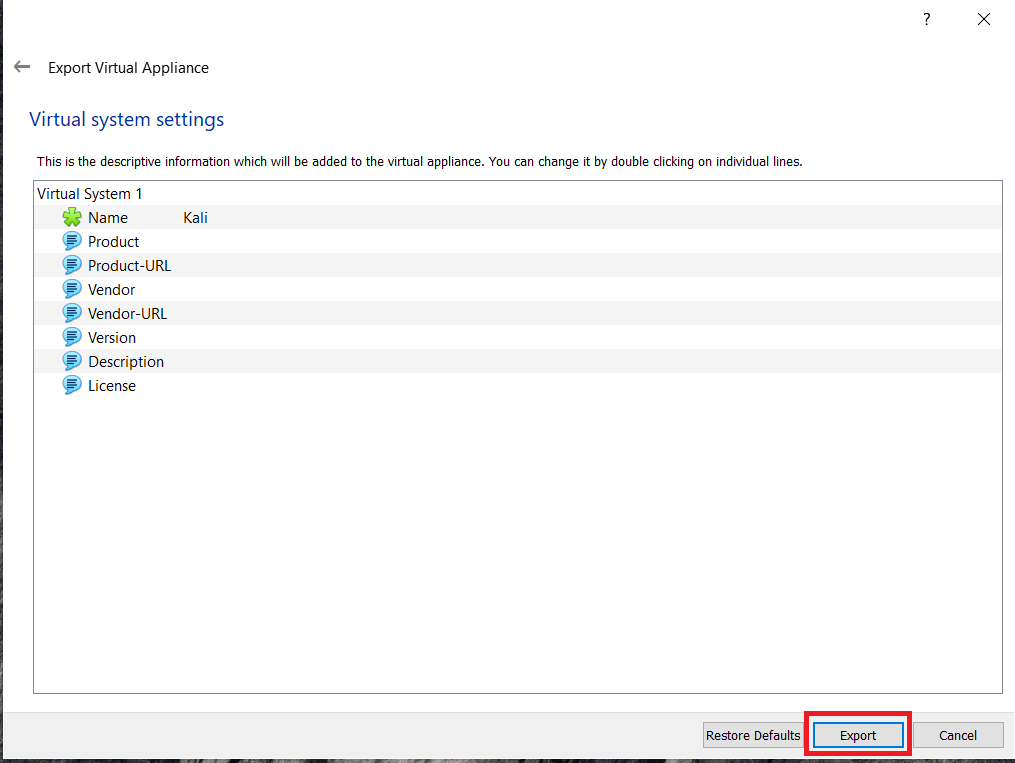
- Next, you can edit the descriptive information on this screen or just hit Export.
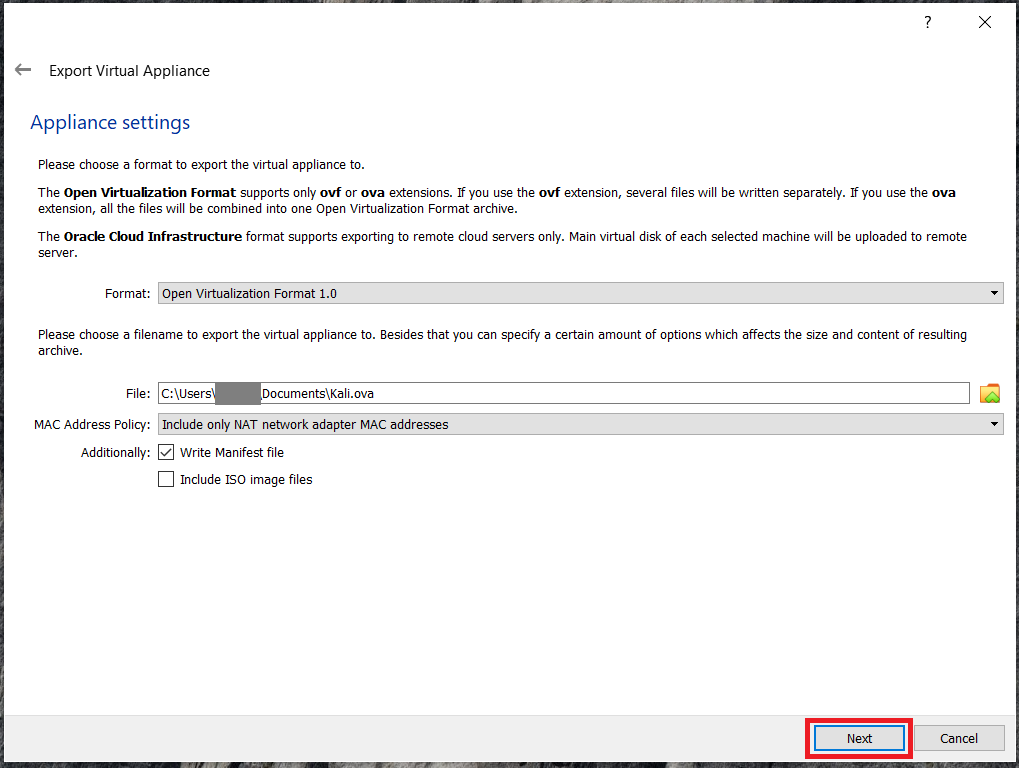
VirtualBox will then create an OVA file which you can use in other VM software. The format options are all OVF, but OVA and OVF are the same things. The file suffix is .ova regardless of what option you select here.
Errors and Issues
OVA files are supposed to be universal but as usual, things aren’t as simple as that. Occasionally when you import an OVA file you will see errors. The syntax can vary but the error message will often say something like ‘Import failed because the image did not pass OVA or OVF conformance or virtual hardware compliance checks.’ If you see these errors, hit retry and the file will usually be imported as expected.
If the import fails more than twice, recheck the OVA file with the program that created it to make sure it hasn’t been corrupted.
VirtualBox Guest Additions
If you are using VirtualBox for the first time, or have installed fresh onto a new computer, you will need to install VirtualBox Guest Additions. This is a resource install with drivers and applications that enable the VM to work properly. For some reason, these files are never included in the default VirtualBox installation and have to be installed separately.
- Download VirtualBox Guest Additions from here. It is called the VirtualBox Oracle VM VirtualBox Extension Pack. It will likely have a version number but this changes all the time.
- Ensure DVD or shared drive is enabled in your virtual machine.
- Start your VM image.
- Select Install Guest Additions from the Devices menu of the VM.
- Let the process complete.
The Device menu is part of the VirtualBox menu, not the guest operating system. It will be at the top or bottom of the screen depending on how you configure your VMs. Once installed, your virtual machine’s operating system should be fully functional.
If you have any tips and tricks for using OVA files with VirtualBox, please comment below.
Disclaimer: Some pages on this site may include an affiliate link. This does not effect our editorial in any way.