Chrome extensions are a great way to improve your browsing experience and make it more efficient. With the help of these extensions, you can essentially turn your browser into a custom-tailored suite that’s perfect for your needs. As a result, you can do almost anything – from staying up-to-date with your favorite social media sites, to making web pages load faster, to blocking distracting ads and removing clutter from your browsing experience.
However, extensions don’t always last. They can be disabled or even removed in just a few errant clicks. This can be quite frustrating, especially if you’re sharing your device with someone else.
Whether it be through updates or accidental removal, this guide will show you how to prevent your favorite extensions from being removed without your permission.
How to Prevent Chrome Extensions From Being Removed?
Method 1: Tweaking the Registry
Every Chrome extension comes with a “Remove” button. All you have to do is toggle the button and the extension will be removed from your browser immediately. Unfortunately, Chrome gives all users this privilege, which means you could lose all of your favorite extensions in a matter of seconds if someone else using the computer unknowingly removes them.
Luckily, tweaking the registry can be the perfect solution. It allows you to disable the “Remove” button, making it impossible for another user to remove the extension from Chrome. And the best part is that you don’t even need special software to do it.
Before trying this method, it’s important to note that tweaking the registry can cause problems for your computer. The registry is a crucial and essential part of your computer that helps your hardware interface with the operating system. Adding or replacing lines in the registry can result in data corruption and extensive problems throughout your PC.
In addition, you could end up breaking functionality or creating a new problem elsewhere on your system. To be on the safe side, ensure that you’ve created a backup of the registry before getting started.
Steps to Disable the Remove Button From the Extension Manager in Chrome
To tweak your registry and disable the “Remove” button, follow these steps:
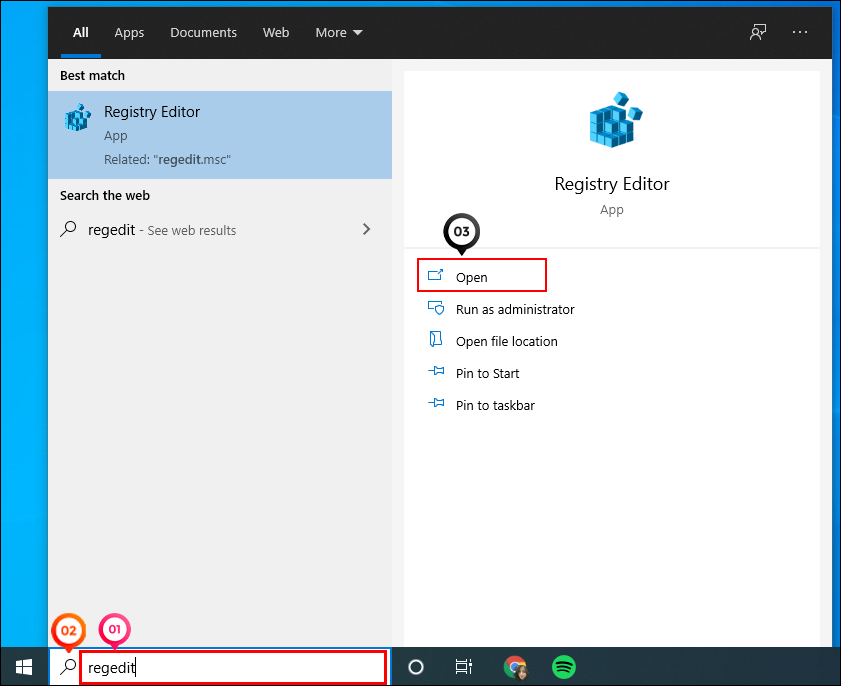
- Type “
regedit” in the Windows “Search” bar in the bottom left corner and then click on “Open.” Alternatively, type “Run” in the search bar and type “regedit” in the Run window. A new window will open for Registry Editor. It’s important to note that you’ll need administrator rights to open the registry.
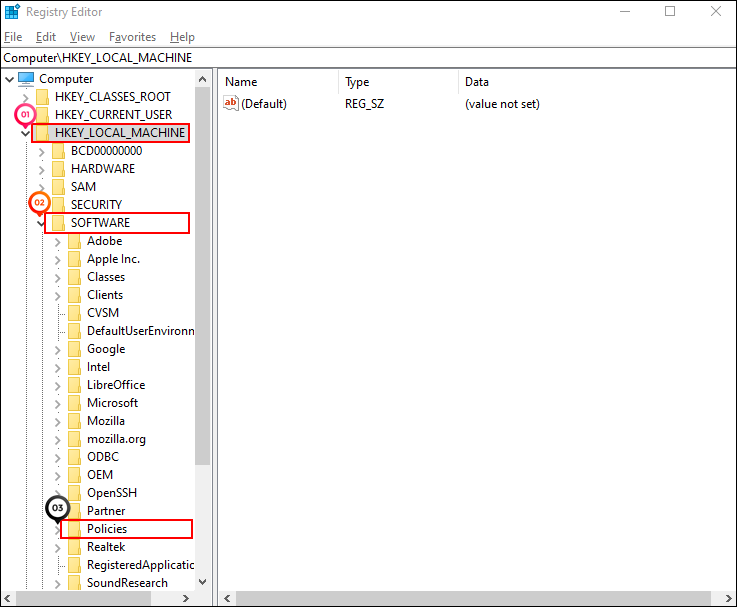
- Once the registry editor is open, you should see a folder navigation menu on the left with a list of all registry folders currently in your system. First, click on “
HKEY_LOCAL_MACHINE” and then select “Software” from the dropdown list. Lastly, click on “Policies.”
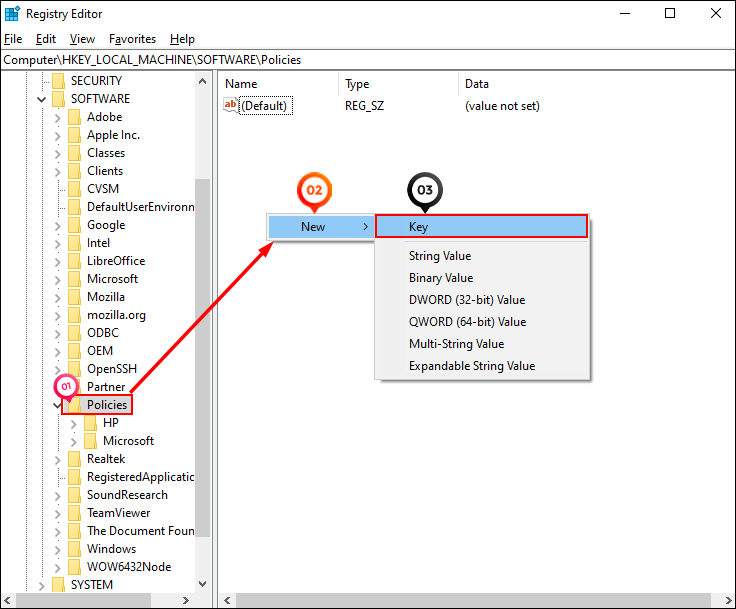
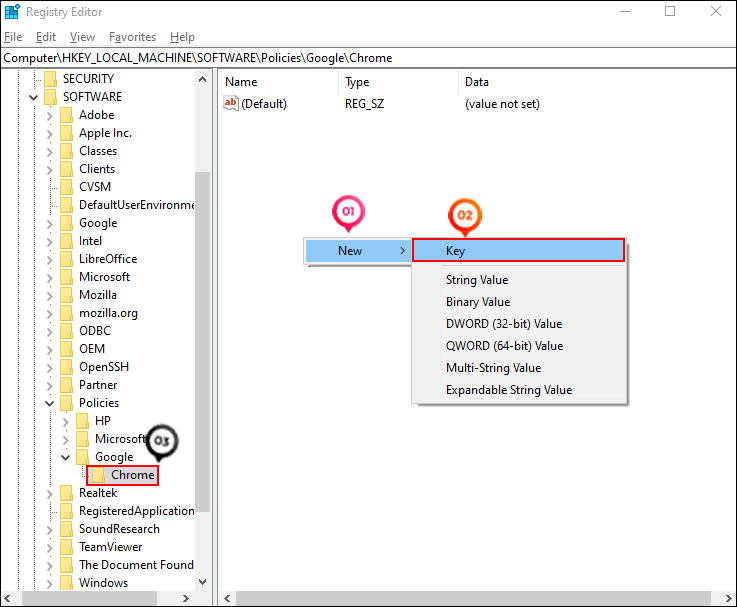
- You’ll now need to create a Chrome folder under “Policies.” To do so, position your cursor anywhere inside the blank space to the right of the registry. Then right-click and select “Key” from the context menu.
You’ll notice you now have a new folder under “Policies” named “New Key #1” by default. Next, change the name to “Google.”
Once again, position your cursor anywhere inside the blank space to the right of the registry, right-click and then select “Key” from the context menu. As before, a new folder will be created under “Google.” Rename it as “Chrome.”
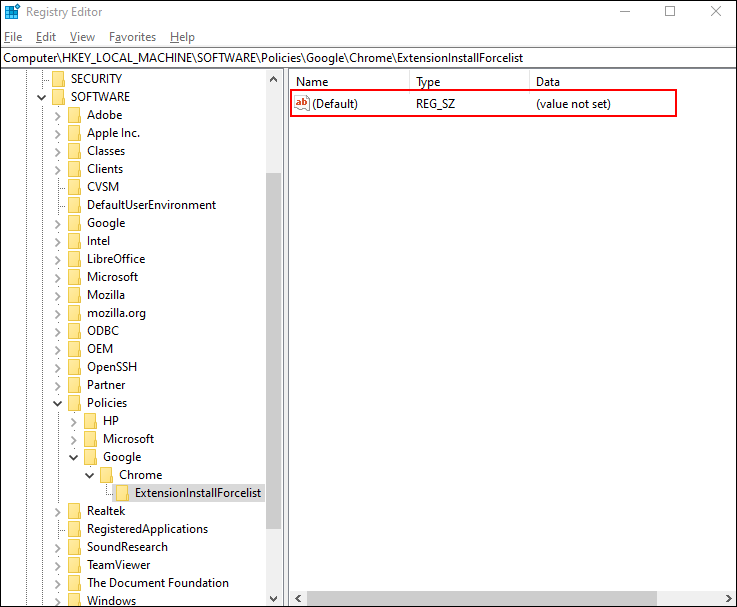
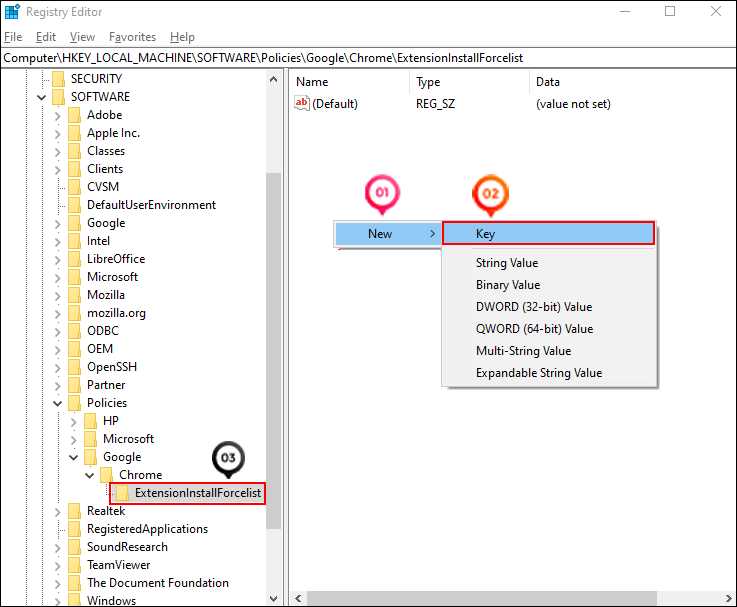
Repeat the above process one more time and create a new folder under “Chrome” named “ExtensionInstallForcelist.“
After that, you’ll have created a complete registry path for Chrome:HKEY_LOCAL_MACHINE\Software\Policies\Google\Chrome\ExtensionInstallForcelistThis folder will contain all the registry entries for the extensions you wish to protect. - Inside the “ExtensionInstallForcelist“ folder, you’ll notice a single line entry in the right panel. That’s the default registry entry. To keep your favorite extensions from being removed, you need to create a registry entry for each of them.
- Let’s use Site Blocker to demonstrate how to create a registry entry for each of your extensions.
Step 1: Visit the Chrome web store and open the extension you wish to protect. In the address bar, the last part of the URL will give you the extension’s name. In this case, the URL is: https://chrome.google.com/webstore/detail/siteblocker/hlkngmcfankakebbjakacpfcanlkmfej
Our extension’s name is “hlkngmcfankakebbjakacpfcanlkmfej“
Step 2: Copy the name and append it with:
“;https://clients2.google.com/service/update2/crx“
Eventually, therefore, you should have a string that appears as follows:Hlkngmcfankakebbjakacpfcanlkmfej;https://clients2.google.com/service/update2/crxNotice that the extension’s name and URL are separated by a semicolon (;).
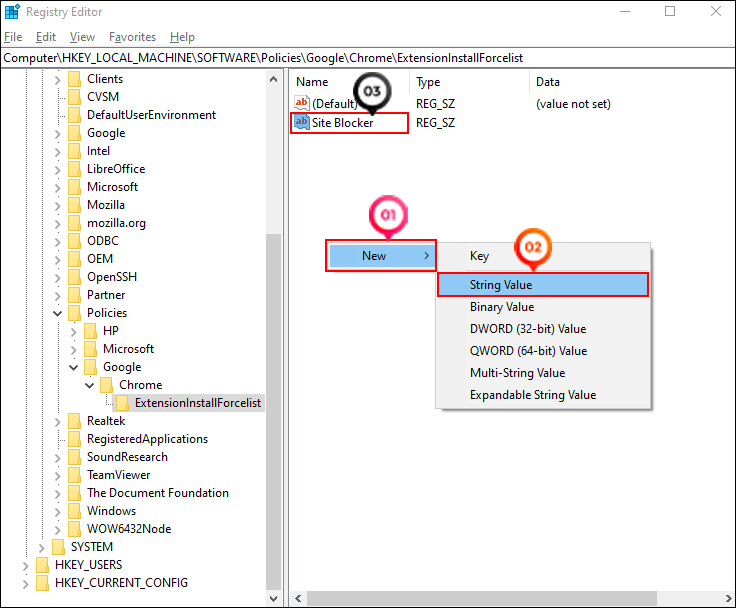
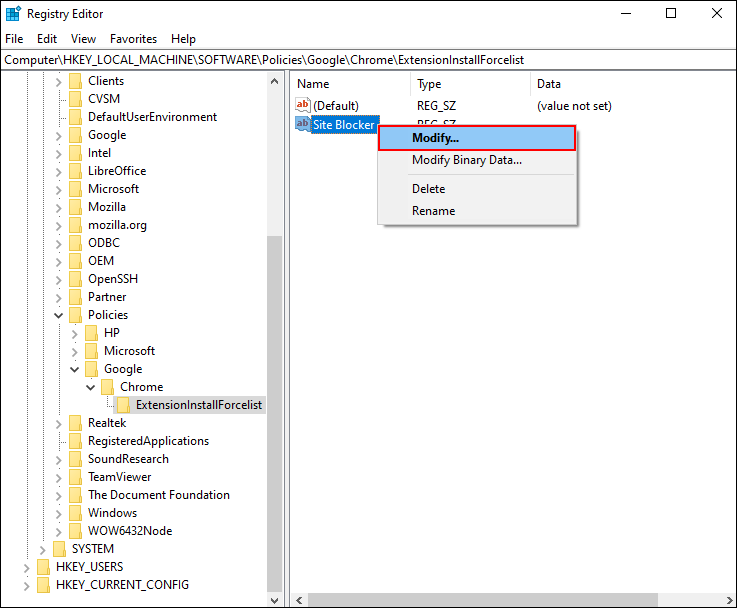
Step 3: Right-click on “ExtensionInstallForcelist“ and then select “New string.” This should create a new entry right under the default entry in the right panel. The latest entry is named “New Value #1.” Change that to “Site Blocker.”
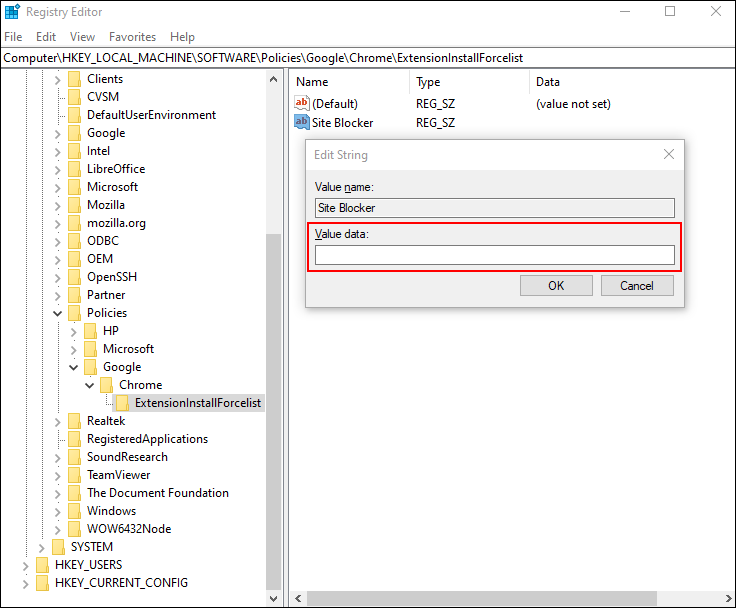
Step 4: Right-click on your newly named registry entry and then select “Modify” from the context menu. This should launch a string editing window.
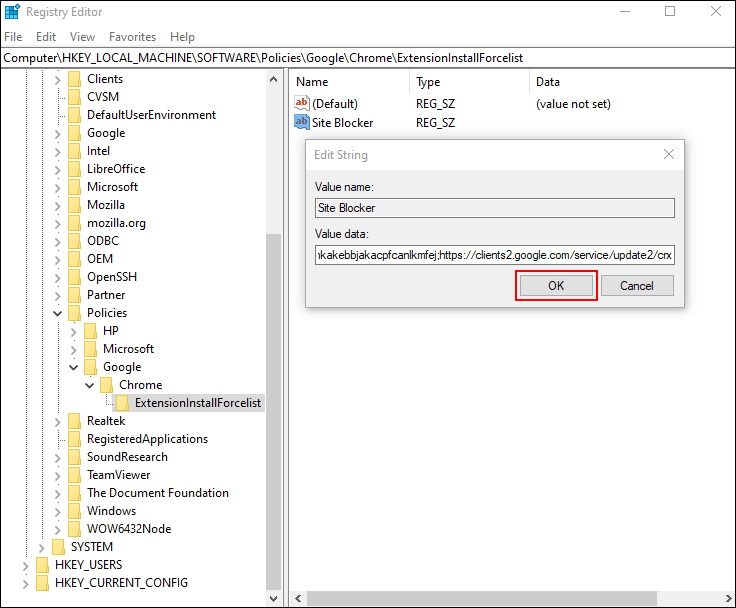
Step 5: Paste the extension’s string (created in step 2) in the field named “Value data:”
Step 6: Click on “Ok” and close your browser.
Repeat these steps for each of the extensions you’d like to protect.


Once you’ve added an extension to the “ExtensionInstallForcelist“ folder, there’s no way to remove it. The “Remove” button that appears against it in the extensions management section of your browser is rendered inactive.
If at some point you no longer wish to protect an extension, all you need to do is remove it from the registry (ExtensionInstallForcelist folder).
Method 2: Configuring a List of Force-Installed Extensions for Corporate-Managed Computers
For corporate-managed computers, Chrome developers have worked out a way to allow IT admins to restrict users from disabling or removing extensions. This happens under the Chrome corporate users’ ExtensionInstallForcelist policy. The policy gives admins the privilege to create a list of extensions that can’t be disabled or removed by anyone across all computers in the network. All of the extensions on the restricted list install silently in the background without the user’s knowledge or interaction.
Each entry in the restricted list is comprised of an extension ID and an “update” URL. A semicolon (;) separates the two values. The extension ID is a 32-letter string that can be found when you’re in Developer mode of your chrome browser.
The restrictions policy can be created and enforced on Windows, Linus, Google Chrome OS, and Mac. However, it comes with a catch because it doesn’t work under the Incognito mode.
Method 3: Removing the Extensions Menu From the Chrome Toolbar
In the latest version, Chrome’s developers have created a permanent shortcut to the extensions menu in the browser’s toolbar. The shortcut is shaped like a jigsaw puzzle piece, and a single click takes you right to the list of all the extensions you’ve added. Although the goal is to improve user experience, the shortcut makes it extremely easy for anyone to access and interfere with your extensions.
It’s not too difficult to imagine a situation where you’d rather not have the shortcut. For example, you may have installed a site blocker extension in your child’s Chromebook, and you don’t want them to discover a way around it too quickly.
To remove the “Extensions” menu button from your Chrome browser:
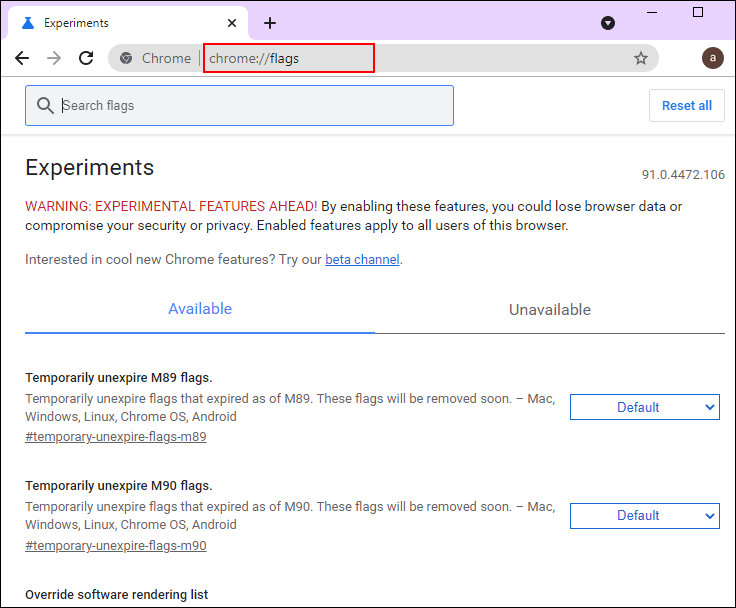
- Open Chrome and enter “
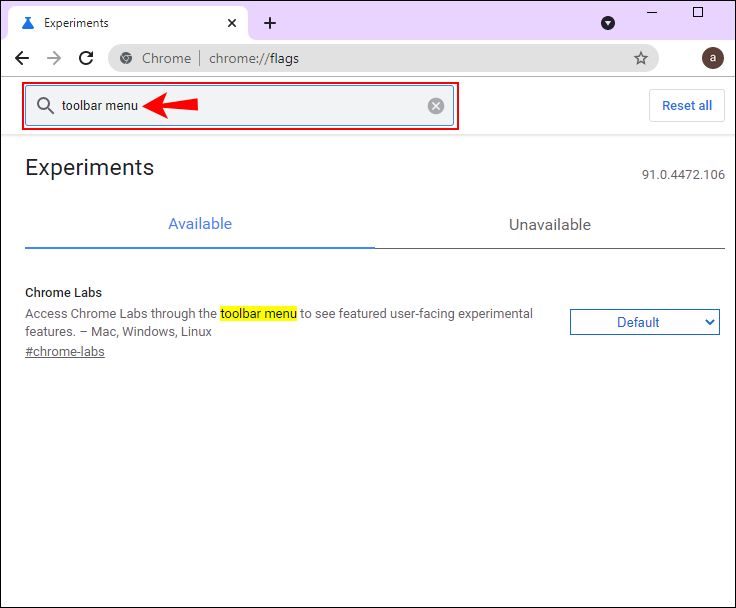
chrome://flags/” in the address bar, then hit “Enter.” This should take you to the advanced configuration section. - In the resulting “Search Flags” box, type “toolbar menu.” This will automatically take you the Chrome labs option that reads as follows:
Access Chrome Labs through the toolbar menu to see featured user-facing experimental features. – Mac, Windows, Linux - To remove the “Extensions” menu button from the Chrome toolbar, toggle the dropdown list on the right and select “Disabled.”
- At this point, Chrome will prompt you to restart your browser. After restart, the “Extensions” button will no longer be in Chrome’s toolbar.

Although this option technically doesn’t disable the “remove extension” button, it can be a useful tool if all you want to do is to hide the extensions menu from the prying eyes of other users.
Frequently Asked Questions
1. What Are the Steps to Disable the Remove Button From the Extension Manager in Chrome?
1. Use the Windows search bar to open the registry editor.
2. Click on “HKEY_LOCAL_MACHINE” and then select “Software from the dropdown list. Lastly, click on “Policies.”

3. Create a “Google” key under “Policies.”
4. Create a “Chrome” key under “Google.”
5. Create an “ExtensionInstallForcelist” key under “Chrome.”
6. Proceed to create a new String Value and rename it appropriately.
7. Visit the Chrome web store and open the extension you wish to protect.
8. Copy the extension’s name and append it with its URL, separated by a semicolon.
9. Paste the extension’s string (created in step 2) in the field named “Value data:”
10. Save and restart your Chrome browser.
2. How Do I Disable Incognito Mode on Chrome?
If you don’t want anyone to browse incognito using your Chrome browser, here’s what to do:
1. Type “regedit” in the Windows “Search” bar in the bottom left corner and then click on “Open.”
2. Click on “HKEY_LOCAL_MACHINE” and then select “Software from the dropdown list. Lastly, click on “Policies.”
3. Create a “Google” key under “Policies.”
4. Create a “Chrome” key under “Google” (Skip steps 3 and 4 if you have already created a Chrome registry).
5. Right-click on “Chrome,” select “New,” and then enter “DWORD 32-bit value “in the Value data field.
6. Name the new string value as “IncognitoModeAvailability.”
7. Right-click on your newly named registry entry and then select “Modify” from the context menu. This should launch a string editing window.
8. Type “1” in the field named “Value data:”
9. Click on “Ok” and close your browser.
Once you restart your browser, the “New incognito window” option will have been rendered inactive.
Enjoy Your Favorite Add-Ons Without Interruption
Chrome extensions are a great way to increase productivity by adding features that you can’t find in the basic browser. However, you can lose them in just a few clicks, forcing you to install them all over again. Luckily, you can take steps to protect your extensions and ensure that no one can remove them without your approval. Through this tutorial, we have divulged all the information you need.
Have you disabled the remove button for any of your extensions? Let us know in the comments section below.
Disclaimer: Some pages on this site may include an affiliate link. This does not effect our editorial in any way.