If you’re a fan of iBooks, you probably know they’re available on portable iOS devices, such as iPhones and iPads, as well as Mac laptops and desktops. You might also know you can’t download them directly to your Windows devices.
Still, is there a way to read them on Windows? If you’d like an answer to that, you’ve come to the right place. There is a way for you to transfer iBooks (also known simply as Apple Books) from your iOS device to your Windows.
In this guide, we’ll show the easiest method you can use to read iBooks on your Windows. In addition, we’ll answer some common questions that you might have regarding ways to read iBooks on Windows devices.
How to Sync iBooks to a Windows PC
To transfer iBooks from your iOS device to Windows, you will need the newest version of iTunes for Windows on your computer. You will also need a USB cable to connect the two devices. Here’s what you need to do to transfer iBooks to Windows:
- Connect your iPhone/iPad to your Windows computer via USB cable.

- Open iTunes on your computer (if it isn’t opened automatically).

- Go to “Account” on the top toolbar.
- Find “Authorizations” on the drop-down menu.
- Choose “Authorize this computer.”
- Type in your Apple ID and your password.
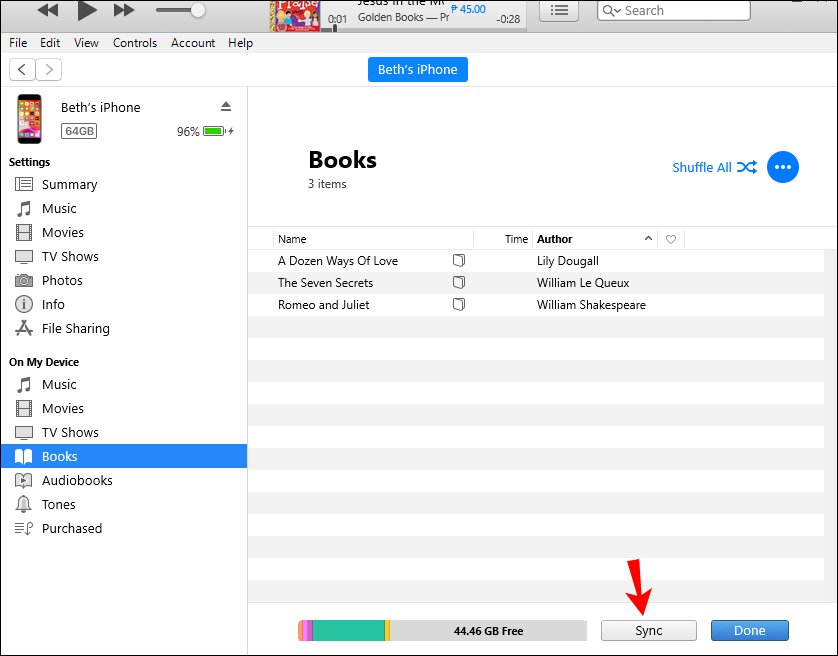
- Click on “iPhone” or “iPad” on the left sidebar.
- Continue to “Books.”
- Check the “Sync Books” box.
- Go to “Sync” at the bottom of the window.
- When the syncing process is complete, select “Done.”


Depending on whether you want to transfer all your iBooks from your iOS device, select either “All Books” or “Selected Books” in the same section. After completing all these steps, your iBooks should be transferred to your Windows.
How to Locate Your iBooks
Once you’ve synced the iBooks from iTunes, you may be wondering where they will be stored. Finding them only requires a couple of quick steps:
- Click on the “Books” section on the left sidebar.
- Find the iBook that you synced to your Windows computer and right-click on it.
- Choose “Show in Windows Explorer” from the drop-down menu.
- When Windows Explorer is opened, copy your iBook.
- Decide where you would like to store it on your Windows.
- Paste the iBook in the right folder.
You should copy and paste the file. Don’t move the iBook from its original location, as it can create issues with iTunes Library.
How to Read Your iBooks
Now that you’ve synced and located your iBook, it’s finally time to read it on your Windows computer. As mentioned before, there is no desktop version of an iBook reader. In other words, you will have to download a third-party app to be able to read the iBooks.
Note that the majority of iBooks have ePub formats. The good news is that there are many third-party apps you can find that are compatible with the ePub format. Some of the most popular options include Adobe Digital Editions, FB Reader, and Calibre.
Another great app you can use to read your iBooks is the Coolmuster iOS Assistant. Not only can you use this app to read all your iBooks, but you can use it to export both purchased and non-purchased iBooks from any iOS device. In fact, you can use it for both Windows and Mac.
When you download it on your computer, you will still need a USB cable to connect it to your iOS device. All your iBooks will be directly imported from your iOS device to this app, from where you can read both ePub and PDF files.
You can also use the Coolmuster iOS Assistant to export other types of files, such as music, messages, images, contacts, apps, or any other type of information from your iOS device.
Additional FAQs
How can I download iBooks directly to a PC from iTunes?
You have the option to download iBooks from iTunes directly if the iBooks were purchased from iTunes on your iOS device. In other words, you can download the iBooks to your Windows device without connecting your computer to your iOS device.
This method is even easier than using a USB cable. For it to work, make sure that you have the newest version of iTunes installed on your computer. Then follow these steps:
1. Open iTunes on your Windows and log into your account.
Note: It must be the same account you used to buy the iBook.
2. Click on the “Account” tab on the top menu.

3. Find and select “Purchases” from the drop-down menu. This will open a list of all your purchases.

4. Proceed to “Books” on the list.

5. Find the iBook/s that you wish to download on your device.
6. Right-click on the iBook and select “Download.”

This will automatically download all the iBooks you selected from your iTunes to your computer.
Can I read DRM protected iBooks on Windows Computers?
DRM refers to Digital Rights Management protection, and some iBooks come with this layer of protection. Therefore, you might encounter some issues upon trying to read an iBook with DRM protection. The good news is that you can also install a third-party app to fix this issue by removing this layer of protection.
While this problem can be easily solved, it could cause issues concerning copyrights. To check whether your iBook is DRM protected, right-click on it and click on “Get Info.” Afterward, click on “File,” and you should be able to see whether your iBook is DRM protected. It’s important that you do this before you try to open it for the first time.
One great third-party app you can download to remove this layer of protection is called Requiem. It’s very simple to install the app on your computer; just follow the on-screen instructions. Once you use it to remove the DRM protection, you are free to read your iBooks without having to worry.
Read All of Your iBooks on Your Windows
Now you know how to transfer iBooks from your iOS device to your Windows computer using iTunes. You also know to download purchased iBooks from iTunes directly, and which apps you should install to read those iBooks. Once you have exported all your iBooks, you can finally kick back, relax, and read on your Windows device.
Have you ever read an iBook on Windows before? Did you use the same method we covered in this article? Let us know in the comments section below.
Disclaimer: Some pages on this site may include an affiliate link. This does not effect our editorial in any way.


