There are plenty of options on Shopify to make your online store more SEO friendly and visible to more users. Optimizing images and product descriptions are some examples, as are tags.
Tags help customers find what they’re looking for quickly and increase your chances of reaching new prospective customers. They also make your shop more organized. But how do you delete them when you no longer need them? You’ll find out in this article.
Adding and Deleting Product Tags
It doesn’t take long to delete tags you no longer need. You can remove them from products, orders, drafts, blog posts, even customers and transfers. There are two ways to go.
You can either:
- Click on the desired product to open the details (or click on the customer name, transfer, blog post, order, or other).
- Navigate to the x icon next to the tag name and click it.
- Once you select Save, the tag will disappear from this specific product.
Or:
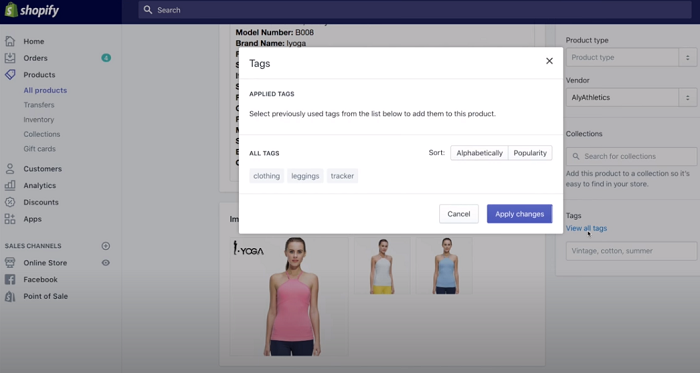
- Open the Tags tab.
- Choose View all tags.
- Select the x icon next to the name of the tag you want to delete.
- Select Apply changes, and you will remove the tag from the full list.


How to Permanently Remove a Tag
Before you permanently remove a tag from your Shopify store, you need to delete it from each product that may have been using it.
- From the Shopify admin panel, go to Products.
- Open All products.
- Check the box next to the Edit products button to select all the products. You will see the number of products selected once you click the checkbox.
- Click the Actions tab to reveal a drop-down menu.
- From there, choose Remove tags.
- Type in one or more tags you want to delete.
- Click on Apply changes.
How to Add New Tags
Now, if you want to add new tags to replace the deleted ones, here’s what to do:
- Click on the desired product, customer, order, or another element.
- Go to the Tags section and enter the desired tag. You can also choose a new tag from the list of presets. When you create a tag, it will become available for all other elements you wish to use the tag for later on.
- Select Save to finish.
Remember that you can add tags while you’re creating a product, an order, or other things, as well as by editing the existing elements. Also, when adding a tag, avoid using symbols, accents, or anything that’s not a conventional letter, number, or a hyphen. Any tags containing symbols or accented vowels won’t appear in search results. Therefore, your customers won’t be able to see the products containing these tags if they search for items by tag.
Just like you can remove tags from the full list, you can also add them from there.
- Open the Tags section.
- Select View all tags.
- Choose a tag to add and then select Apply changes to finish.
What Types of Tags Are There?
There are several types of tags on Shopify.
Product tags appear on the product details page and help you create automated collections. They also enable your customers to find the desired products more quickly. Each product can have up to 250 tags.
There are also transfer tags and order tags that help you filter and organize transfers and find the specific ones when you need them.
Draft order tags can also help you filter draft orders. When you create the final order from the draft, you also transfer the tags, so they become order tags.
Customer tags can help you organize and filter saved customer details. Those may be buyers who often make orders on your website. Once you add tags, it’s easier to find them.
Blog posts can also contain tags, which make it more visible in the search results.
How to Use Tags as Filters
When you have a large number of products in your online store, tags can make your job much more comfortable. When you open a page with, for instance, all your products and you want to find specific ones, do the following:
- Select the drop-down menu on the All products page.
- Find the Select a filter option, and choose Tagged with.
- Type in the tag you’d like to filter the list by.
- Select Add filter.
- You’ll see the list of the products that contain the selected tag. You can also add more filters to see the products that contain all the selected tags.
How to Use Tags to Make Collections
Tags help create automated collections. Here’s how to make one:
- From the admin dashboard, open Products.
- Click on Collections and choose Create collection.
- Name the collection and add a brief description.
- Select Automated from the Collection type section. Choose what type of products can be included in this collection. Tags can represent the condition your collection will be based on. This means all products with the same tags will be grouped.
- Select Save.
Make sure your collection is set to available so your customers can see it and add a collection image.
Tags for Quicker Search
Tags can be super useful both for you and your customers. You’ll find it easier to locate specific products on your long list of items on the admin panel. Your customers, on the other hand, won’t have to scroll endlessly through your store because they’ll be able to find exactly what they need by typing in a specific tag.
When you no longer use a tag – delete it to avoid possible confusion.
Have you deleted any tags recently? How many new ones do you add weekly? Let us know in the comments section below.
Disclaimer: Some pages on this site may include an affiliate link. This does not effect our editorial in any way.