Netflix, whether you’re watching it on the TV, or on a computer in browsers like Google Chrome or Mozilla Firefox, is a fickle thing. It’s not always as straight forward as loading up the laptop, logging into your Netflix account, and playing a movie. Sometimes you run into audio errors, or more commonly, problems with the video quality.
On top of that, it isn’t immediately clear on how to adjust the video quality of the movie or TV show — it’s not nearly as simple as clicking the gear icon you would see on YouTube to adjust the quality.
So if you’re wondering why you aren’t getting 1080p quality in Google Chrome or Mozilla Firefox, follow along below. We’ll show you how you can boost that quality right up. Let’s dive right in.
Video optimization
One big reason why Netflix might not be running in 1080p in Chrome or Firefox is that, by default, Netflix is set to auto-optimize the video quality based on the strength of your network connection.
If your network connection is slow (i.e., low bandwidth), Netflix will automatically adjust the video and sound quality to a level that your Internet speed can support so that you still get a smooth video streaming experience without constant buffering.
However. you can manually adjust video quality within Netflix’s account settings so that it doesn’t automatically optimize video for your network connection. By changing the settings, you can keep it at a consistent 1080p, though you may experience some buffering.
Changing the video quality settings within Netflix is actually quite easy. Open your web browser, head to Netflix, then login to your Netflix account with your account credentials.
Once you’ve logged into Netflix, click on the profile icon at the top right corner and then select the link that says Account.
At the bottom of the page, you’ll then want to select the Playback Settings link. Here is where you’ll see, by default, it’s set to Auto, where it will automatically adjust video quality based on your network strength.
You’ll see three options that we can set it to:
- Low — Low is basic video quality, likely sitting well under 720p. It uses a meager 0.3GB per hour as you’re streaming, possibly lower.
- Medium — Medium quality should be around 720p. It uses a little more, at 0.7GB per hour of video watched.
- High — High is obviously the best that you’re going to get as far as video quality goes. If you have a high-definition plan, High will use approximately 3GB per hour, but if you’re signed up for Ultra HD, you’re looking at a good 7GB per hour of video watched.
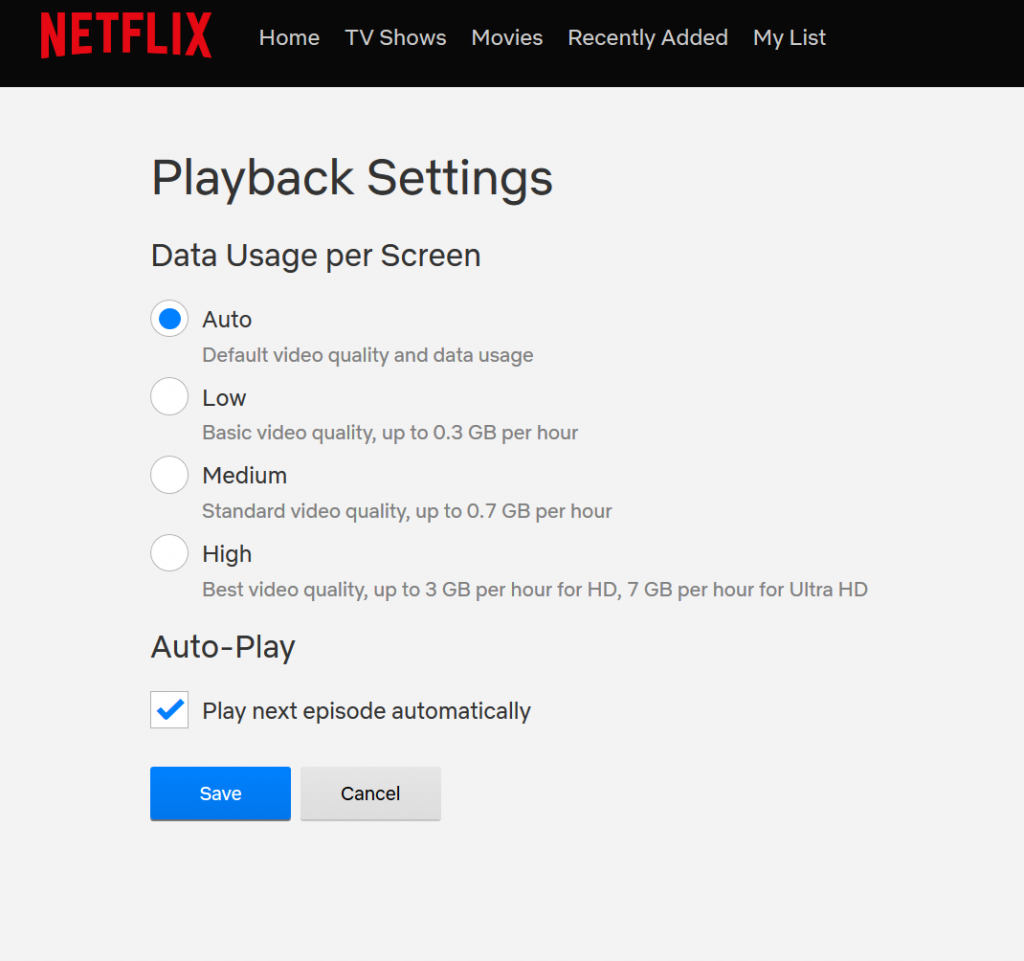
Now, if you want to watch 1080p in your browser, you’ll definitely want to go for the High setting. Though just keep in mind the higher data usage in the event that you’re on a limited data plan, which will cost you more money. Once you select High, press the blue Save button.
This should get you on your way to having 1080p quality in Mozilla Firefox and Google Chrome; however, there’s one more account setting that we need to check. Back from the home page, click on your profile icon at the top right corner and then select the link that says Account.
Next, under the Plan Details section, make sure you plan says Standard HD, otherwise, we’ll need to change your plan, as your current plan doesn’t support 1080p playback. To do this, simply click Change Plan under the Plan Details section.
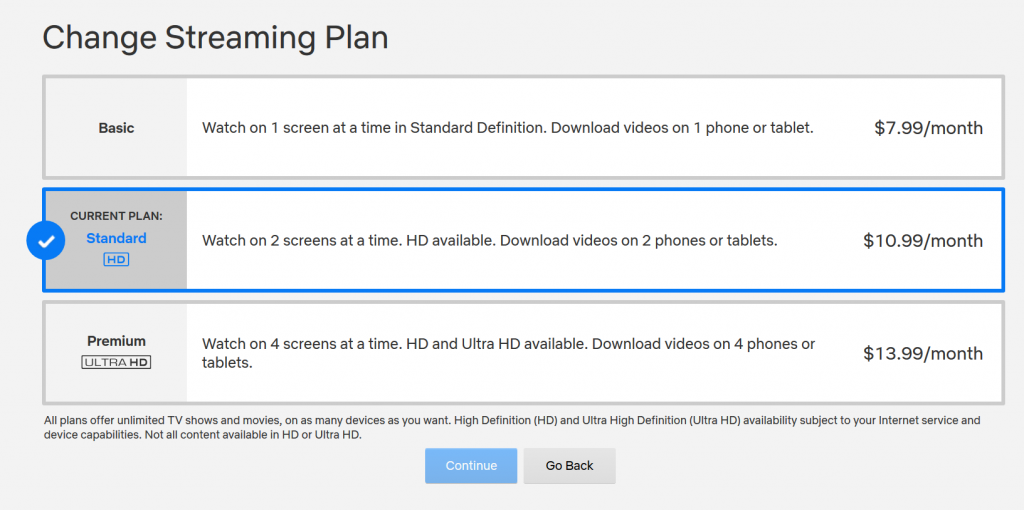
Next, make sure that Standard HD is selected. If not, you won’t get that crisp, HD quality that you would want from Netflix in your browser.
The other option to choose from is Premium Ultra HD, which unlocks 4K video quality for you; however, 4K will only work if the device you’re streaming on can support 4K playback, particularly when it comes to the screen.
You also need an Internet connection that can handle the hefty requirements. If neither of those is true, it automatically reverts to the standard 1080p HD quality.
Make you plan choice and press Continue; follow the prompts and agreements to select the price increase on moving from Standard Definition to High Definition.
And that’s all the settings that we need to change within our Netflix account, but there are still a couple of things we need to do to make 1080p possible in Google Chrome and Mozilla Firefox.
Do keep in mind that these changes we made will be retroactive for all devices, so any device you’re streaming on will automatically revert to that manual 1080p setting we chose.
Hardware support
Finally, you need to make sure that your display supports 1080p resolution. This is less of a concern in 2019, with most monitors shipping with better resolution than 1080p for years now.
However, on the off chance that you’re running on an older monitor, you’ll want to start shopping for something that can, at the very least, support 1080p resolution, which would be 1,920 x 1,080.
Here are just two good display options to consider:
Acer SB220Q
Acer’s SB220Q monitor is an excellent way to watch Netflix in 1080p with. It comes in at 21.5-inches in size and has an ultra-thin bezel so that you get as close to a cinema experience as possible.
It has a refresh rate of 75Hz as well, so the video quality will never look choppy. The IPS panel that Acer uses really brings out realistic colors as well, making your Netflix experience even better.
Buy it now at Amazon.
HP Pavilion IPS LCD
The HP Pavilion IPS LCD is another great choice, supporting 1080p playback with a resolution of 1,920 x 1080p. This one has just a slightly thicker frame than the Acer, so it’s still great for getting that cinema-like movie experience. It comes in at 21.5-inches in size, so you’ll get a great range of view as well.
Buy it now at Amazon
The crux of the problem
Now that we have the Netflix account settings and hardware conflicts out of the way, there’s one more problem — Firefox and Chrome don’t support Netflix playback in 1080p, only 720p. That’s why we need a free browser plugin to override this issue.
If you’re running Google Chrome, Netflix 1080p is a great extension. And if in Firefox, Force 1080p Playback for Netflix is a good add-on. Either can be installed for free.
With these add-ons installed, we can force 1080p playback. Once you complete the installation process, open up any Netflix title and start playing it. Once you’re there, press Ctrl+Alt+Shift+S on a Windows or Command+Option+Shift+S on a Mac keyboard. This keyboard shortcut will open up the Video Bitrate Menu. If your Netflix plan supports HD quality, and you installed the extensions right, you can select the 1080p (1000) option in the Video Bitrate Menu, and press Override enabling you to start watching content in 1080p.
Keep in mind that you have to go through this same process whenever you play a new movie as your preferences for 1080p HD aren’t saved for future use. If you’re watching, say, Black Panther, and force 1080p, once you’re done with the movie and go back to watch it again a couple of days later, you’ll have to go through the same process to enable 1080p again, even if it’s the same movie you watched in HD just recently. You have to do the same thing for every movie, TV show episode, and so on.
Closing
And that’s all there is to it! You can start watching Netflix in Chrome or Firefox with 1080p quality if you followed the steps correctly — just make sure you manually override the Video Bitrate whenever you start a new show!
If you found this article useful, you mind like other TechJunkie articles, such as these:
- The 25 Best Family-Friendly Movies Streaming on Netflix – August 2019
- How To Use Netflix Without a Smart TV
- Where Are Netflix Downloads Saved on the iPhone
- Netflix Not Working in Chrome – What To Do
Do you have any tips or tricks for using Netflix in HD with Chrome or Firefox? If so, please tell us about it in the comments below!
Disclaimer: Some pages on this site may include an affiliate link. This does not effect our editorial in any way.


