Reinstalling Windows can be a time-consuming process, riddled with obstacles. Some people might get lucky and not receive a single error message in the process, while others will need to solve some problems.
While a lot can go wrong, there are a few “Windows cannot be installed to disk” messages that are more common than others.
Thankfully, there are ways to fix these problems and continue with Windows installation. Whether you’re trying to move Windows to a newly installed SSD or having issues with the partition style, we can help you find solutions.
Windows Cannot Be Installed to This Disk GPT
The error “The selected disk has a GPT partition style” comes up because your computer was designed to be set up in Basic Input/Output System or BIOS mode.
But the hard drive where you’re trying to install Windows is partitioned in GPT, which runs on Unified Extensible Firmware Interface or UEFI.
The only way to solve this problem is to convert the GUID Partition Table or GPT disk to the Master Boot Record of MBR. Here’s what you should do:
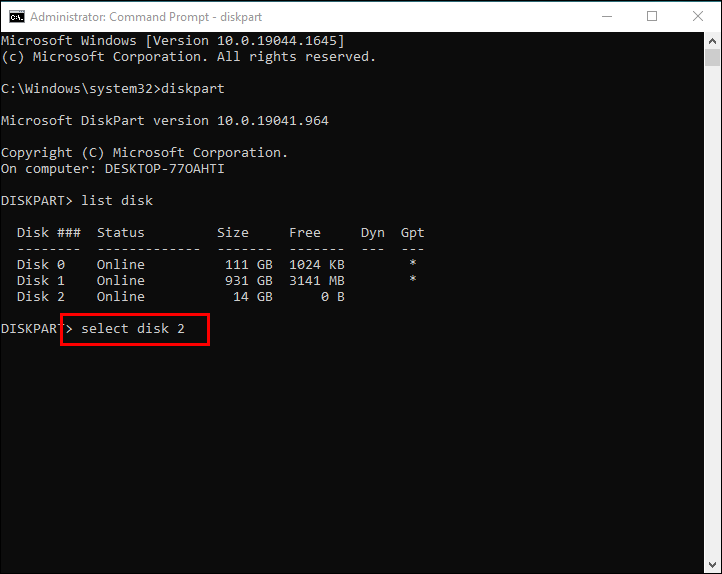
- When you see the error “The selected disk has a GPT partition style” on your screen, open Command Prompt.

- Enter the “
diskpart” command and press Enter.
- Type the “
list disk” command and hit Enter again. - Type “
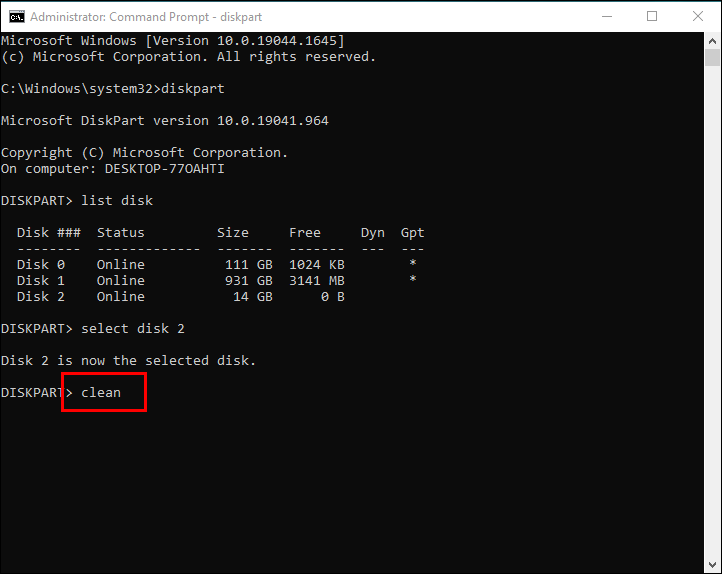
select disk #” and press Enter. Make sure to replace “#” with the GPT partition style disk number. - Type “
clean” and hit Enter followed by “convert mbr” and Enter.


Windows Cannot Be Installed to This Disk MBR
Many users come across “The selected disk is of the MBR partition style” when they’re trying to install Windows 10, 8, or 7.
That happens when you’re trying to set up Windows in UEFI, but your hard drive is not set up to support it. Essentially, the selected disk has GPT instead of MBR partition style.
The good news is that you can change the UEFI boot configuration by going through BIOS. Here’s how:
- Reboot your computer and start BIOS mode. Note that the process may vary depending on the manufacturer, but “Delete + F10” is the standard shortcut.
- Go to “Boot Devices” in BIOS and select the boot order that changes the DVD drive from UEFI to Legacy Mode.
- Make sure to save the changes and exit BIOS.
- Reboot your computer and try the Windows installation process again.


Windows Cannot Be Installed to This Disk SSD
If you have a brand new Solid State Drive (SSD) on your computer, moving Windows will surely improve speed and performance.
But you might run into a situation where either BIOS or the Windows setup doesn’t recognize the SSD. The first course of action should be to check the cable connection to the SSD.
You might need to replace the serial advanced technology attachment or SATA cable used with SSD. It’s also important to check if the SATA port is enabled, which you can check manually by going into BIOS mode and controller and drive details.
However, if the problem persists, you’ll need to use Command Prompt function to fix the problem. Here’s how:
- Launch Command Prompt by searching it in Windows’ main toolbar.
- Type “
diskpart” followed by the Enter key. - Enter “
list disk #” and replace the disk’s number, then press Enter. - Enter “
clean all” and press Enter again. - Type “
exit,” close Command Prompt. - Go back to Windows setup.

Don’t forget to back up any valuable information from SSD before going through this process, as it will wipe any data you have on it.
Windows Cannot Be Installed to This Disk the Disk May Fail Soon
If you’re trying to reinstall Windows 10 or 11 to ensure better performance, upgrade the system, or get rid of malware, you may encounter a strange error.
A pop-up window may appear telling you that “The Windows cannot be installed to this disk. The disk may fail soon.” The error will prompt you to consider another disk for Windows installation, but there is a way to get around this problem.
You can attempt to solve this problem with the CHKDSK (check disk) Windows utility. It was designed to catch errors and resolve them. The process is straightforward, and these are the steps to follow:
- Go to your desktop’s search bar and type in “
CHKDSK.” - Right-click on the results and select “Run ad Administrator.”


You can also perform the same check using Command Prompt by launching it and entering “CHKDSK.”
Windows Cannot Be Installed to This Disk NTFS
Some users have run into the “Windows must be installed to an NTFS partition” error when trying to install Windows to a specific location.
This means that your boot partition is not properly set up, and you might need to convert some older file systems to the New Technology File System or NTFS drives.
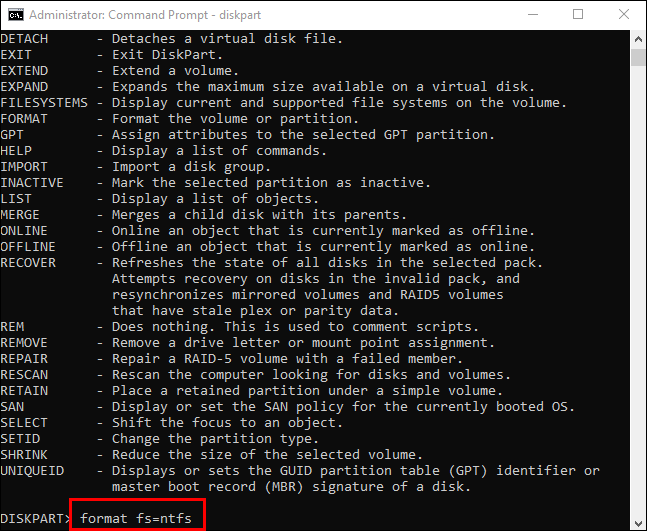
As with many other partition style issues, the most efficient solution is to use the DiskPart management. In this particular case, that procedure requires the following steps:
- Open the Command Prompt and type “
diskpart” and press Enter. - Type “
select disk #” press Enter and type “list partition” and press Enter. - Type “
select partition #” followed by Enter key. - Type “
format fs=ntfs quick” and press the Enter key to start the file system conversion.


Windows Cannot Be Installed to This Disk 0x803
The “Error 0x80300024” is something many Windows users encounter when installing a newer version of the operating system.
Again, this problem indicates an issue with a partition style or volume. However, it’s also essential to check if your computer has minimal requirements in terms of hardware and can indeed support the Windows upgrade. If that’s not an issue, you can try several other solutions.
This error can be caused by other hard drives connected to your computer. They could be interfering with the Windows installation process, so make sure to disconnect them.
Also, installing the new Windows using any of the USB ports on your computer might be the root of the problem. Try every USB port to eliminate the possibility that one of the ports is causing the problem.
Finally, the hard drive partition might contain some corrupted data, preventing the Windows installation. The only solution there is to format the disk where you want to install Windows.
It’s a simple enough process, but you will need to back up any existing data on the disk – otherwise, it will be permanently lost. If you want to wipe the data clean or already have it saved, here’s what you need to do:
- Right-click on the disk where the Windows installation will go.
- Select the “Format” option and confirm.
- Select the “Next” option when the disk is formatted to proceed with Windows installation.
Installing Windows Without a Hitch
If you’ve ever attempted to reinstall the current version of Windows or install a new one, you probably know that errors are not unusual. Still, it can be frustrating trying to figure out what went wrong and how to fix it.
Fortunately, the most frequent issues are relatively easy to solve by going into BIOS mode or using commands in Command Prompt. Sometimes it is a hardware issue, and you’ll need to check USB ports, cables, and even format a disk to erase any corrupted files.
Have you ever run into an error when installing Windows? Let us know in the comments section below.
Disclaimer: Some pages on this site may include an affiliate link. This does not effect our editorial in any way.


