The latest version of OBS Studio has a new feature that lets you see the aspect ratio that accompanies different resolution settings. Thanks to this nifty addition, you’ll be able to elevate your streams and avoid issues like Black Bars appearing on the screen. Furthermore, you’ll get a better grasp of how the fantastic open-source software works.
In this tutorial, we’ll explain how to change the aspect ratio with step-by-step instructions. In addition, we’ll show you how to fine-tune other video settings and resize the screen for an even better result. Once you master these elements, working with OBS will become incredibly fun.
How to Change Aspect Ratio on OBS?
First thing’s first – what is an aspect ratio, and why is it important? Simply put, it’s the relation between the width and height of a particular image. Typically, the dimensions are expressed with two numerical values separated by a colon, i.e., x:y – with x being the width and y being the height. So, for example, the most common format for TV is 16:9, while 4:3 is the standard ratio for computer monitors.
If the aspect ratio of the image doesn’t match your screen, you won’t be able to view it properly. Instead, you’ll either see the infamous Black Bars appear on the sides, or the image won’t show entirely. Either way, if you want to avoid glitches when streaming, you’ll need to set the width and height to a corresponding value.
The aspect ratio is also greatly affected by the resolution setting. Again, it’s because the width and height of a particular image have to accommodate the number of pixels or dots contained within it. That’s why in most cases, you can change the aspect ratio simply by switching to a different resolution. And the same goes for OBS.
The streaming software is famously user-friendly and comes with a slew of advanced video settings. We’ll cover each of them in the following section, but for now, let’s focus on changing the aspect ratio. Mainly, when you adjust the Canvas or Base Resolution, the software will resize the image to a ratio that works best with it. It’s simple and requires little effort on your part. Here’s how to do it:
- Launch the OBS desktop app.

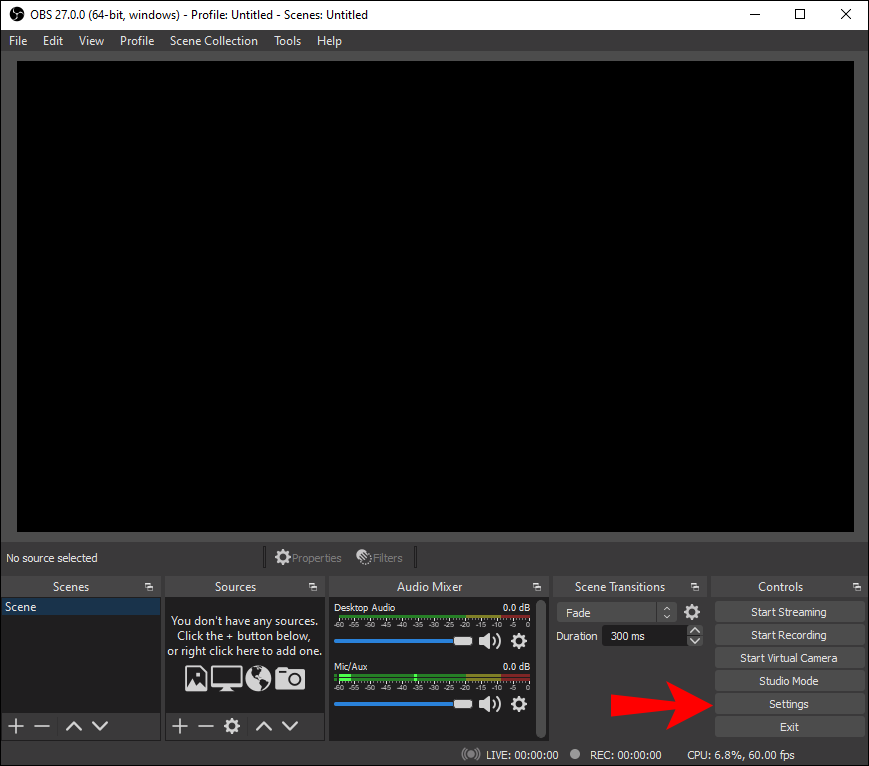
- In the bottom-right corner of the screen, click on “Settings.”

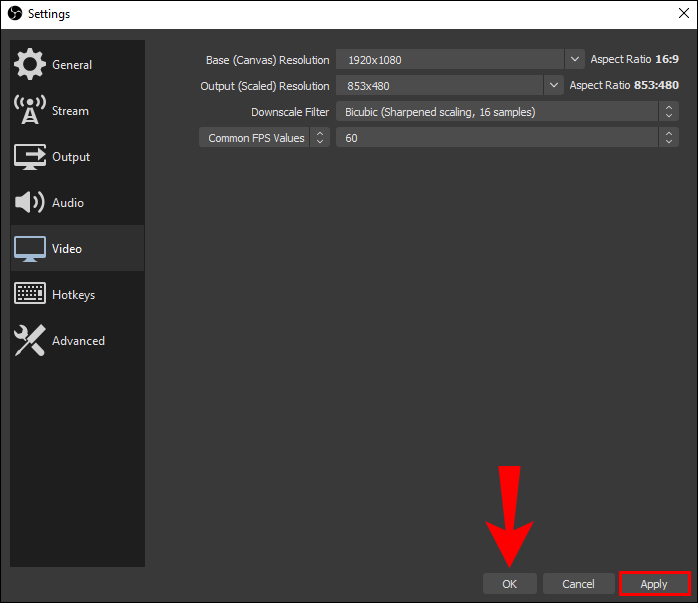
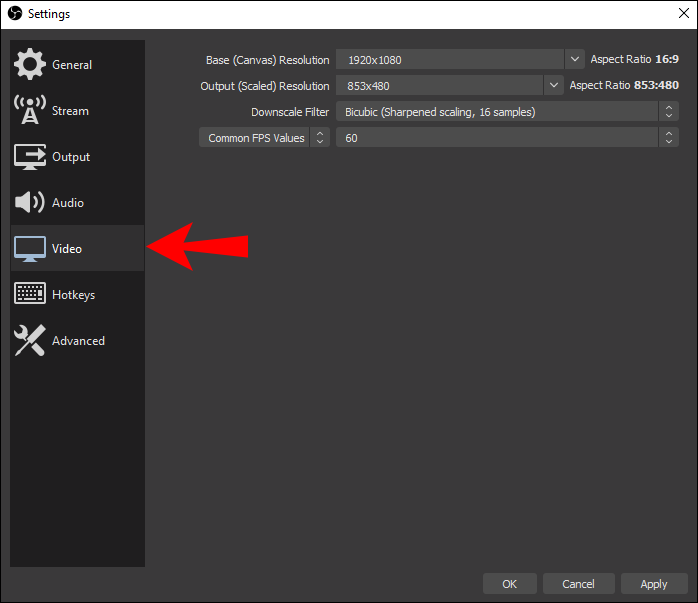
- A new window will appear. Then, from the panel on the left-hand side, open the “Video” tab.
- Click on the downward arrow marked “Canvas (Base) Resolution.” You’ll be able to see the aspect ratio next to the drop-down list on the right-hand side. Change the resolution to switch between different ratios.
- Once you’re done, press “OK.”

The recommended setting for streaming with OBS is 16:9, so you can try either 1080p or 720p to hit the mark. There’s also a middle-ground, such as the 900p (1600 x 900), that can do the trick.
Also, there’s another way to affect the aspect ratio in OBS from outside the app. You can change the resolution setting of your computer monitor before launching the software. While it’s not as effective, it can’t hurt to try. Here’s how to do it with a PC running on Windows:
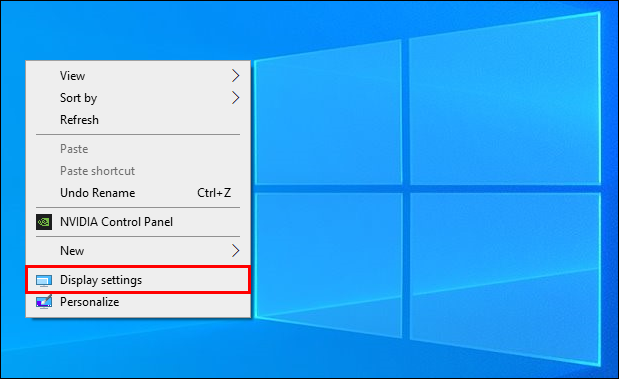
- Right-click anywhere on display to access a drop-down list.
- Choose “Display Settings” to open the Control Panel.
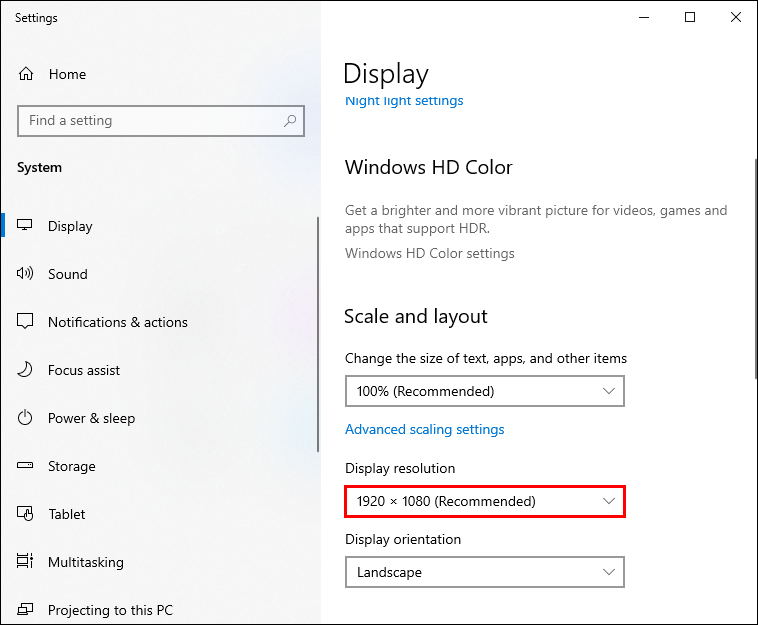
- A new window will open. First, find the “Display Resolution” section and click on the tiny downward arrow next to the current setting. Next, choose a preferred ratio from the drop-down list.
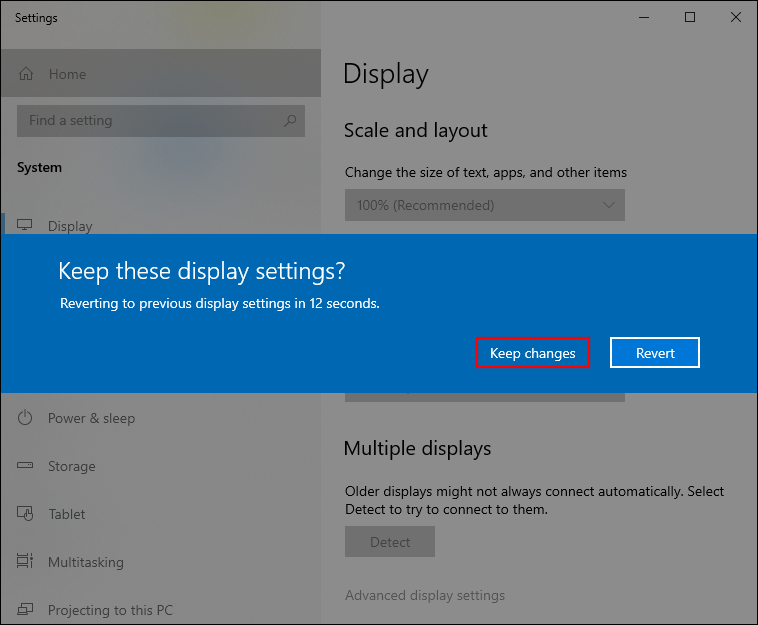
- Once you’re done, hit “Keep changes.”
For Mac users, complete the following steps to change the resolution on your primary display:
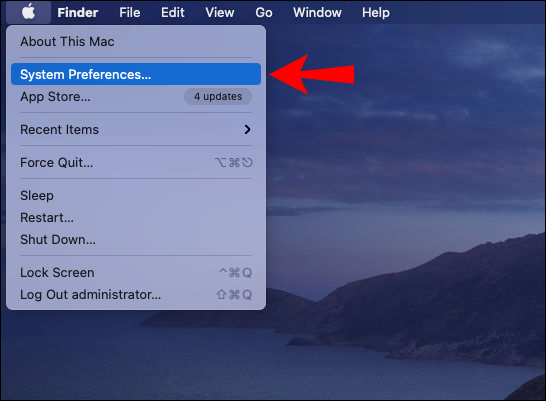
- Open Apple Menu and select “System Preferences.”
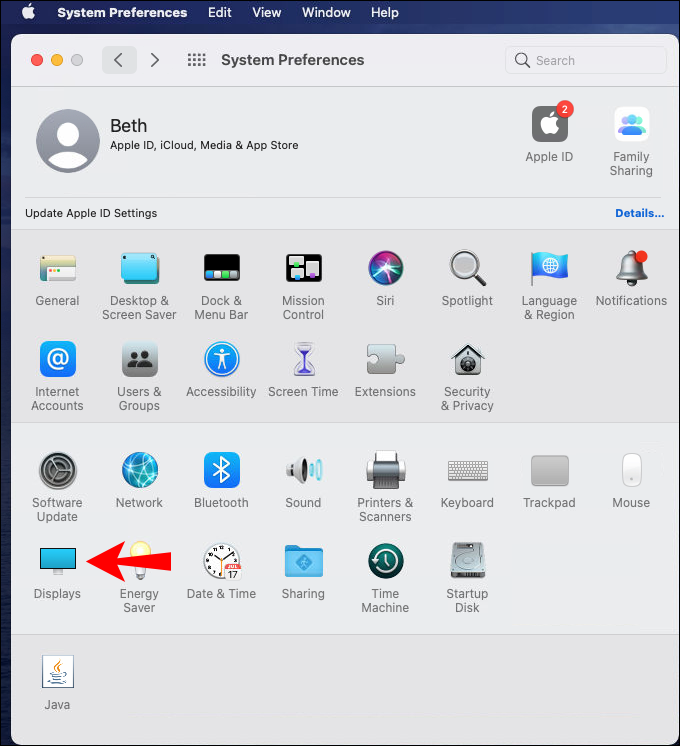
- Click on the “Displays” tab and then choose “Display.”
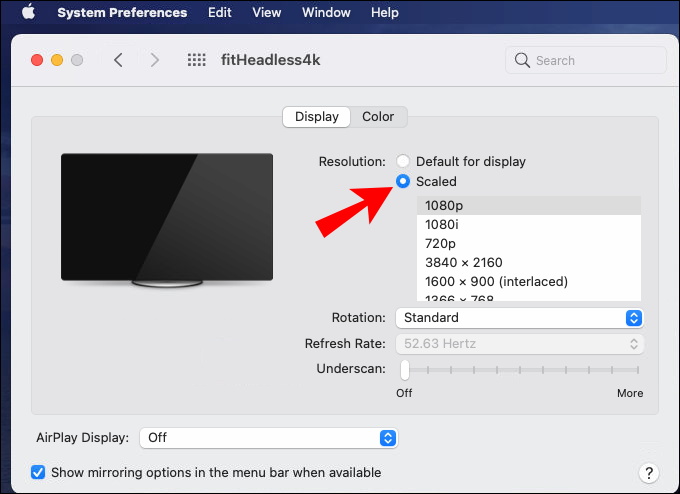
- Click “Scaled” and then choose a preferred setting.
How to Change Video Settings in OBS?
Apart from Canvas Resolution, there’s a slew of other video settings that can improve the quality of your streams. For example, let’s say you want to stream in 720p, you need to downscale the aspect ratio accordingly. OBS has a special filter that allows you to do that, and here’s how to enable it:
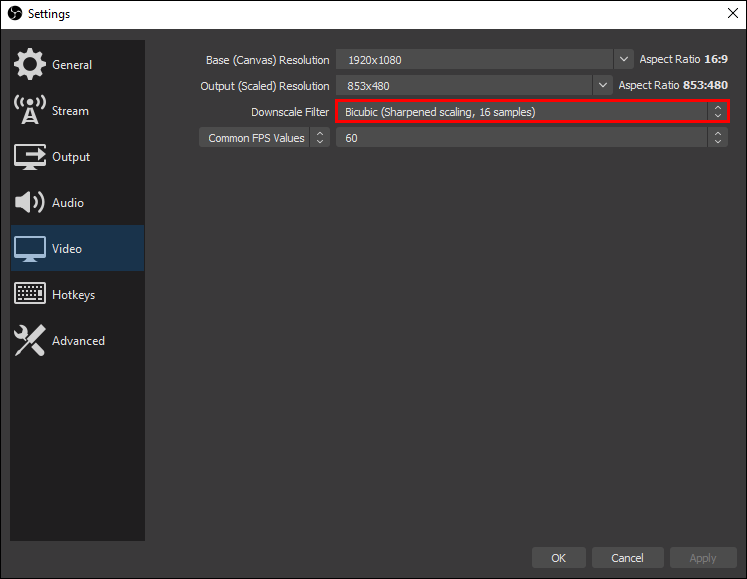
- Launch OBS and open “Settings.”
- Click on the “Video” tab in the panel on the left-hand side.
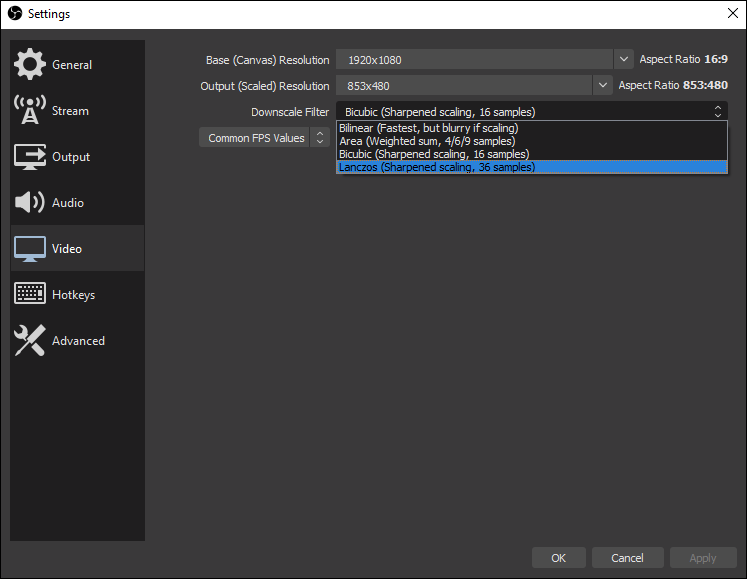
- Find the “Downscale Filter” and click on the downward arrow next to it, on the right-hand side.
- You’ll see several options in the drop-down list. The recommended filter is the Lanczos. However, it requires more GPU or CPU power. If you don’t want to strain your PC too much, go with Bicubic.
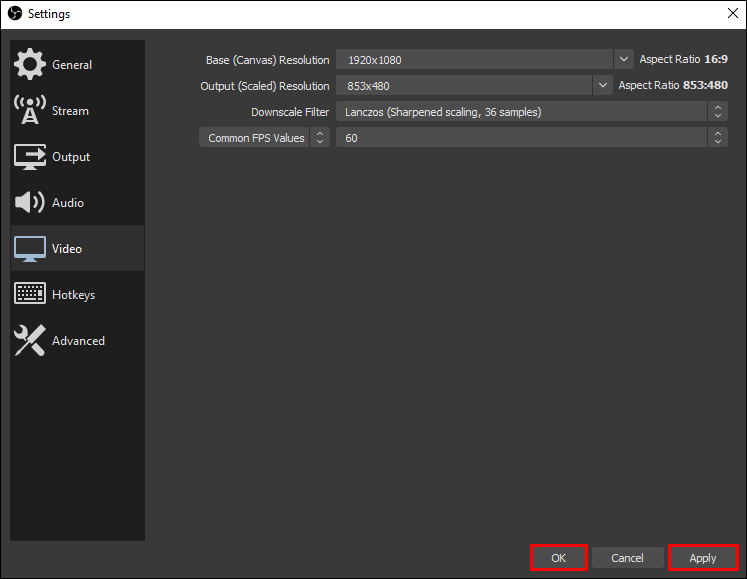
- Once you’re done, click “Apply” and confirm with “OK.”
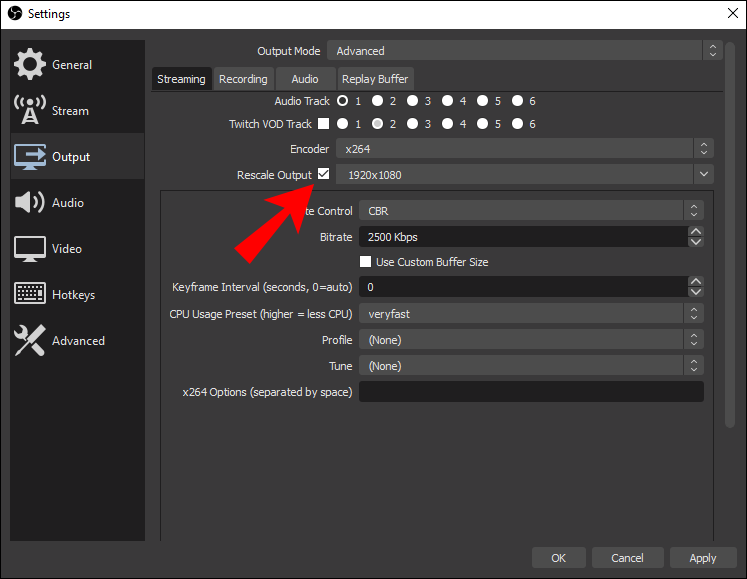
Keep in mind if you want to live stream independently from the Canvas Resolution, you’ll have to enable the Rescale Output setting. That way, OBS will rescale the image based on your preferred output setting, i.e., after it’s been downscaled and not the Base Resolution. Here’s how to do it:
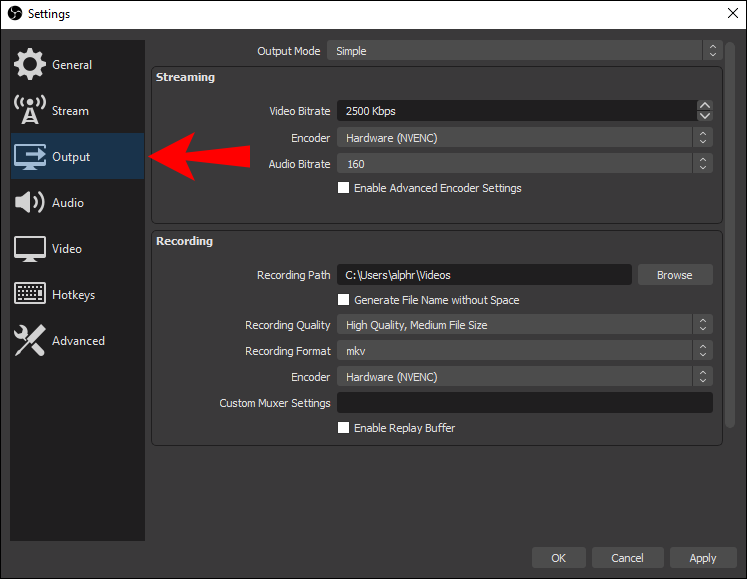
- Go to “Settings” and click on the “Output” tab in the side panel.
- Check the little box next to “Rescale Output.”
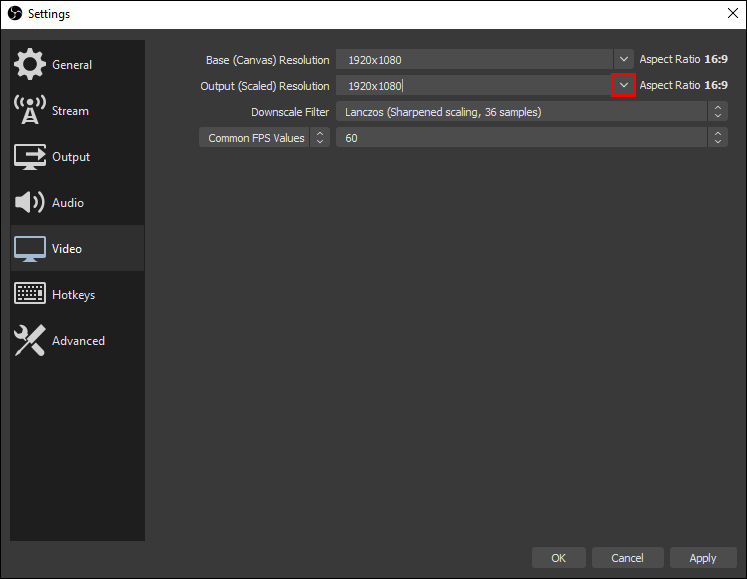
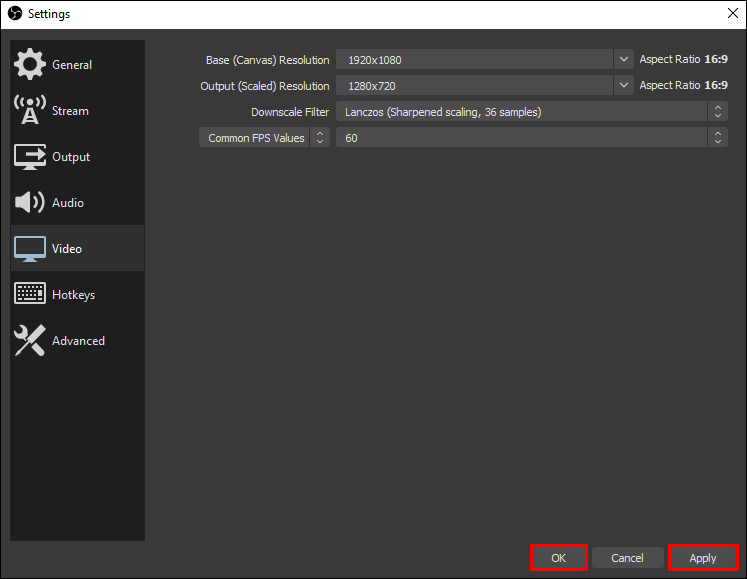
Of course, OBS is more than a streaming software – you can also use it for screen capturing. If you want to adjust the resolution and aspect ratio of a screen recording, you’ll need to change the Output Resolution. Here’s how to do it:
- Open “Settings” in OBS and go to “Video.”
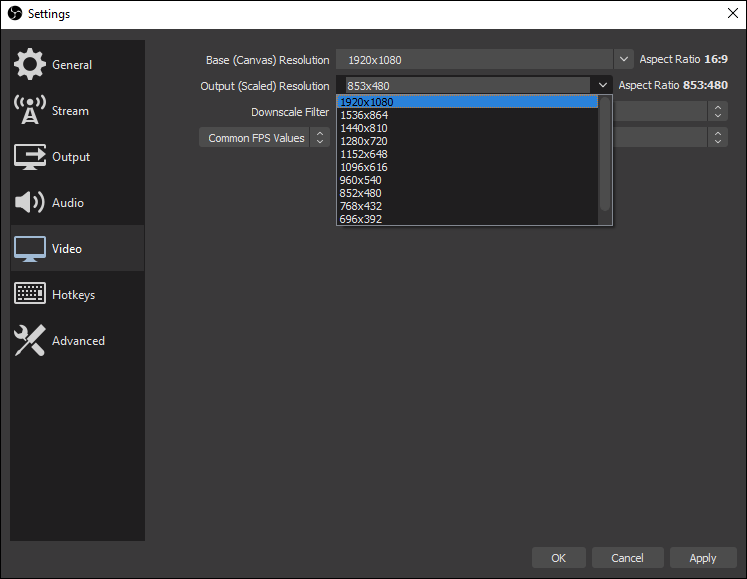
- Next to “Output (Scaled) Resolution,” expand the drop-down menu by clicking on the downward arrow.
- Select the resolution based on the aspect ratio you want. The number will appear on the right-hand side.
- Click “Apply,” then “OK.”
The feature lets you record videos in a higher or lower resolution than the Base set. However, the different settings can sometimes lead to glitches, but more on that later.
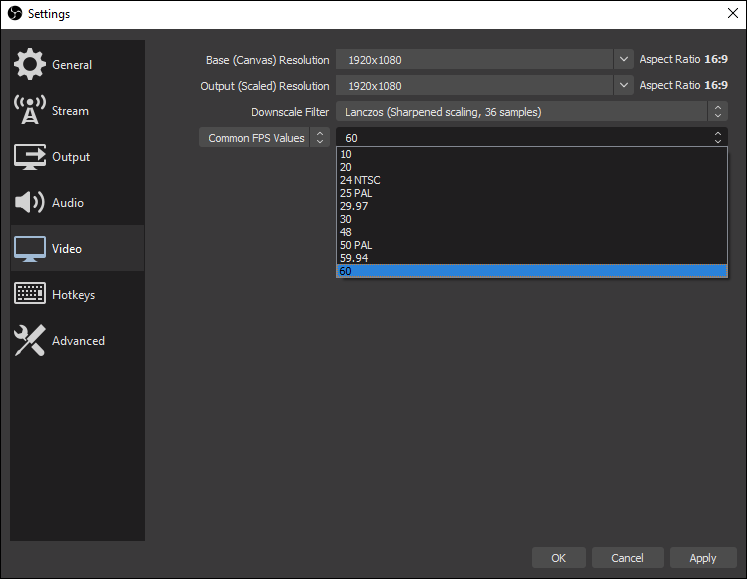
If the video quality is subpar after you’ve adjusted the aspect ratio, try changing the FPS setting. The frames-per-second speed is another important factor when it comes to streaming. So if your video is lagging or blurry, it might be because of FPS issues rather than aspect ratio. Here’s how to change it:
- Go to “Settings” in OBS.
- Open the “Video” tab.
- Expand the drop-down menu by clicking on the “Common FPS Values.” Next, choose the preferred setting from the list. The default is typically 30 FPS, but you can play around with other options to see what works best.
Additional FAQs
How Do I Fix Black Bars in OBS?
The infamous Black Bars are a common issue in OBS, directly related to aspect ratio. If the image is too small, it won’t be able to fill in the entire screen. As a result, the Black Bars will appear at the top and bottom, or left and right sides of the display capture. While it’s not harmful, the bug is very unsightly.
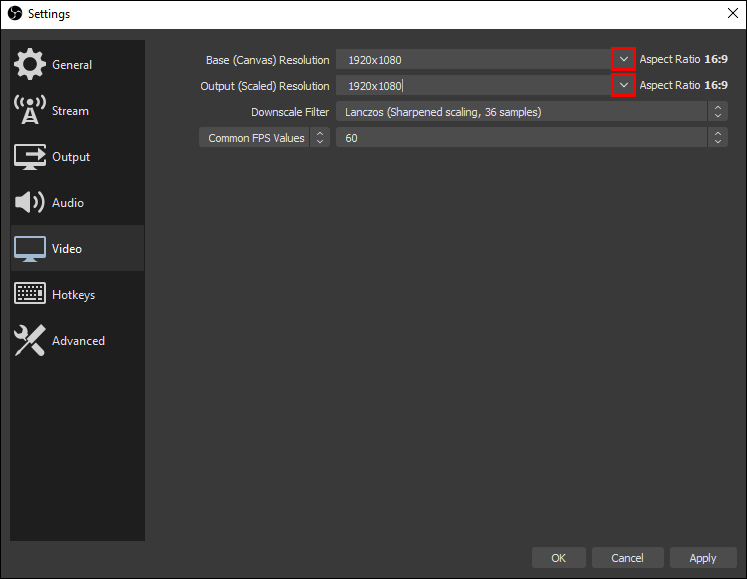
To fix this problem, you’ll have to adjust the aspect ratio so that the width and height of the image are compatible with the screen. As mentioned, you can do that by changing the Canvas and Output Resolution. The trick is to make the two match up:
1. Open OBS and click on “Settings” in the bottom-right corner of the screen.
2. Select the “Video” tab from the panel on the right-hand side.
3. Check if the aspect ratios for the Canvas and Output resolution match. If not, readjust accordingly.
4. Click “Apply.”

One more thing you can try is adjusting the display resolution to match the Base and Output settings. Check out the previous sections for the steps to change the screen resolution on a Mac and PC.
How Do I Make OBS Fit My Screen?
Readjusting the size of the screen can also fix the aspect ratio without fiddling with resolution settings. There are two ways you can do this: by applying the Crop/Pad filter or by using a keyboard command.
If the image is too large for the OBS screen, you can crop it to a compatible size. Here’s how to do it:
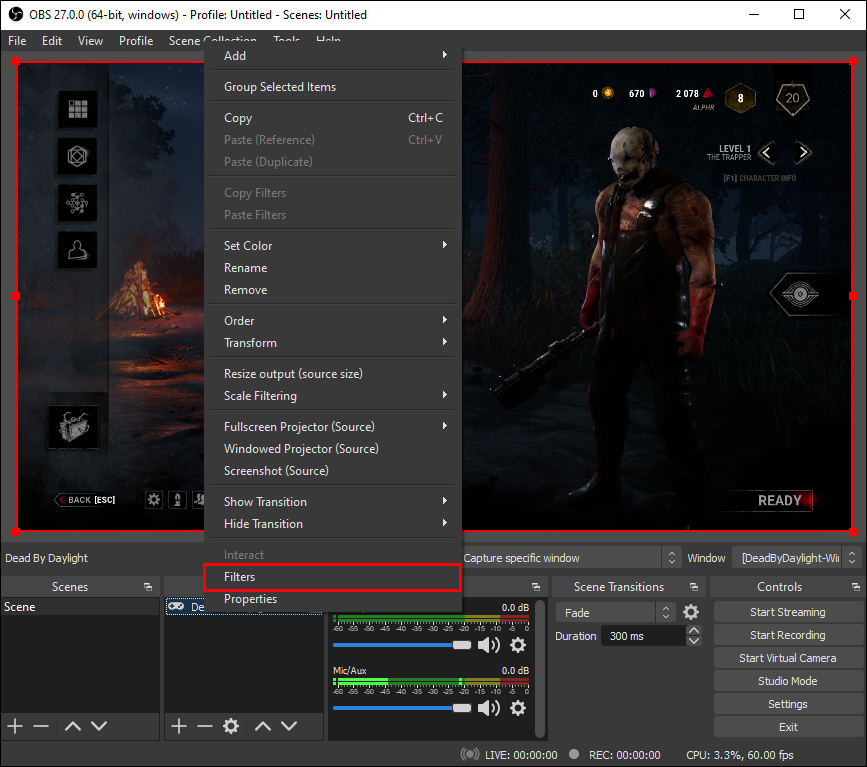
1. Scroll to the bottom of the screen and right-click on the “Sources” box.
2. A pop-up window will appear. Click “Filter.”
3. You’ll be redirected to a new window. Click on the plus icon in the bottom-left corner to add the “Crop/Pad” filter.
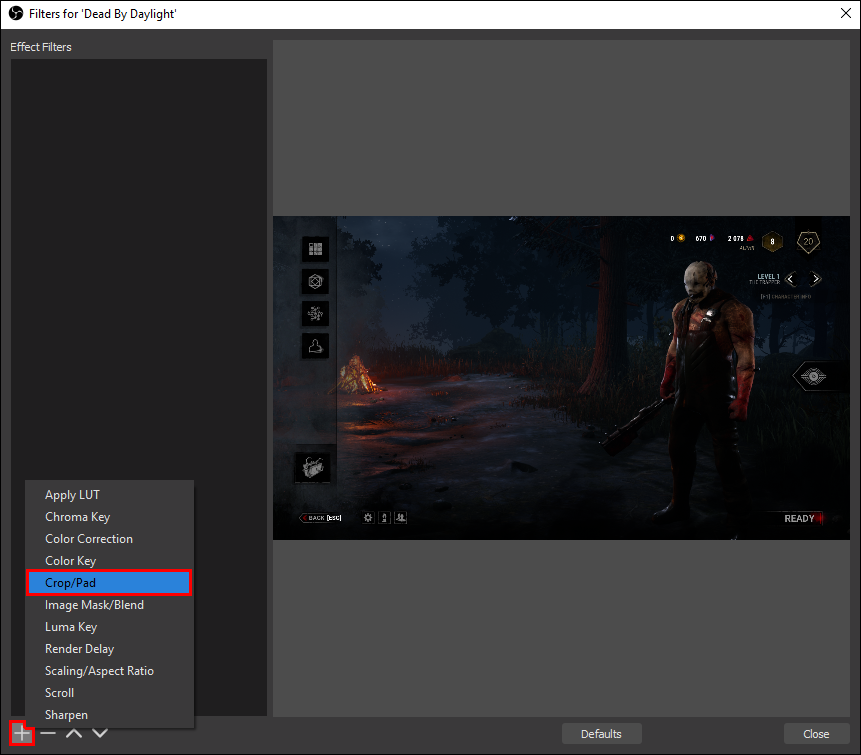
4. Adjust the cropping parameters to fit the screen. Click “OK” when done.
The other method works great if the image is too small. You can use your cursor to stretch the corners to fit the screen and eliminate Black Bars. It’s super easy:
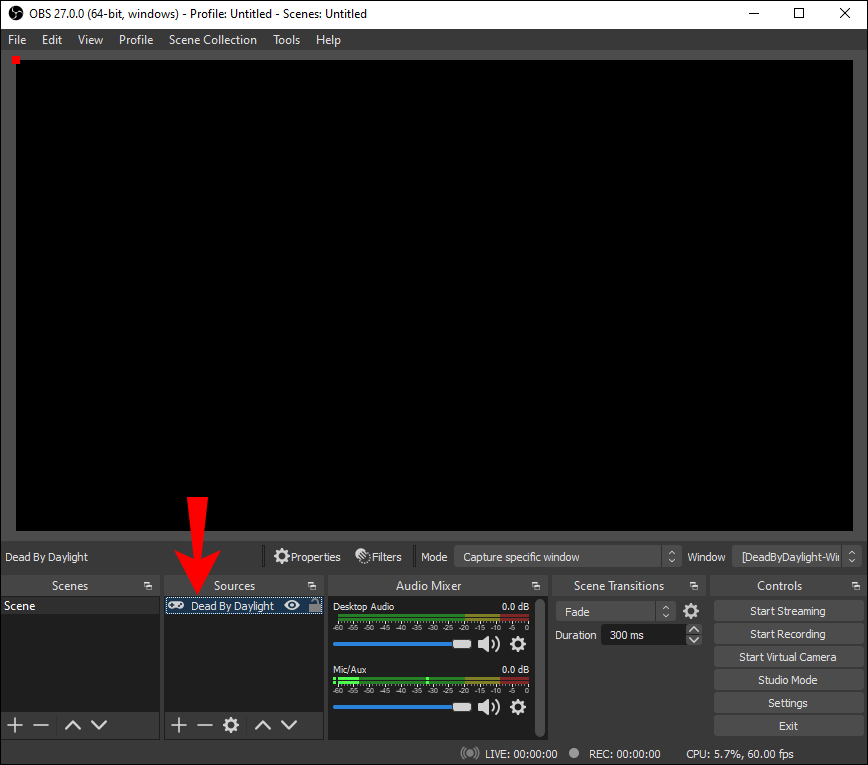
1. The screen capture is outlined with red lines. Click on the little red circles to adjust the size.
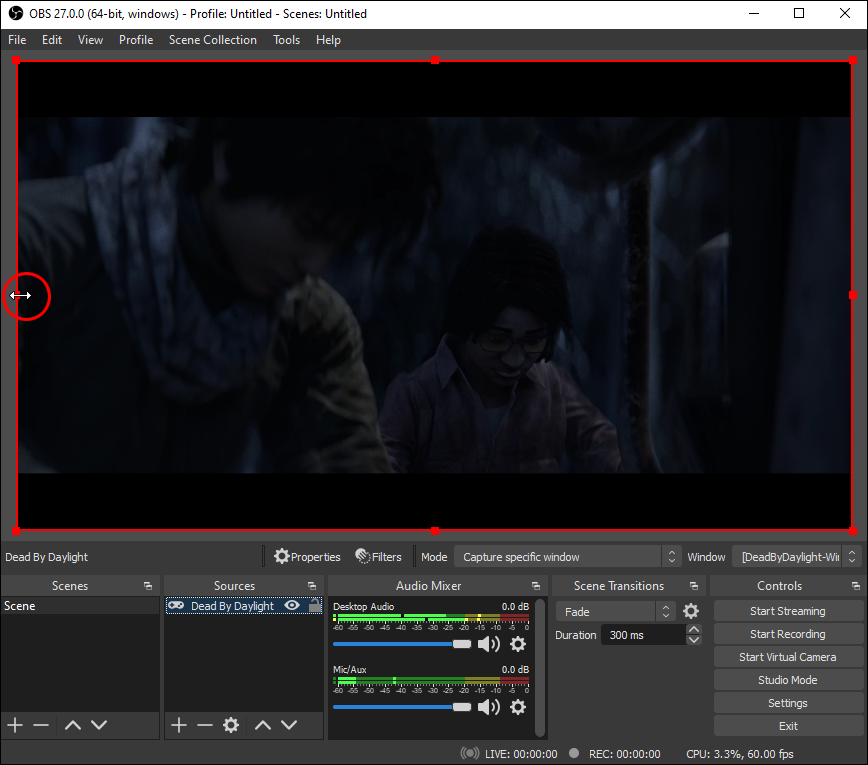
2. Press the “Alt” key and hold it while you move the cursor. For Mac users, hold the “Options” key.

3. Stretch the top, bottom, sides, and corners of the image to adjust the aspect ratio manually.
However, while this is the easiest way to fix the aspect ratio, it’s also the least effective. Stretching the image can sometimes distort it, especially when it comes to faces and geometrical shapes. For optimal results, it’s better to stick to changing the resolution settings.
Choose the Right Ratio
OBS Studio lets you adjust the video settings to your liking. The best part is – most of the features are programmed to automatically complement each other. So, for example, if you want to change the aspect ratio, all you have to do is set the right resolution.
Once you figure out which aspect ratio works best with which setting, you’ll be able to improve the quality of your streams. OBS Studio has a streamlined interface that’s easy to navigate, so even first-time users will be able to manage. And if you don’t feel like tempering with resolution settings, you can always do it manually. However, it may lead to some distortion, so bear that in mind.
Do you use OBS Studio for live streaming? Have you ever encountered the Black Bars? Comment below and tell us if there’s another way to fix the aspect ratio.
Disclaimer: Some pages on this site may include an affiliate link. This does not effect our editorial in any way.


