I’d say about 98 percent of the Live Photos I’ve taken weren’t intentional. Sometimes I did intend to take a picture, of course, but when I found out that I’d accidentally taken a Live Photo instead…well, I was less than happy. You can always turn off Live Photo for a saved image, but you may not get the exact frame you want in your new still image.
Thankfully, there’s a way to set your own “key photo” for a Live Photo, which means you’ll get the exact frame you want when you convert the Live Photo to a standard image. Here’s how it works.
Convert Live Photo to Still Image
Step 1
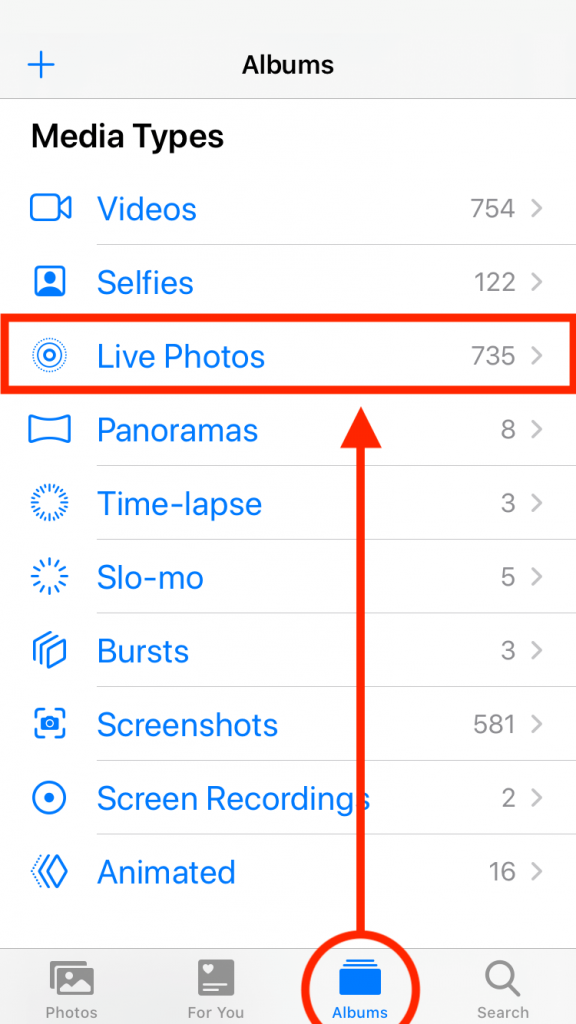
Open the Photos app on your phone, and then find the Live Photo you want to work with. A quick way to do this is to select Albums from the navigation at the bottom of the screen, scroll down, and then select Live Photos to get a list of all Live Photos on your device.
Step 2
Once you’ve found the Live Photo you want to convert, tap to open it and select Edit from the upper-right corner of the screen.

Step 3
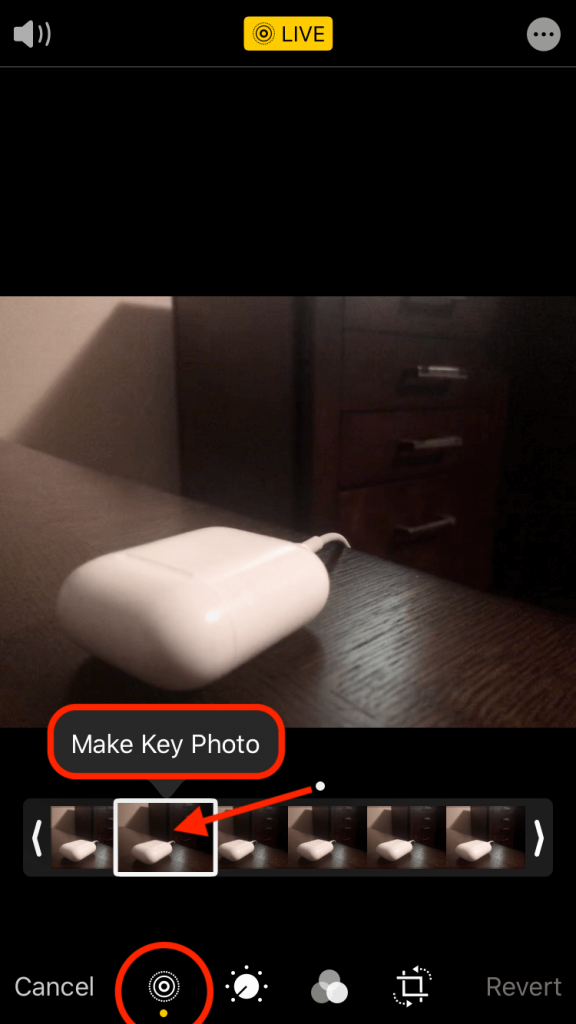
When the editing mode launches, you’ll see a few different editing options along the bottom. Tap the one that looks like a small sun, matching the Live Photo symbol at the top of the screen.
This will pull up a slider of the different frames that make up the Live Photo. Tap and drag the slider to select the frame you want to save when you convert your Live Photo to a still image. Once you drag the slider to a new spot, you’ll notice a grey dot indicating the default keyframe.
Step 4
Once your desired frame is selected, tap Make Key Photo.
Step 5
Finally, tap the Live button at the top of the screen. This will turn off the Live Photo feature for your image and save the file using the exact frame you selected in Step 3.

And that’s it! Your Live Photo is now a regular photo of your desired frame.
Do Live Photos Take Up More Memory?
Technically, yes, but broadly, not really. Here’s a quick explanation:
When Live Photos were first released in iOS 9, they took up significantly more space than a standard photo – about double the amount of storage. Which makes sense, since they are essentially mini-videos. If your iPhone has limited storage and you don’t have much (or any) iCloud storage, this would be a major concern, and Live Photos likely wouldn’t be worth the trouble.
However, Apple (not wanting to nix the feature altogether) switched from JPEG photos to a new file format known as HEIF. HEIF is great preserving image quality while taking up a minimal amount of storage, and is useful for regular photos and sequences of images. In other words, it’s a nearly perfect solution to the storage dilemma presented by Live Photos.
So, if you’re on a device that’s running iOS 11 or later, you can leave Live Photos on without having to worry about the storage. Live Photos do technically take up more memory still, but the overall storage needs of photos have been reduced so greatly that’s is mostly insignificant. Unless you’re at the end of your device’s storage capacity, there’s no need to turn Live Photos off.
How To Turn Off Live Photos
Even though we just explained why you don’t actually need to turn off Live Photos, there may be those of you out there who just don’t like the feature at all, are almost completely out of storage, or are on a device running iOS 10 or earlier and don’t have the luxury of the HEIF storage improvements.
If that’s you, here’s how you can turn off the Live Photos feature.
First, go into the Settings app, scroll down to Camera, tap Preserve Settings, and make sure that the switch by Live Photo is in the “On” position.

This will ensure that once you turn off Live Photos, it stays off. Otherwise, it’ll go back to being On every time you open your Camera, which will get frustrating very quickly.
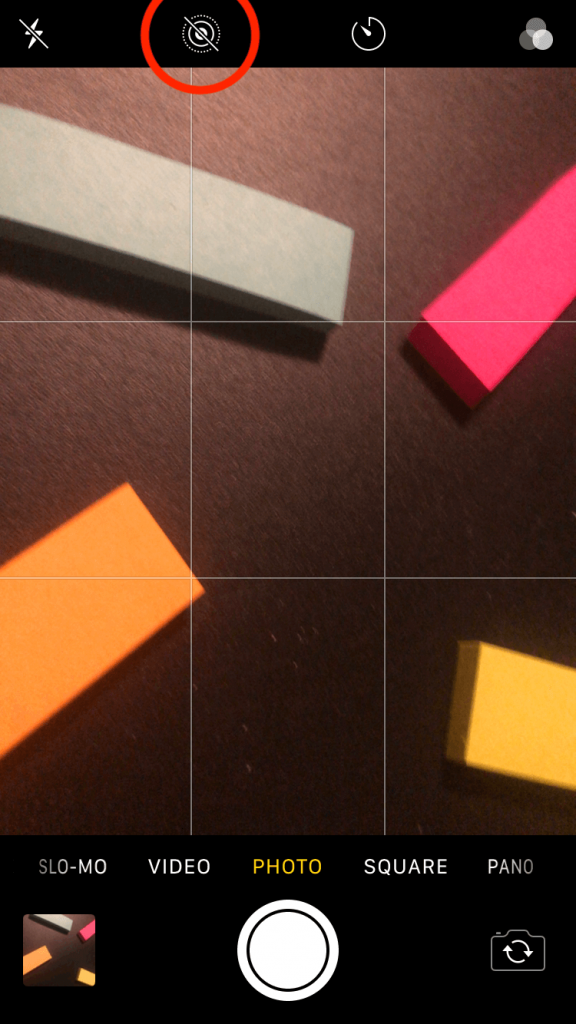
Next, open your Camera app. At the top of the screen, you’ll see that familiar yellow sun icon that represents Live Photos. If it’s yellow, then that means it’s On. If it’s grey, that means it’s Off. Just tap it to switch it to grey:
And you’re done! No more Live Photos from here on out (unless you decide to tap the Live Photos icon again).
Closing Thoughts
The great thing about the iOS Photos app is that your edits are nondestructive. This means that if you ever change your mind and want the Live Photo version of your image back, simply return to the photo, tap Edit, and then tap the Off button at the top of the screen to turn Live Photo back on.
You’re not losing any data by stripping the image down to a single frame. And afterward, you can feel confident that your Great Aunt Edna won’t see the part of the Live Photo where you dropped your phone and yelled something obscene as it fell. Not that I’ve ever had anything like that happen, of course.
Disclaimer: Some pages on this site may include an affiliate link. This does not effect our editorial in any way.