Chrome extensions help you to effectively browse the internet, and you can easily find them in the Chrome Web Store. But on some occasions, these add-ons may disappear from the store. Also, there’s always a chance that a new update doesn’t suit you as much as the previous one did.
That’s why you may want to export all your Google Chrome extensions into one place. This way, you can always reinstall them, regardless of any changes to the Web Store or the extension itself.
These extensions come in unique CRX file formats, and this article will explain how to store them on your drive.
Check Your Chrome Profile
Before you start exporting, you should check if your Google Chrome profile is the right one. Chrome allows you to use multiple profiles, and each one will have its own set of extensions.
You can make sure that you are using the correct Chrome profile in a few simple steps:
- Open Google Chrome and click on the More icon in the top-right corner (three vertical dots).

- Now, select Settings from the dropdown menu.
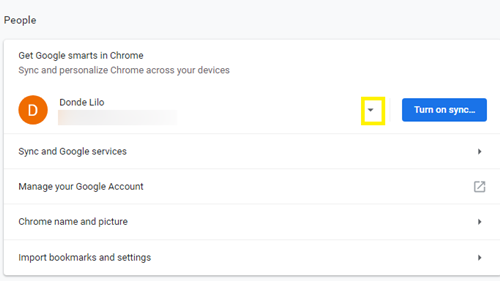
- Under the People section, check if you are currently using your profile, if not, click on the small arrow next to the profile name and switch the profile.


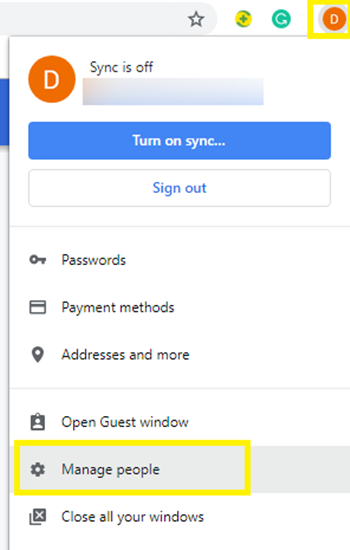
You can also add and remove profiles by clicking on the profile icon on the top-right, and selecting Manage people.
Export Chrome Extensions as CRX Files
If you want to export Chrome extensions manually, you have to enable ‘Developer mode’ in the browser and pack the extension in a CRX file. CRX is a file that Chrome automatically downloads and installs when you add an extension.
To do this, you should:
- As mentioned above, launch Google Chrome and press the More icon (three vertical dots).
- Hover your mouse over More tools and then click on Extensions.
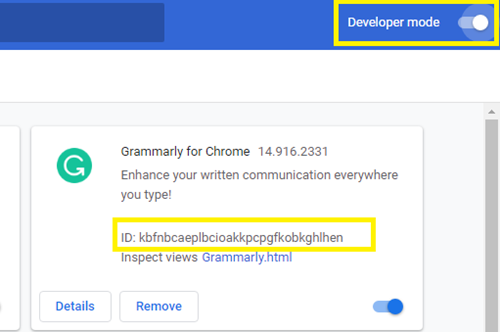
- Now, enable the Developer mode on the top-right of the Extensions menu. Remember the ID that appears under the extension that you want to pack.
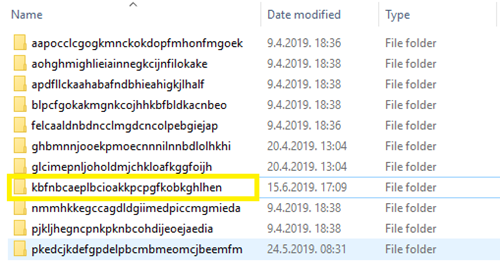
- Now, hold Win Key + E to open Windows Explorer and go to the following path:
“C:\Users\<Username>\AppData\Local\Google\Chrome\User Data\Default\Extensions“
Note that the <Username> should be your username.
- Locate the folder that has the same ID and copy it to your Desktop.
- Now, go back to the Extensions menu and click the Pack extension button on the top-left corner of the menu.
- When the new window appears, select Browse, choose the folder that you’ve moved to the desktop and click OK.
- Select the Pack Extension button. Leave the Private key file section blank.


Now, the extension folder should have a CRX file too.
For each extension that you want to export, you can use the same method. You can share these CRX files, or store them on your drive.
How to Find Extension Folder on MacOS or Linux
If you’re using MacOS or Linux, the process is slightly different. You can follow the same first six steps from the previous section, but the path to the extension folder is slightly different.
For MacOS users, the correct application folder is normally in ~/Library/Application Support.
For Linux users, the extension folder should be in the ~/.config folder.
Use a Special URL to Save and Download Extensions
If packing extensions to a CRX file seems like a long and exhausting job, you can just save the extension URL somewhere and download it when you need it.
- Using the method from the previous section, save the extension ID if you already have it on the computer. If you don’t, you can find the extension from the Chrome Web Store and copy the extension ID. The ID is always the last part of the URL in the address bar.
- Once you get the ID, open any other browser besides Chrome and type this link in the address bar: ‘https://clients2.google.com/service/update2/crx?response=redirect&prodversion=49.0&x=id%3D<Extension_ID>%26installsource%3Dondemand%26uc‘ remember to replace the ‘<Extension_ID>’ part with the proper ID and execute.
- A download window will pop up prompting you to complete the download. You should get the CRX file on your computer.
It’s important to use another browser (like Mozilla Firefox or Opera) because Google Chrome will try to install the extension automatically instead of downloading it.
Use a Third-Party App
There are various third-party extensions and web apps whose only purpose is to help you export other extensions.
For example, Chrome Extension Downloader will download the CRX files directly from Chrome.
Just type in the extension ID or copy/paste the extension URL in the address bar and hit the ‘Download Extension’ button.
Another useful extension is Export Links to All Extensions which exports all extension names and URLs to a single file. You can combine these two apps to quickly get all needed URLs and then get their CRX files.
How to Import Extensions
All of the aforementioned methods will download a CRX file. However, you can’t just click on these files and expect them to install. Instead, you should:
- Open the ‘Extensions’ menu as explained in the previous sections.
- Locate the CRX file on your computer.
- Drag-and-drop the CRX file from its location to Chrome’s Extensions menu.
- Wait for the extension to install.
Keep Your Extensions Safe
Now that you know how to export all your Chrome extensions, you don’t have to worry about them disappearing from the store. Also, you can easily keep track of all extensions that you use, so you don’t miss out on some if you need to switch profiles.
Do you prefer to keep your extensions backed up? Have you ever lost an extension that you couldn’t get back? Leave a comment and let the other readers know.
Disclaimer: Some pages on this site may include an affiliate link. This does not effect our editorial in any way.