The Path Tool is one of GIMP’s most powerful image editing options available. With this tool, you can develop editable and precise outlines or paths on images. The Path Tool effectively replaces the Pen tool found in other editing software, but has a few additional tricks. When the Path Tool is mastered, you can produce professional results.
In this guide, you’ll be acquainted with how to use the Path Tool in GIMP for the most remarkable outcomes.
Using the Path Tool
The Path Tool in GIMP allows you to create lines, curves, and shapes, similar to the Pen tool in Photoshop. However, it also supports complex selections by selecting multiple points or creating a Bezier curve. Anyone who’s used Inkscape, Illustrator, or Photoshop’s Pen Tool may not have a hard time using the Paths tool in GIMP.
Drawing a Path
Using the paths tool to draw a path allows you to get a precise selection around the object or image form. This way, it becomes relatively easier to get rid of a background. This is how to go about it:
- Open an image by going to “File.” Under this section, click “Open” and choose the image you want to work on.

- If you want to start from scratch, select “File” and “New” instead. Here, pick the canvas size, and the settings. Click “OK” to confirm.
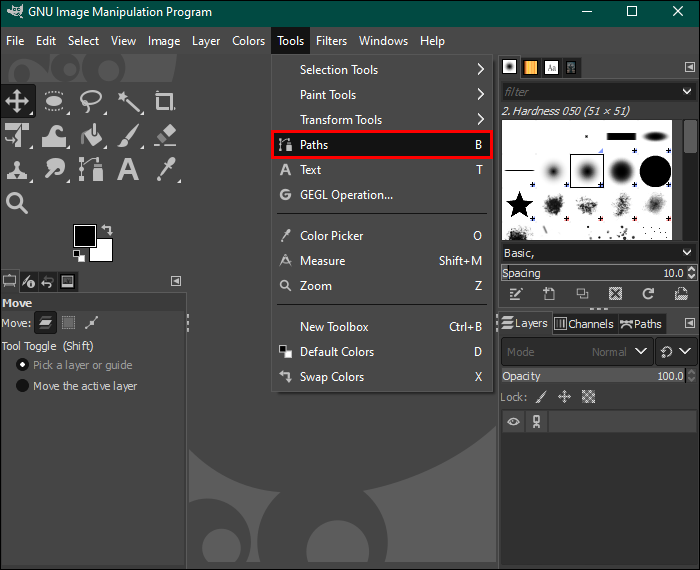
- Hit the “B” key to launch the “Paths” tool. Alternatively, go to the toolbar and select the “Paths” icon. It’s shown by a dotted line and a pen near the text tool,

- Another option is to launch the “Tools” menu and pick “Paths.”
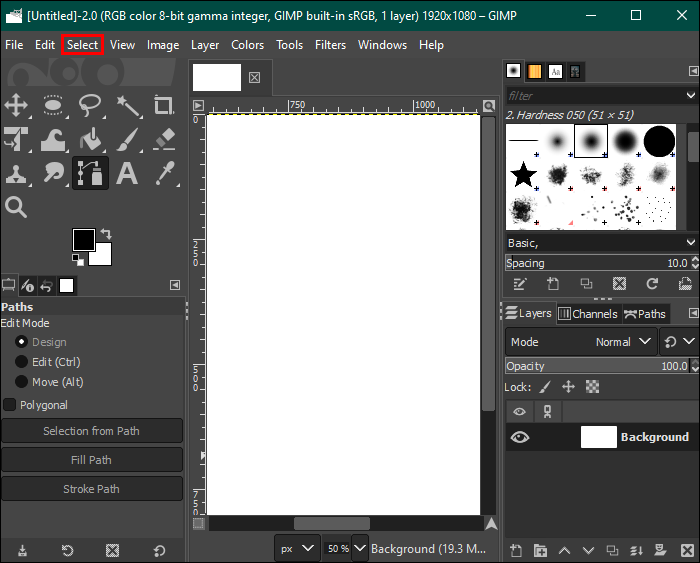
- Once launched, the paths tool is visible on the left panel. Here, you’ll see design, edit, and move modes. Use the design mode in this case. It is the Path Tool default setting.
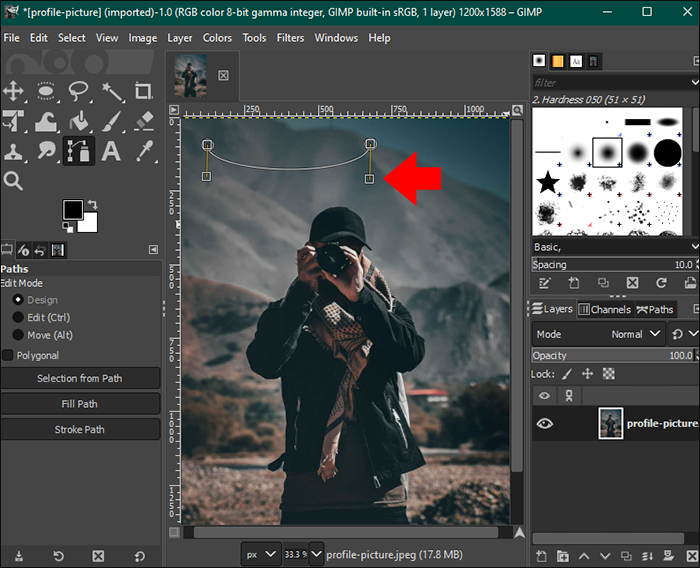
- Click on the canvas or image and place the first point. If dealing with an object, go to its edge and click somewhere. For drawing, you need to click on the place where the first curve or line is meant to start.
- Every point placed may be joined to another by a line or segment. These lines may be curved or straight.
- When selecting objects, the main aim is to have points placed all around its perimeter.
- Choose a location for the second point. When it’s created, it will connect with the first one by a segment.
- Create a curved segment by clicking and dragging. If the next segment is supposed to be a curve, you can set it to follow that specific direction. You need to move your mouse towards the direction of the next point. Click and drag your cursor right to curve the line left or right to curve the line to the right.
- The curve may be dragged to curve in any desired direction to wrap around your object well. Note that the curve always forms in the opposite direction dragged.
- Once the mouse button is released, there will be new points with yellow directional lines that track the curve’s direction. There are squares at the end of each directional line and they are called handles.
- The handles can be moved to shape the curves precisely. Holding down “Shift” while dragging the handle keeps your curve symmetrical between the points.
- Keep clicking points until you get close to the starting point. This way, you will have surrounded your object or drawn a shape around it.
- The points created depend on the complexity of the object being handled. You may need more or fewer points to come up with an accurate selection.
- Press the Ctrl+Z shortcut on Windows or Command +Z on Mac to undo any points that are wrongly placed.
- When adding points, there is a small “Plus” sign at the right corner of the cursor. The sign changes as you work with the Path Tool.
- Select the “Ctrl” key while clicking on the start point. This should close the path by creating one final segment.


Use a Path to Create a Selection
It’s possible to work with your path as a selection. This applies when you want to recolor, adjust, copy, or extract the area you selected without altering anything else in your image.
- Go to the “Paths” toolbar on the left.
- Choose the “Selection from Path” option.
- Go to the “Select” menu to adjust your selection.


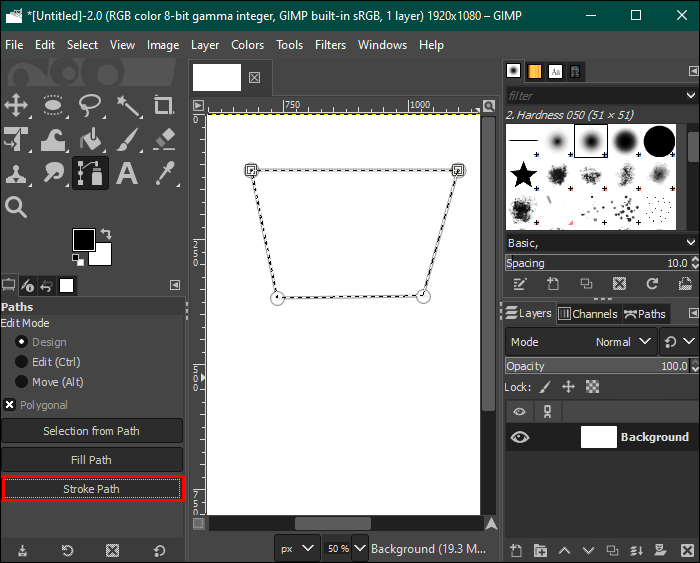
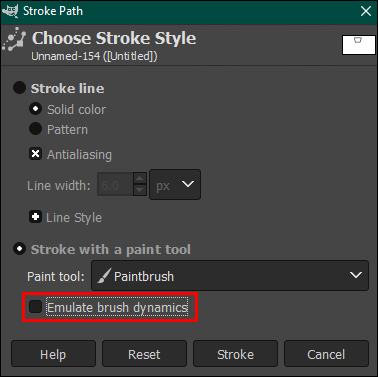
Creating an Illustration
If you want to create illustrations, use the “Stroke Path” in the left panel. Here, you can customize the path line. Here’s how:
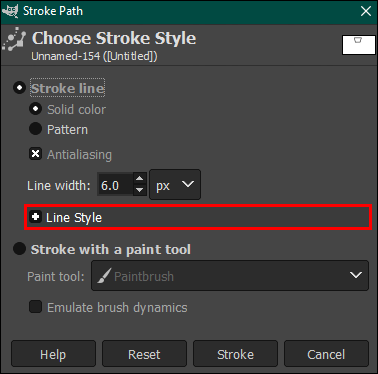
- Choose the “Stroke Path” to launch the dialog box.
- Enter the width for a customizable line.
- Select the “Line Style” menu to pick any other option as desired.
- Choose the “Stroke with a paint tool” option, then pick a tool if you want to use a paintbrush, a pencil, or any other tool. Set the size preferences before proceeding.
- The “Emulate Brush Dynamics” creates a realistic-looking line. This is an essential point for those lifelike drawings.
- To create a line, click “Stroke.”


Editing Paths
When you are still in design mode, you can move a point by clicking and dragging it. If you want multiple points moved simultaneously, hold down the “Shift” key while clicking at every point. To move all the selected points, drag and move one of them.
In the edit mode, dragging points curves your previous segment. Using the edit and design modes allows you to make a lot of changes to your path. However, each of the modes comes with different features. In edit mode, users are only able to handle the existing path. If you desire to make many changes at once, the design mode is the best way to go.
Add a New Point
New points can be added in both the design and edit modes by holding down the “Ctrl” (or CMD) key and clicking at the desired point within the segment.
Curve Lines in Segments
Once the path is completed, you can curve segments between any two points. While in design mode, hover the cursor over your segment. Watch the small square that’s next to your cursor turn to form a crosshair with arrows. You can now click and drag the target segment in the direction you want. If this is done while holding the “Shift” key down, a symmetrical curve is created.
Adjust Curves
Changing the direction of a curve involves dragging the handles at any of the points toward the direction you want. This feature works in both the edit and design modes.
- Choose a point and click to show the handles.
- Drag any of the handles towards the position you want. Curve symmetrically by holding down the “Shift” button.
- To remove any handle, click it and hold down the “Shift+Ctrl” buttons.


Delete Segments
Segments can be deleted in the Edit mode only. Follow the steps below to complete this successfully:
- In the “Paths” toolbar, open the “Edit” option.
- Hold down the “Shift” key.
- Hover over the segment that needs to be deleted.
- Wait for the minus sign to appear near your cursor, then click. This deletes the segment.


Delete Points
There are instances where the points are too many and you decide to delete some of them. In such a case, you should go to the design or edit mode.
- Pick the point you want to delete.
- Press the “Shift+Ctrl” while clicking on that point.
- If using the edit mode, press the “Shift” button while clicking the point.
Move Points and Paths
Repositioning units is relatively simple. You can do it in the Design mode. The general idea is to click and then drag a point to the desired position. If you need to move more than one point at once, hold down the “Shift” key while clicking on the points you need to move then drag.
To move an entire path, go to the Move mode and select it. Click and drag any point on the path. This moves the entire selection.
Make the Most Out of the Path Tool in GIMP
The Path Tool in GIMP can be used in several ways, like making vector graphics and brush art. This is one of the handiest tools GIMP users have at their disposal. You may place as many points as you want in a path, but try out as few as possible for the best outcome and a clearer line.
Do you know any other ways the Path Tool can be used in GIMP? Let us know in the comments section below.
Disclaimer: Some pages on this site may include an affiliate link. This does not effect our editorial in any way.


