No matter how high the quality of a raster image, it can’t always fulfill your needs. There may come a time, especially in the design field, when you need something highly scalable that won’t lose its quality when enlarged. And the answer is vectors.
Vector graphics work completely differently from raster images, but simply clicking “Save as…” won’t be enough to leverage all their potential. Instead, you’ll need to vectorize your image in Illustrator. Read on to learn how to do so on several platforms.
Before You Begin
Before we open Illustrator and begin the vectorization process, let’s discuss the importance of the right kind of image for success. Although you can convert any image to vectors using Illustrator, not all images will yield equally professional results. Vector images are usually used for logos and other simple graphics. Therefore, you’ll have better luck if you start out with a reasonably simple raster image. Focusing your efforts on a single subject rather than a detailed landscape is a good idea.
A PNG with a transparent background is a perfect candidate for vectorization, but a JPG with a single subject and a white background also performs well. If the image you want to convert doesn’t fit this profile, preparing it first will facilitate both your and the computer’s job later. Crop your image so only the part you want to vectorize is included. When your image is ready, follow the steps below.
How to Vectorize an Image in Illustrator on a PC
Illustrator is equipped with a handy Image Trace feature that makes turning raster images into vectors a breeze. This option will work well in most cases, with minimal adjustments needed. If tweaking the Image Trace settings doesn’t yield a perfect vector graphic, you can trace your image manually instead.
Here’s how to use Image Trace in Adobe Illustrator on a PC:
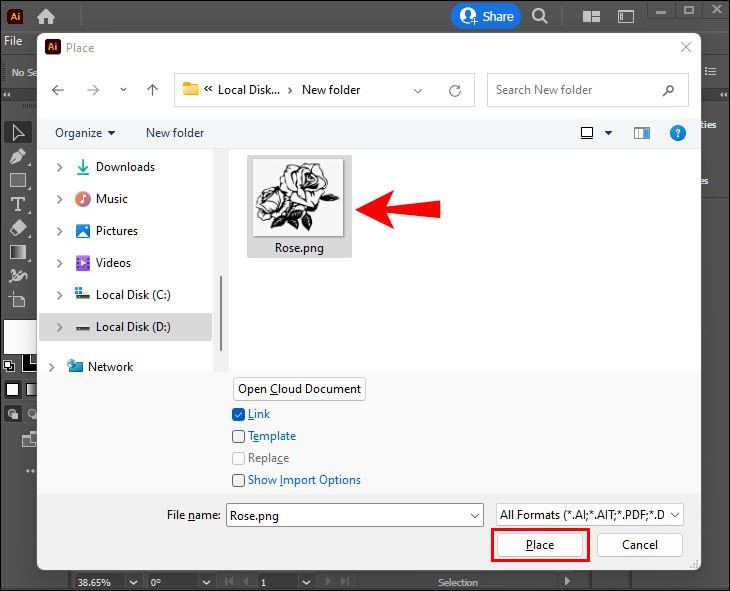
- Launch your Illustrator PC app and create a new file.

- Import or paste the image you want to vectorize.

- Select the image to call forth the image options at the top.
- Click the “Image Trace” button to convert a raster image to vectors instantly.
- Once the image is converted, click the “Expand” button to access the path handles to tweak the shape of your vector graphic.


Clicking the “Image Trace” button applies the default settings to your vector image. The default settings work well for simple black and white images. If you’re just converting a logo, you might not have to tweak anything and will still end up with a flawless vector graphic. However, this is merely scratching the surface when it comes to the capabilities of Illustrator’s Image Trace function.
If you’re converting a colored image or simply need a bit more control over the presets, enable the Image Trace panel.
- Make sure your image is selected.
- Press “Window” in the menu bar.
- Check “Image Trace.”


You’ll see a myriad of settings you can use to fine-tune the vectorization process in this panel. The first and most important one is Presets. Selecting a suitable preset instantly adapts the vector settings to the nature of your image. For instance, a detailed image will benefit from the High Fidelity Photo option, while you can use a limited color setting for a simple graphic. Every image is different, so you’ll have to play around with the settings to find the best fit.
If none of the presets gives you the desired result, further advanced options in the Image Trace panel give you greater control over the details. Adjusting the threshold, the number of colors, the paths, the corners, etc. can make a significant difference depending on the image and the preset. It’s also easy to remove a white background from an image by checking “Ignore White” in these advanced options. To tweak the paths manually, click the “Expand” button mentioned above.
Illustrator’s Image Trace is advanced, but if automatic tracing isn’t suitable for your photo, you’ll need to trace the image manually.
- Add a new layer on top of the image layer.
- Select the Pen tool and trace the image on the new layer.


Note: You can use any tool you wish to trace your image, but the Pen tool will give you the cleanest, most easily adjustable lines.
When you’re done vectorizing your image, save your file as an AI, SVG, or EPS.
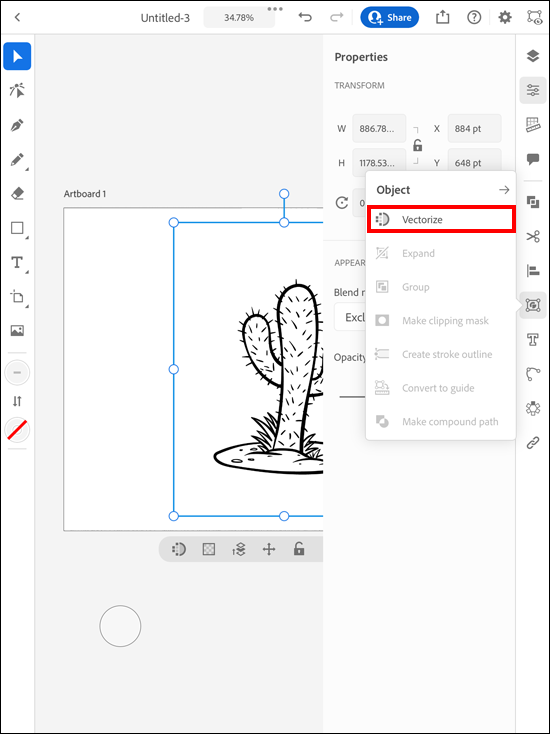
How to Vectorize an Image in Illustrator on an iPad
If you’re using Illustrator on your iPad, you might have noticed that the Image Trace option you would normally use to vectorize an image is missing. Although the app is somewhat different from the desktop version, it still allows you to vectorize images in a simple way. Before you begin, check that you have at least version 2.0 of the app.
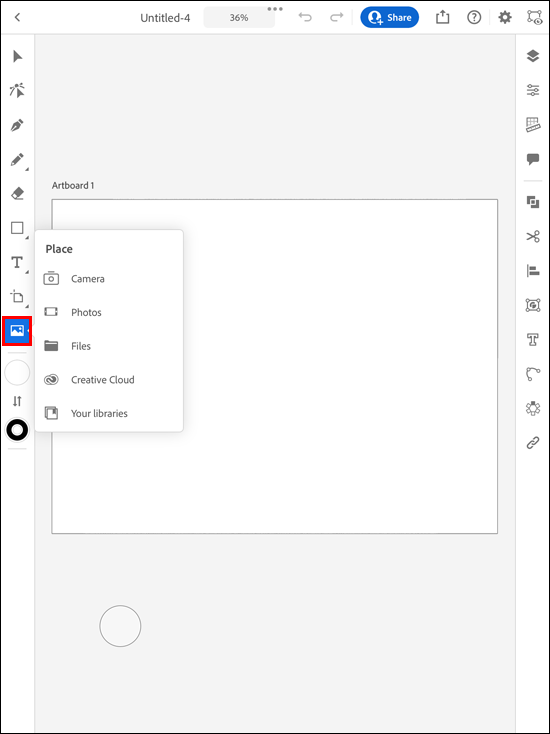
- Open the Adobe Illustrator app for iPad and create a new canvas.
- Tap the Photo icon in the left-side toolbar and import the photo you want to vectorize.
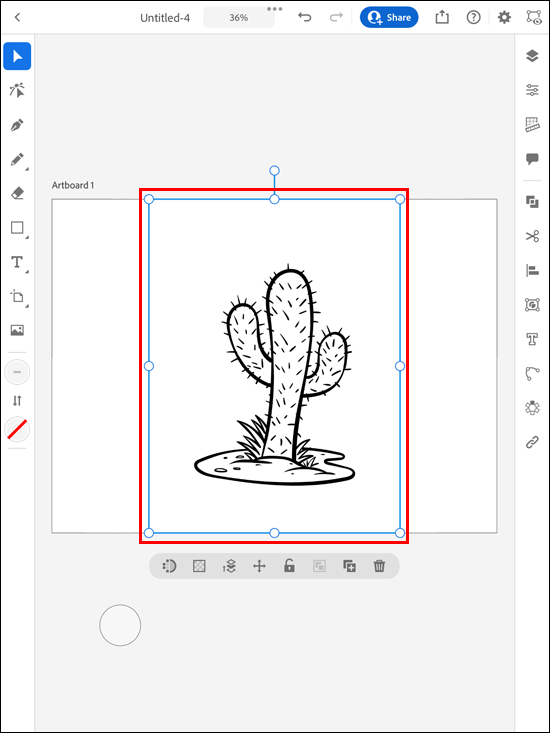
- Make sure the image is selected and tap the Object icon (a rectangle with handles on all four corners) in the right-side toolbar.
- Select “Vectorize” from the menu and the app will instantly convert your image to a vector file.
- Refine the result in the Properties window that opens automatically upon conversion:
- Select the source image so the app has more information about how to approach the conversion.
- Change the color mode in the dropdown menu.
- Adjust the number of colors in the case of a colored vector image.
- Adjust the threshold for black and white graphics.
- To edit individual elements, tap the Object icon again and press “Expand vectorization.” Select an element and edit it as you want.
- When your vector graphic is ready, export the file in a vector format like AI, SVG, or EPS.


Say Goodbye to Pixels
Inflexible pixels don’t always cut it. When a low-quality PNG is causing you problems, you can vectorize the image in Illustrator with a few clicks. Tweak the settings until you’re satisfied with the result, and you’ll have a vector graphic you can resize to your heart’s content.
Have you ever vectorized an image in Illustrator? Do you have any tips other users might find helpful in the process? Let us know in the comments section below.
Disclaimer: Some pages on this site may include an affiliate link. This does not effect our editorial in any way.