Microsoft Foundry (or Azure AI Foundry) allows you to build agents using models, tools, and other capabilities suited to specific workloads and then distribute them to all work users. The Copilot Studio Enterprise workflow handles the conversation and the channels, including Teams and Microsoft Copilot. As such, Azure AI Foundry integrations let your Copilot Studio agent hand off specialized requests to the Foundry agent directly inside the chat. Here’s how to connect Azure AI Foundry to Copilot Studio.
Part 1 – Make a New Foundry Agent
Step 1. Open the Microsoft Foundry portal and select the project that contains your agent. If you can’t access the project because of missing permissions, ask an administrator with the appropriate Azure permissions to assign you the Foundry User role on the project.
If you own the profile, you can go to “Account settings” and toggle the “Access management for Azure resources” setting.
Step 2. Click the button “Continue in code,” then copy the “project endpoint” from the project overview page. It should follow this pattern: https://<username>-resource.services.ai.azure.com/api/projects/<project-name>
You can also open the “Details” tab to get that information.

Step 3. Note the agent ID (Entra Agent identity).
Part 2 – Enable the Activity Protocol
A new Foundry agent usually has only the Responses and A2A endpoints. However, Copilot Studio needs the Activity protocol, and there is no switch for it in the portal. In some cases, the protocol is created by default, so you can try to skip it and return if it doesn’t work.
Step 1. Sign in with the Azure CLI and request an access token for https://ai.azure.com. Your account needs the “Foundry User” role on the project.
Step 2. Patch the agent’s protocols by adding “activity” to the protocol_configuration block under agent_endpoint. Microsoft has published a complete overview of how to do this, including the exact commands you need here.
The request will replace the existing protocol configuration, so you may want to preserve the previous wording for every protocol you need if you’ve previously made changes.
Step 3. The agent’s “Endpoints” section might still show “Responses” and “A2A” after the change, but this is normal.
Part 3 – Connect Azure AI Foundry to Copilot Studio
Step 1. Open your main agent in Copilot Studio. Go to the “Agents” page and select “Add an agent.”
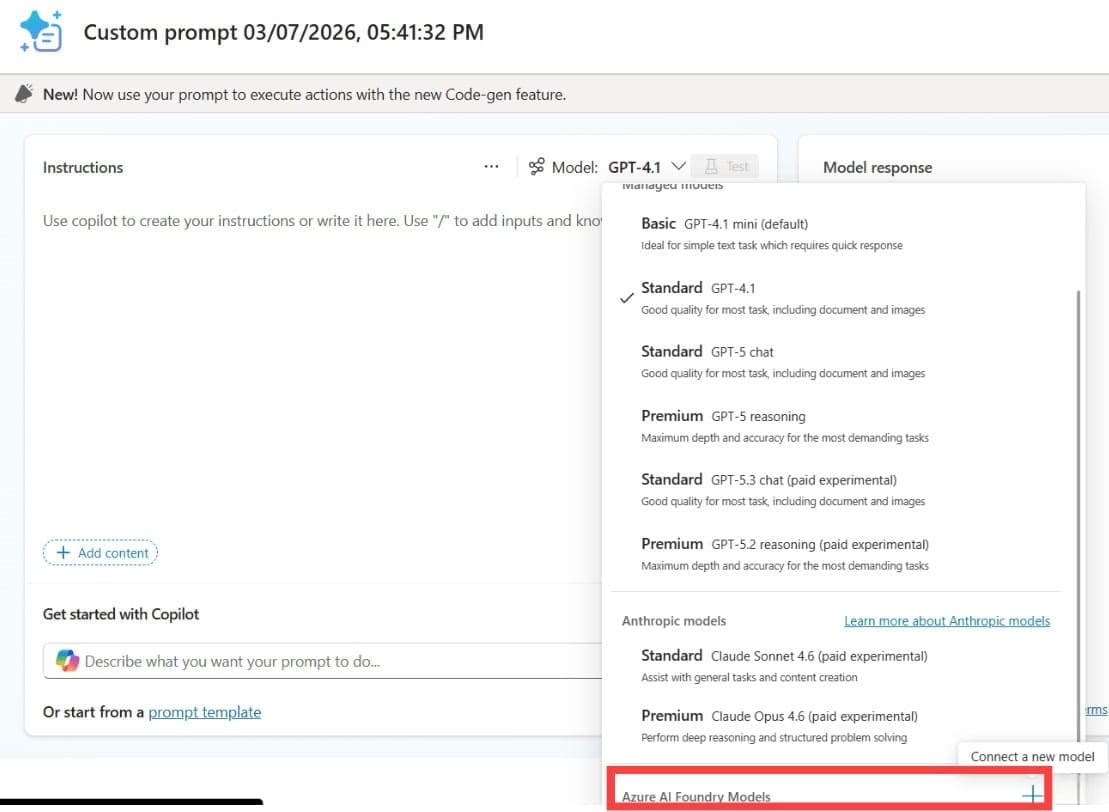
Step 2. Under “Connect to an external agent,” select “Microsoft Foundry.”
Step 3. Create a new connection by pasting the project endpoint that you copied in Part 1, then select “Next.”
Step 4. Enter a name and description for the agent. Be specific in the description, because your main agent reads it to decide when to call the Foundry agent during the chat.
Step 5. Go back to the Details page to copy and paste the Agent ID for the Microsoft Foundry agent, then select “Add Agent.”
Part 4 – Test and Publish to Microsoft Copilot
With all that done, you can start testing the new agent.
Step 1. Ask a question in the test pane that should trigger the Foundry agent. If you get an HTTP 400 error saying the endpoint “does not support activity,” go back to Part 2 and enable the Activity protocol.
Step 2. Select “Publish.” Then, open “Channels” and add the Microsoft Teams and Microsoft 365 Copilot channel. Once approved, the agent should appear in Microsoft Copilot with the Foundry agent working behind it.
Related Posts
 Azure AI Foundry vs. Copilot Studio: Which AI Agent Platform Do You Need?
 Is Browserbase AI Worth It? An Honest Look at Web Automation for AI Agents
 How Good Is BotDojo AI at Developing AI Agents?
 Can Bloome AI Allow AI Agents to Collaborate?
 5 Best Local, Open-Source Agents for
 Steps to Install Microsoft Copilot on WhatsApp
 Ways to Use Microsoft Copilot on Telegram
 Can Using Microsoft Copilot Cowork Boost Your Productivity?
 Copilot Unable to Read a PDF? Try These 4 Quick Fixes

Disclaimer: Some pages on this site may include an affiliate link. This does not effect our editorial in any way.